Invoicing refers to the process of creating an invoice, recording service information and handling the payment. It is the most active part of LubeSoft®, and is used for almost 90% of daily operations. Invoicing starts the moment the first vehicle enters the bay in the morning and continues until the last one leaves at night.
LubeSoft has two ways to process invoices, giving you a choice of the type of center you want to run.
After you have been using the system for a while, many of your customers will be repeat customers. When you enter the vehicle ID, if the system finds a matching vehicle ID, it assumes that the vehicle is a repeat customer and lists the information it has about the vehicle and the customer.
These instructions contain the basic steps you need to know to create an invoice. For more additional information, see the Other Invoice Processing Tips section at the end of this article.
| Note: | If you are just learning to use LubeSoft, it is a good idea to follow along using the Bay Invoicing Tutorial (1-1-7). The tutorial is the same as the bay invoicing option, except that it does not save any of the vehicle information you add or change. |
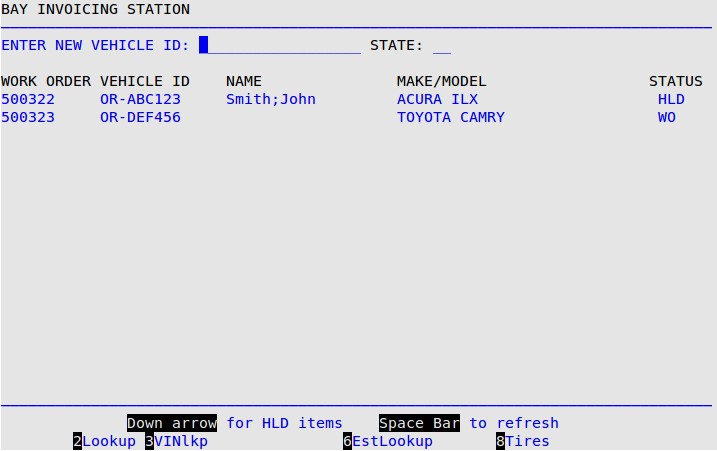
| Function Key | Description |
|---|---|
| 2Lookup | Allows you to search for a vehicle using the customer’s name. |
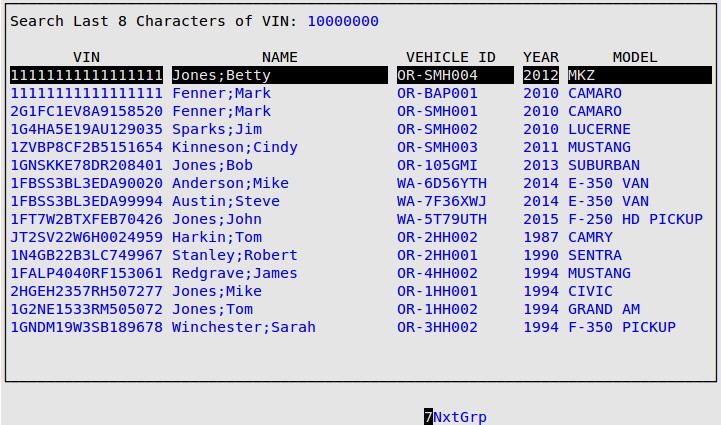
| 3VINlkp | Allows you to search for a vehicle using up to the last 8 characters of the VIN. |
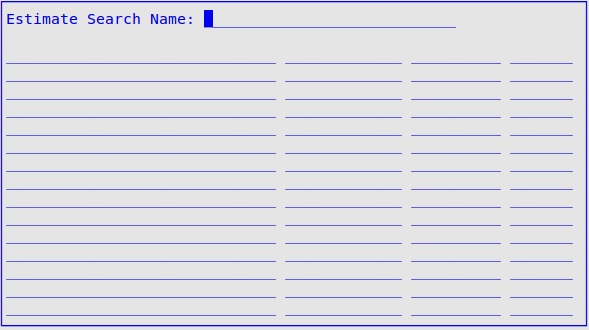
| 6EstLookup | Allows you to search for estimates previously created at the store. This option is only displayed if the Estimate feature is active. |
| 8Tires | Allows you to search through tire inventory. This option is only displayed if Tire Help has been enabled in the Center Control File (1-6-1-1). It opens the Tire Search PopUp. |
| Note: | If your store uses alternate IDs and the License Number has not been filled in, you receive a prompt. Fill in the License Number field (and State field if required) and press [Enter]. |
If you are unsure of the vehicle ID or if you use another customer identification method, there are several ways to quickly find a returning customer record:
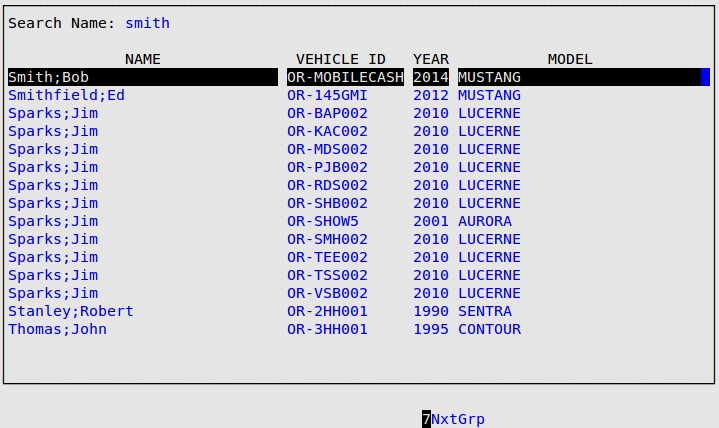
| Note: | You need to type the last eight characters of the VIN instead of the first eight characters because the last eight characters of each VIN are unique to each vehicle. |
| Note: | For step-by-step instructions on how to create an Estimate, see the Using Estimating article. |
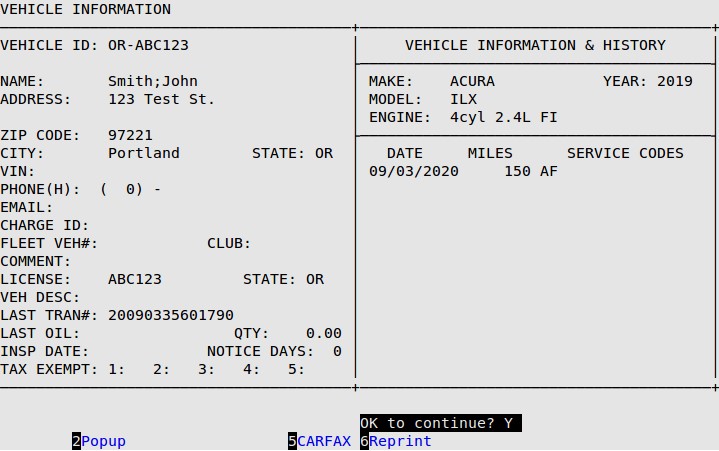
| Function Key | Description |
|---|---|
| 2Popup | Allows you to update the customer name or VIN. |
| 5Carfax | This key is only visible if the Carfax service history check is enabled. It displays the date, mileage, and services performed for the vehicle, as reported by Carfax. |
| 6Reprint | This displays a list of previous invoices for this vehicle. Plain paper invoices cashed out at this store may be viewed or reprinted. |
| Note: | If the Club Auto PopUp field is set to A or B on screen 1 of the Center Control File, the Club Auto PopUp will appear. |
| Note: | If the vehicle being invoiced is a manual vehicle, you may receive the following message:
It is possible that the system now has ESM information for the vehicle. Press [Y] to convert the vehicle into an ESM vehicle. This offers you the advantage of having ESM information, such as part, fluid, and service data made available to you. If you are sure this vehicle is not in the ESM press [N]. You’ll see the following message:
Enter N to receive the manual vehicle prompt the next time the vehicle is invoiced. Enter Y to stop receiving the manual vehicle prompt for this vehicle. |
| Note: | The browser-based ESM is only available at LubeSoft version 15.22 and above. On older versions, you will have the legacy ESM PopUp. |
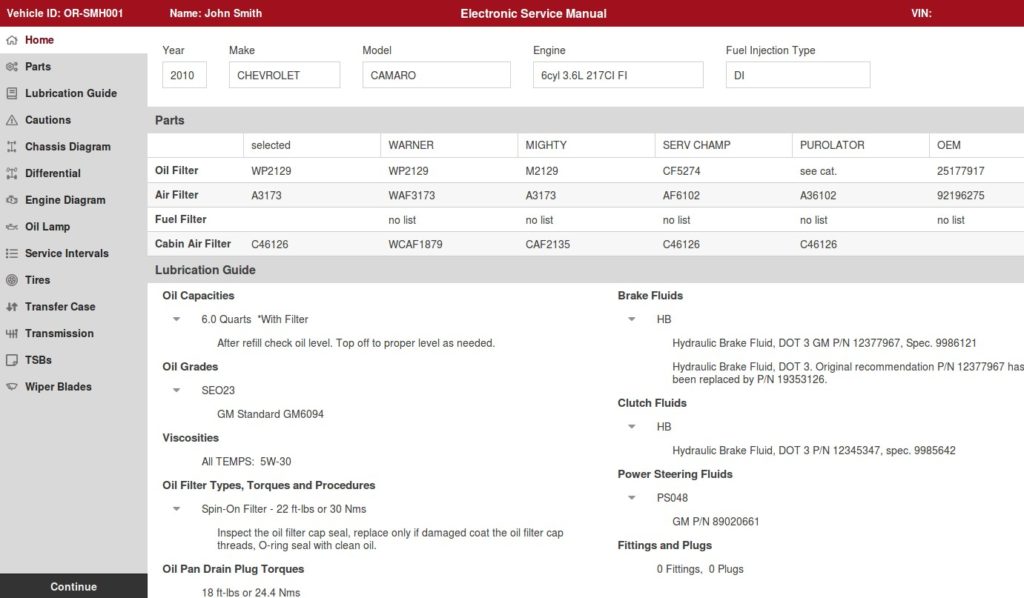
| Note: | The following popup will appear if the vehicle being serviced has a Club Program ID attached that doesn’t exist at your store. This popup will occur regardless of what option you chose (N, B, T, A) for the Club Auto Popup in the Center Control File. You will need to inform your customer that this visit won’t count towards their Loyalty Club Program.
|
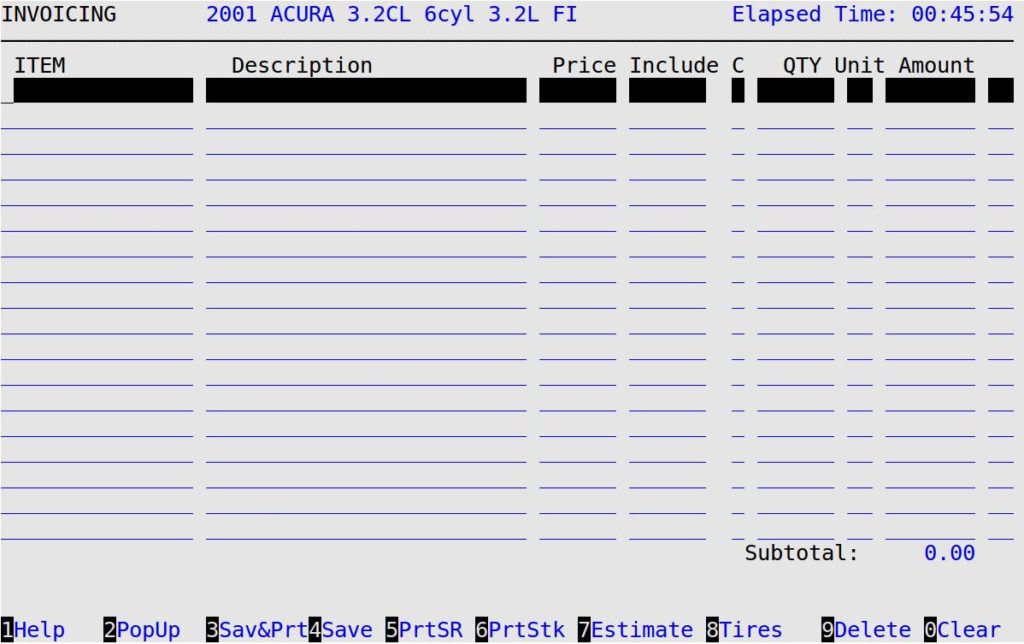
The Bay Invoicing function is the most used screen in LubeSoft. On this screen, you fill in the services that the customer has requested. The following list describes these function keys.
| Function Key | Description | ||
|---|---|---|---|
| 1Help | Brings up a list of all the valid inventory item numbers you can put in the Item column on the Enter Invoices – Invoicing screen. Select an item from the list and press [Enter] to fill it in automatically on the screen. This is useful when you know the category of the item you want to sell, but not the exact part number. Type the category to determine the starting point of the list and press [F1] to bring up the list of all the inventory items under the desired category. For a list of the typical categories, see the Categories article. Press [F7] and [F8] to scroll through the groups of items until you locate the item you want. Press the up or down arrows to select the item, then press [Enter] to fill in the item’s part number in the Item column. To get out of the Help popup without selecting an item, press [Esc] [Esc].
|
||
| 2PopUp | Brings up the PopUp Menu on the bottom of the screen containing several options for entering customer information. | ||
| 3PMRpt
3b Sav&Prt |
This function key only appears on the Enter Invoices – Invoicing screen if you use ISI’s Preventative Maintenance add-on product. This option allows you to print the Preventative Maintenance Report from this screen. | ||
| This key only appears if the Work Order Report function is enabled in the Center Control File. See the Work Order Form article for more information. | |||
| 4Save | Saves the information you have entered, puts the work order in Hold status, and returns you to the Bay Invoicing Station screen. | ||
| 5PrtSR | Prints a Service Review for the current vehicle ID. This report includes services performed on the vehicle and the mileage when each service was performed. You must enter the current mileage, through the Mileage PopUp, before you can print a Service Review. | ||
| 6PrtStk
6b DOT# |
This function key only appears on the Enter Invoices – Invoicing screen if you use ISI’s Thermal AutoSticker add-on product. This option allows you to print a Thermal AutoSticker from this screen.
This function key appears in the Tire Search PopUp only when you are in a work order and have DOT collection enabled in the Center Control File. |
||
| 7Estimate | This function key only appears on the Enter Invoices – Invoicing screen if you have turned on the Estimating functionality on the Set Up Estimating screen. See Using the Enter Estimate Information PopUp for more information. | ||
| 8Tires | Allows you to search through tire inventory. This option is only displayed if the tire feature is enabled in the Center Control File. It opens the Tire Search PopUp. | ||
| 9Delete | If you need to delete a group of items, move your cursor to one line in the group you want to delete, and press [F9]. You receive the Delete Group x? prompt (where x represents the group number shown to the right of each line). Type Y to delete the group or N to abort the deletion. | ||
| 0Clear | This key removes all items filled in on the Enter Invoices – Invoicing screen and allows you to start processing over again. You receive the Clear ALL Invoice items? prompt. Type Y to proceed or N to cancel. |
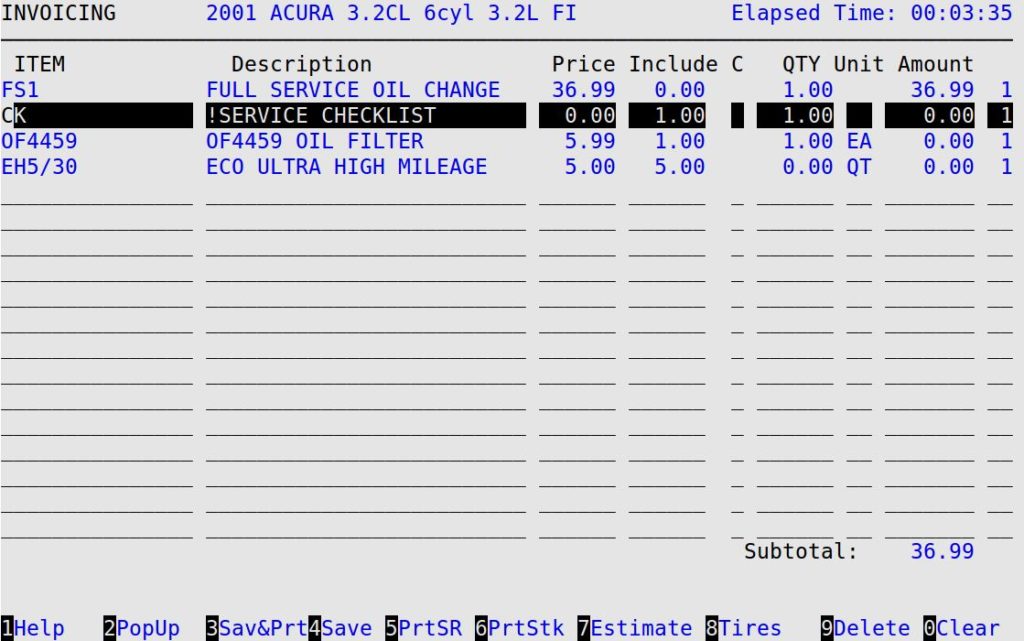
| Note: | If the quantity is 1, the system automatically accepts the 1 and moves to the next line. This feature is included to reduce the entry time, since most items, such as oil filters and air filters, are sold one per service. If you need to change the quantity, press the Up Arrow to move to the previous line, press [Enter] to return to the QTY column, and type the desired quantity.
If you enter a quantity of 0, the terminal beeps and gives you the message Quantity is zero. Press enter to accept. This is to keep you from entering a zero (0) by mistake. Type the proper quantity (0 or other quantity), and press [Enter]. |
The display only columns are explained in the following list:
Elapsed Time 00:00:00
The In Bay timer begins ticking when a work order is first created or pulled up from the Bay Invoicing screen. The timer doesn’t stop until the work order is cashed out. This feature is meant to track invoices started and cashed out on the same business day.
Description
This field contains the description of the item. This information is taken from the Set Up Inventory Items screen.
| Note: | If you set up an inventory item (1-7-1-2) with an exclamation point (!) as the first character and the amount field is zero (0), the item will not print on the invoice. For more information on setting these up, see the Setting Up Inventory Items article. |
Price
This field lists the retail price of the item for a sales unit. This information is taken from the Set Up Inventory Items screen.
Include
The system displays the quantity of the item that is included at no extra cost as part of the service. If this number is greater than or equal to the number in the QTY column, a zero (0) value is displayed in the Amount column. If this number is less than the one in the QTY column, the system calculates the amount using the formula (QTY – Include) * Price = Amount.
Unit
This field contains the unit of measure to which the QTY column refers. It is taken from the Sales Unit field on the Set Up Inventory Items screen for the specific item sold. For example, EA means each and QT means quart.
Amount
This field lists the total charge for the line. It is calculated by multiplying the price by the quantity, unless it is an included item, in which case the formula explained above under the Include column is used. If the Amount is zero, then either the quantity is 0.00, the retail price of the item is 0.00, or the item is included in the price of another item.
Group
On the far right of the screen, the system displays the group number of an item. For example, an FS1 job usually includes checkpoints, an oil filter, and oil. Each item in the job is assigned the same group number.
| Note: | You can press [F1] while in the Employee Tracking by Inventory Item PopUp to bring up a list of IDs of all active employees. Select one of these employees to enter the employee ID and name in the Employee Tracking by Inventory Item PopUp.
The order and titles of the employee tracking positions are set up on screen 4 of the Center Control File. |
Codes:
N – This code indicates that the item will not be taxed for this sale only. If the item is set up as nontaxable in Set Up Inventory Items, an N automatically appears in this column.
W – This code indicates that you are not going to charge a customer for this item because it is under warranty. The customer is not charged for the item and it is deducted from inventory just like a regular sale.
| Note: | If you have DOT collection enabled in the Center Control File, you will receive the DOT Collection PopUp. |
The following list contains more information to help you use the invoicing functions.
| Note: | Plain paper invoice lengths are dynamic, depending on the information included on the invoice and the selected format. |
| Note: | When an invoice is sent to the Cashier Screen with a quantity of zero, you receive the following error message: Quantity cannot be zero. To send the invoice to the cashier, enter the correct non-zero quantity for the item on the Invoicing screen. The Center Control File can be set up to allow other items to be sold with quantity zero. |
For additional instruction on invoicing vehicles, see the following articles: