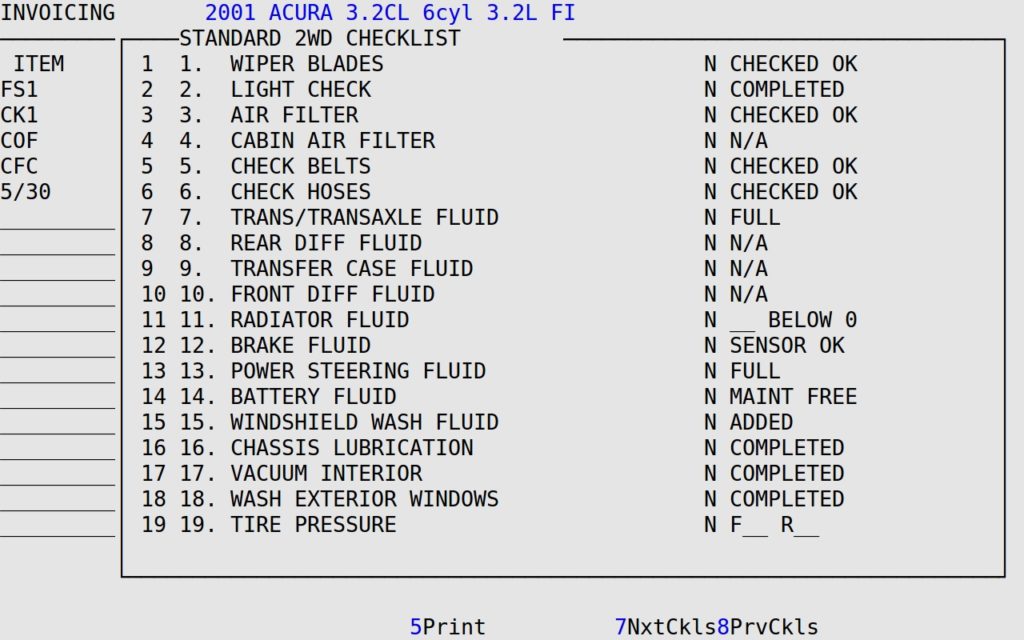
The Checkpoints PopUp allows you to fill out the checklist if any of the services on this work order require one.
Use the following steps to access the Checkpoints PopUp:
- On the Enter Invoices-Invoicing screen, press [F2] to display the PopUp Menu at the bottom of the screen (see below).

- Press C to receive a popup similar to the following:

The list of checkpoints appears on the left of the popup with the default responses listed to the right with an N or Y in the center column. You can specify on screen 1 of the Center Control File if you want this PopUp to be required. See the article Setting Up the Center Control File for more information. The following list contains the options you have in the Checkpoints PopUp.
- To change the response to Y and move to the next checkpoint, press [Enter].
- To leave the N in the field and move to the next checkpoint, press [↓].
- To change the response for a given checkpoint, press the space bar to scroll through the list of available responses. When you see the desired response, press [Enter] to accept it and move to the next checkpoint. When you cycle through the responses (up to eight), the system loops through them.
- If you change a response and the item has not been entered on the work order, the system alerts you. For example, if you changed CHECKED on the Air Filter checkpoint to REPLACED and have not entered an air filter on the invoice, the system shows a message at the bottom of the screen: Checkpoint: Air Filter shows REPLACED. Your cursor moves to the last open line so you can add an air filter. This prevents you from selling an item without charging the customer for it. Correct setups must be completed in the Setting Up Checkpoints and Set Up Inventory Items menus for this to work as described.
- Some checkpoints ask for user input. For example, the chassis checkpoint requires you to indicate the number of zerk fittings lubed. The tire pressure checkpoint requires you to specify the tire pressure in the front and rear tires. Type the numbers in these fields instead of scrolling through the responses. Correct setups must be completed in the Setting Up Checkpoints article for this to work as described.
- Press [F5] to print the Checklist Report if the feature is enabled in the Center Control File and there are checkpoints set to print in Set Up Checkpoints that are on the current work order. See the Setting Up the Center Control article.
- The [F7] and [F8] keys navigate forward and backwards through checkpoint sets.
- Complete the checklist, and press [Enter] at the last checkpoint to return to the Enter Invoices – Invoicing screen. The checkpoints are available on the tendering screen for review with the customer, but can only be changed from Bay Invoicing.
![]()
