The Cashier Screen is similar for both types of centers: Bay/Waiting Room and Drive-Thru. The main difference is how the centers access the Cashier Screen.
At Drive-Thru centers, the technician processes the invoice and collects the money at each bay. When an invoice is ready to be cashed out, you automatically receive the Cashier Screen.
Use the following steps to process invoices for a Drive-Thru store:
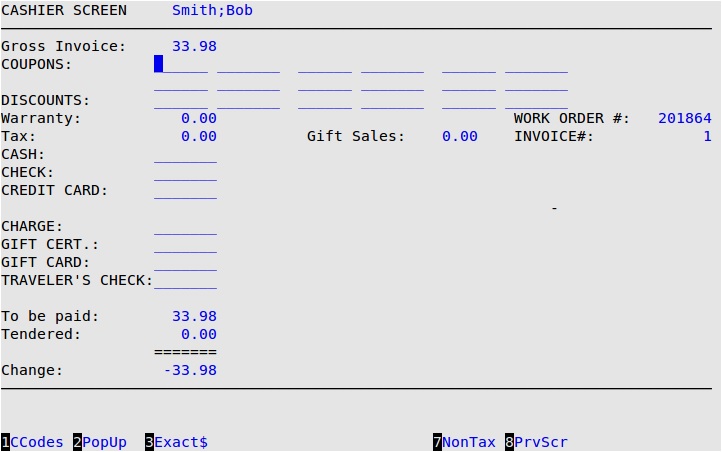
Before you use the Cashier Station, you need to know the different function keys on the screen. The following list contains the function keys on the Cashier Station.
| Function Key | Description |
|---|---|
| 1TaxLst | When the cursor is not on the coupon, discount, or gift redemption lines, this key allows you to bring up a list of the different taxes and their corresponding dollar value that are assessed on the invoice. Press [F1] once for the tax list popup. Press [F1] a second time for the tax exempt list popup. If the customer is a tax-exempt customer, this key shows the customer’s tax-exempt number. If the customer is a fleet tax-exempt customer, this key shows the fleet’s tax exempt number. If a customer has a tax-exempt number and is attached to a fleet that has a tax-exempt number, only the fleet tax-exempt number appears. (Display only.) |
| 1CCodes, 1DCodes, 1GCList | When the cursor is on the coupon, discount, or gift redemption lines, this key allows you to bring up a list of the different coupons, discounts, and gift certificates/cards available. If the customer is part of a points-based club, you can switch to the point reward list by pressing [F1] from the coupon list. |
| 2PopUp | This brings up the PopUp Menu used throughout invoicing. This is not available for quick sales. |
| 3Exact$ | This key automatically enters the balance of the total invoice in the field. It only appears when you are in the Check, Credit Card, and Charge fields because these are usually made out for the exact total. This option is only available if Dollar Key Allowed is set to Y in the Center Control File. |
| 7NonTax | Selecting this key allows you to exempt this customer from taxes after filling in your employee password and the customer’s tax exempt number. The cashier can manually enter a one-time tax exempt number for a fleet driver if Allow cashier to manually exempt tax is set to Y in Set Up Charge Customers. The tax exempt number prints on the last line of the tendering box on the invoice and is also stored in Maintain Vehicle History. You cannot use the nontax function key during a quick sale. |
| 8PrvScr | This selection allows you to return to the previous screen; the Enter Invoices – Invoicing screen. |
Work Order #
The system displays the number that is assigned to the work order. (Display only)
Invoice #
The system displays the up to 8-digit number that is assigned when the work order is cashed out.
If your invoices have preprinted numbers, make sure this invoice number matches the one on the preprinted invoice. If the invoice number in this field is different than the preprinted number on the invoice, press Up Arrow from the first Coupons field to move the cursor to the Invoice # field. Change the number to conform to the preprinted invoice number. You probably need to do this whenever you reload invoice forms in the printer.
| Note: | The invoice number may not be editable by some users if the Security Level to Change Invoice Number setting is higher than 0 in the Center Control File. |
Gross Invoice
The system automatically fills in the total amount of the invoice, taken directly from the Enter Invoices – Invoicing screen. (Display only)
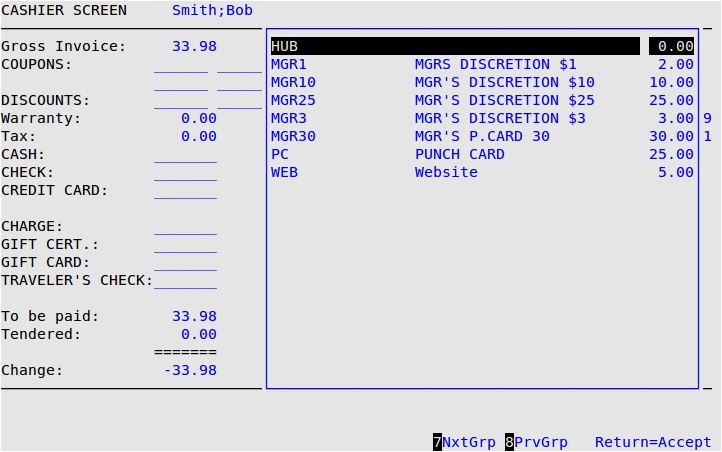
Coupon
If the customer is using a coupon, type the coupon code or press [F1] to access the coupon help list (see below). Highlight a coupon code on the list using the Up and Down Arrows and press [Enter] to select it. Press [F7] and [F8] on the cashier console to move to the next group of coupons. Preprinted invoice forms can fit up to six coupon codes, which are printed on the invoice in the tendering box. Plain paper invoices can have up to twelve coupon codes.
| Note: | You can type any valid coupon amount to generate a list of coupons for that amount. If you type $3, for example, and press [F1], you receive a list of all three dollar coupons. You can also type the first few characters of the coupon code and press [F1] to start the coupon help at that point. |
Discount
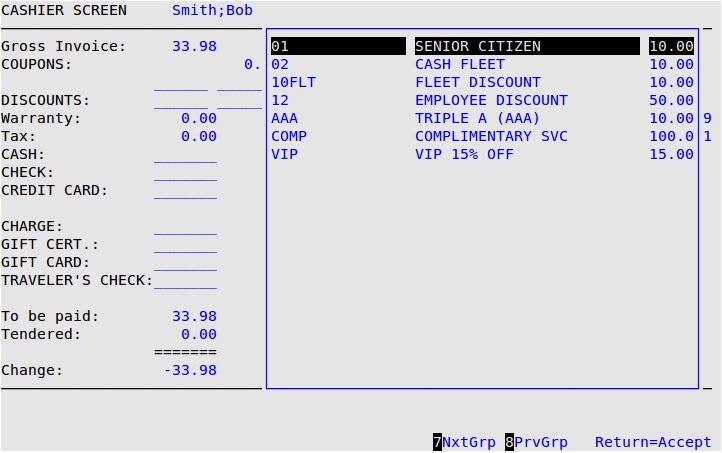
If the customer is using a discount, type the discount code, or press [F1] to access the discount help list (see below). Highlight a discount code using the Up and Down Arrows and press [Enter] to select it. Press [F7] and [F8] on the cashier console to move to the next group of discounts. Preprinted invoice forms can fit up to three discount codes, which are printed on the invoice in the tendering box. Plain paper invoices can have up to twelve discount codes.
| Note: | You can type any valid discount amount to generate a list of discounts for that amount. For example, if you type 10 and press [F1], you receive a list of all ten percent discounts. You can also type the first few characters of the discount code and press [F1] to start the discount help at that point. |
Warranty
The system displays the total dollar amount in this field of all items that have been warrantied on the Enter Invoices – Invoicing screen. (Display only)
Tax
The system shows the total of all taxes assessed on this invoice. To view the breakdown of the taxes, press [F1] if 1TaxLst is displayed on your screen. If the customer is tax exempt, the tax popup shows the tax exempt number. When the tax popup is on the screen, press any key to return to the Cashier Screen.
If the customer is tax exempt for one or more tax, press [F7] and enter the tax exemption number for the appropriate tax. To make the entire invoice exempt, you will need to enter the tax exempt number for each tax. You are prompted to enter your employee password and up to a 15-digit tax exempt number. The cashier can manually enter a one-time tax exempt number for a fleet driver if Allow cashier to manually exempt tax is set to Y in Set Up Charge Customers. The tax exempt number prints on the last line of the tendering box on the invoice and is also stored in Maintain Vehicle History. The tax exempt number will not be permanently attached to the vehicle or fleet.
Gift Sales
The system shows the total dollar amount of gift certificate or gift card sales that occurred on the Enter Invoices – Invoicing screen. (Display only)
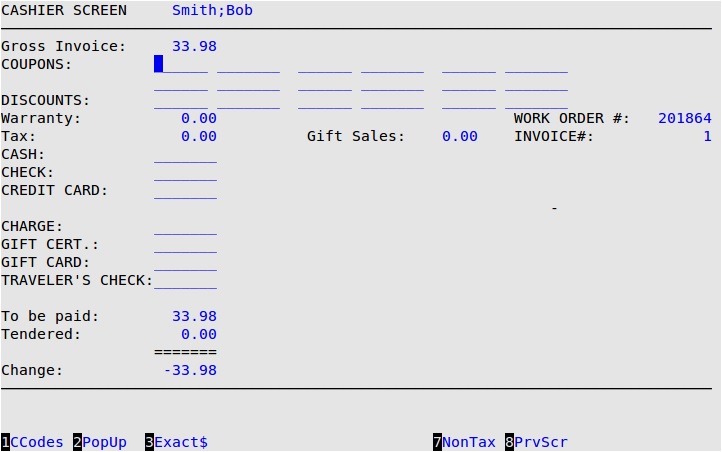
| Note: | For the Cash, Check, Gift Redemption, and Traveler’s Check fields, if the tendered amount is more than $20.00 over the amount to be paid, you receive a message such as Tender exceeds total by $20.01. OK? This is an audit to ensure you do not accidentally accept a number larger than you had intended. If the Dollar Key Allowed field is set to Y in the Center Control File (1-6-1-1), you can press [F3] to enter the remaining amount to be paid in the Check, Credit Card, Charge, Gift Cert or Gift Card fields (depending on the card processor you use). |
Cash
Fill in the total amount the customer is paying in cash. If the customer is not paying with cash, leave the field blank and press [Enter].
Check
Specify the total amount the customer is paying with a check. The system automatically prompts you for the check number, which can be up to 11 characters, and driver’s license number, which can be up to 20 characters. If the customer is not paying with a check, leave the field blank and press [Enter].
Credit Card
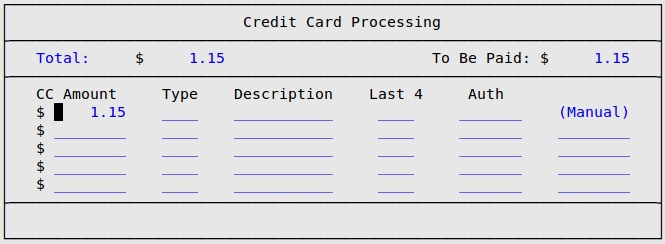
The Credit Card Processing PopUp appears when you arrive at the Credit Card field (see below). If the customer is not paying with a credit card, leave the field blank and press [Enter].
Fill in the amount for the first credit card the customer is using. If the Dollar Key Allowed feature is enabled, you may press [F3] to enter the remaining amount to be paid. For the Type, enter the 1- to 3-character code to specify the type of card, or press [F1] to select from a list of card types. The Description is automatically filled in. Enter the last four digits of the credit card and the authorization code in their respective fields. Repeat the steps to fill in additional card payments, if needed, or press [Enter] on a blank line to proceed to the next field.
For integrated credit card readers that are connected to your computer, after you specify the amount the customer is charging, you will receive the prompt Swipe the Card Now…. Do not type any information. Simply run the credit card through the card slot. The corresponding fields are filled in automatically.
| Note: | If you cannot get the card to swipe, wait for the time-out and then fill in the information manually. |
Charge
To charge a customer, type the amount here. You receive a screen similar to the following.
| Note: | If the cursor skips past the Charge field, this customer has not been identified as a billed charge customer. To attach the vehicle to a billed fleet, press [F2] and [F] to select a fleet from the Fleet PopUp. |
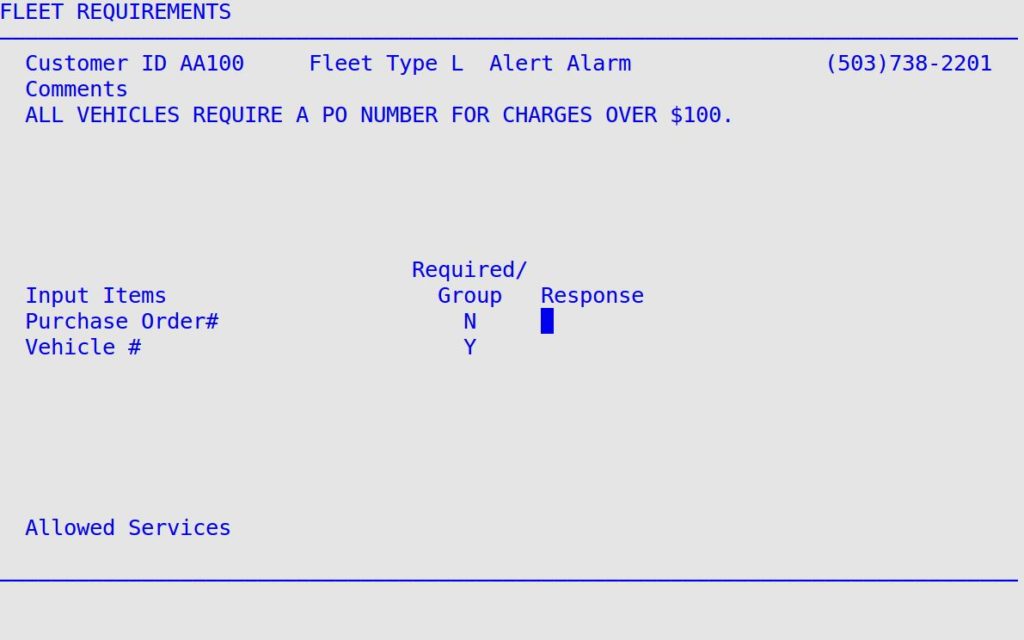
Make sure you read the comments on this screen. If any response is required on the screen, you must enter the information before you are able to cash out the invoice. After all information is filled in, press [Enter] in the last field to return to the Cashier Screen. The charge customer information is now displayed.
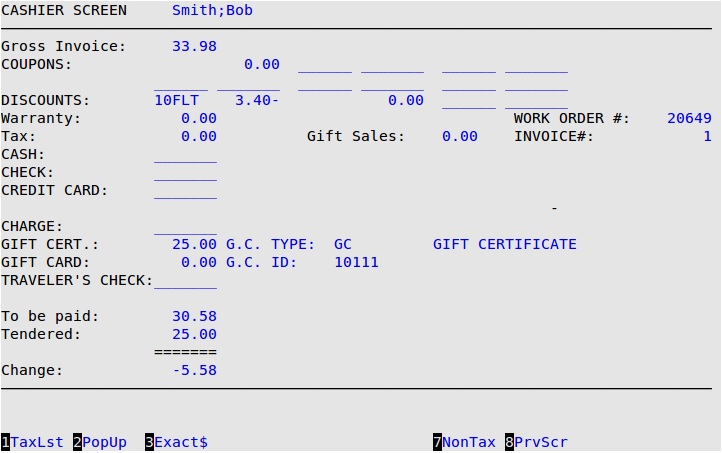
Gift Cert.
Fill in the amount of the gift certificate being redeemed. Enter the the gift certificate code in the G.C. Type field, or press [F1] and select from the list of gift certificate types. Enter an identification number in the G.C. ID field, if needed.
If the customer is not redeeming a gift certificate, leave the field blank and press [Enter].
Gift Card
If you are not using an integrated credit card processor, you will also see a Gift Card field. When the cursor gets to this field, you will see the following screen.
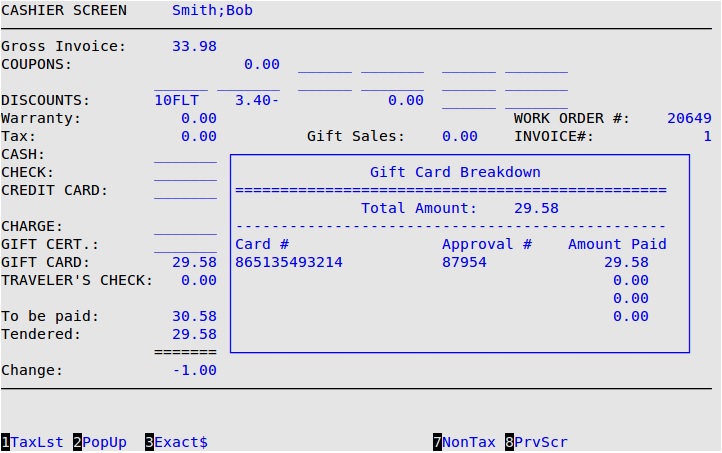
Enter information for up to five gift cards or leave the fields blank if the customer is not using a gift card.
Traveler’s Check
If the customer is using traveler’s checks, enter the total amount of the traveler’s checks in this field.
To Be Paid
The system displays the total amount due for the invoice. (Display only)
| Note: | The difference between the To Be Paid and Tendered fields cannot be more than $99.99. If the difference between these two fields is greater than $99.99, you receive the message, Tender exceeds total by more than $99.99 and you are not able to cash the customer out. |
Tendered
The system displays the total amount given to you by the customer. In the case of cash, it is often more than the total invoice. In the case of checks and charges, it is usually the same. If only one method of payment is used, as is usually the case, this field corresponds exactly to the amount entered for that method of payment. If you are given split tender (more than one method of payment is used), this field is the sum of all methods of payment minus warranties, coupons and discounts plus taxes. (Display only)
Change
This is the amount of change that is due to the customer. It is automatically calculated by the system. (Display only)
| Note: | If your system is set up to collect customer marketing information in the cashier screen, the marketing popup will appear after you enter the amount paid. It will contain up to six fields that must be filled in before the invoice can be cashed out. These settings can be modified in the Set Marketing Controls screen.
|
| Note: | If your system date and invoice date don’t match, you will be prompted with the following warning popup. Either press [Enter] to return to the invoice or type OK and press [Enter] to continue cashing out the customer. We recommend you press [Enter] to return to the invoice and correct whichever date is wrong.
|
| Note: | If the signature capture feature is enabled and a signature has not been collected for the work order, you will be prompted with the following warning popup. Either press [Enter] to return to the invoice or type OK and press [Enter] to continue cashing out the customer without a signature.
|
| Note: | This prompt will only display if the P, E, or B flag has not already been entered using the F2 PopUp on the Enter Invoices – Invoicing screen. |
| Note: | The number of copies of the plain paper invoice is set in the Center Control File. If Print or Both is selected, the set number of copies is printed. If Email is selected, one less copy of the invoice is printed.
For example, assume the system is set to print 3 copies of the plain paper invoice; one copy for the store, one for the office, and one for the customer. If Print is selected, three copies of the invoice are printed. If Email is selected, the customer’s copy is emailed to their address and the other two copies are printed. If Both is selected, three copies of the invoice are printed and a copy is email to the customer. |

Type Y to send the additional attachments with the email invoice or N to not send. You return to the Bay Invoicing or Greeter Station.
| Note: | Any files in the following directory will send with every emailed invoice: /opt/isi/reporting/email/attachments/always.
Any files in the following directory will only send if you answer Y in the above screen: /opt/isi/reporting/email/attachments/prompted. |