There are three main ways in which you will use Estimating once it is set up. You will create an initial Estimate that will be printed before work is performed, ring out a final invoice that contains Estimate information, or create an invoice from a saved Estimate.
Use the following sections to walk through the process of creating an initial Estimate and ringing out an Invoice with Estimate information.
Creating an Initial Estimate
This section walks you through the process of creating an initial Estimate that will be printed out for a customer to review and sign. The following is an example to help you create an initial Estimate from the Bay Invoicing Station:
Use the following steps to begin creating an Estimate for a new customer:
- On the Main Menu, select Lubrication Menu.
- Select Invoicing Menu (1).
- Select Bay Invoicing Station (1) to receive a screen similar to the following.
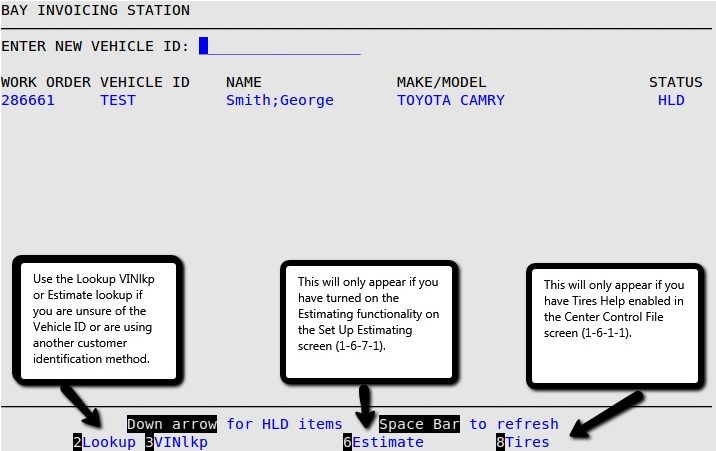
- To enter a new vehicle ID, type the vehicle ID in the Enter New Vehicle ID field, and press [Enter].
- You receive a **NEW VEHICLE ID** message on your screen.
- If the information is correct and you want to continue, press [Enter].
- You receive the following screen. For this example, the vehicle is a 2001 Acura 3.2CL.
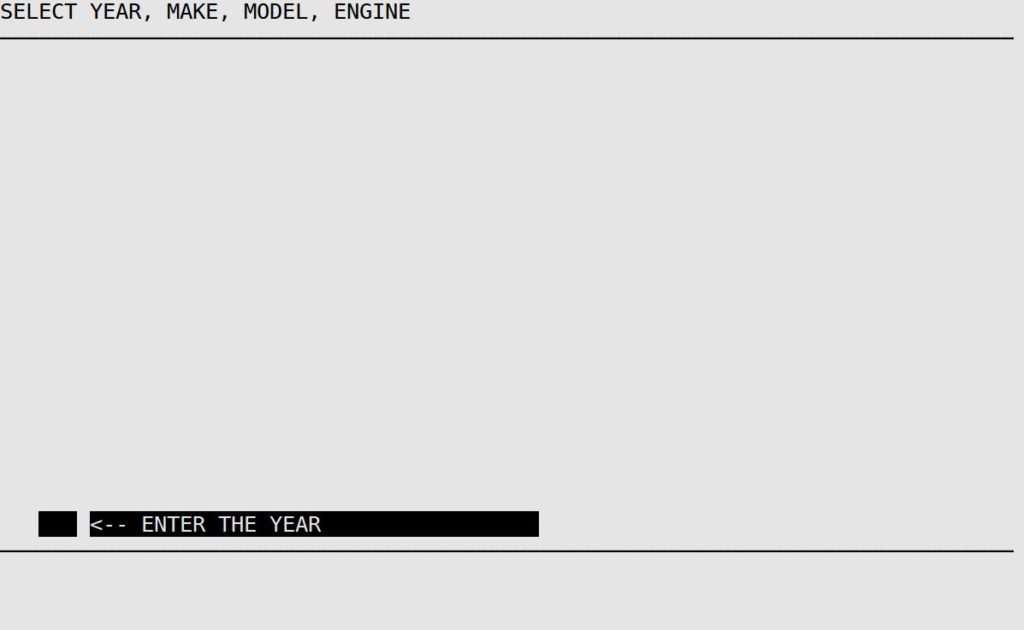
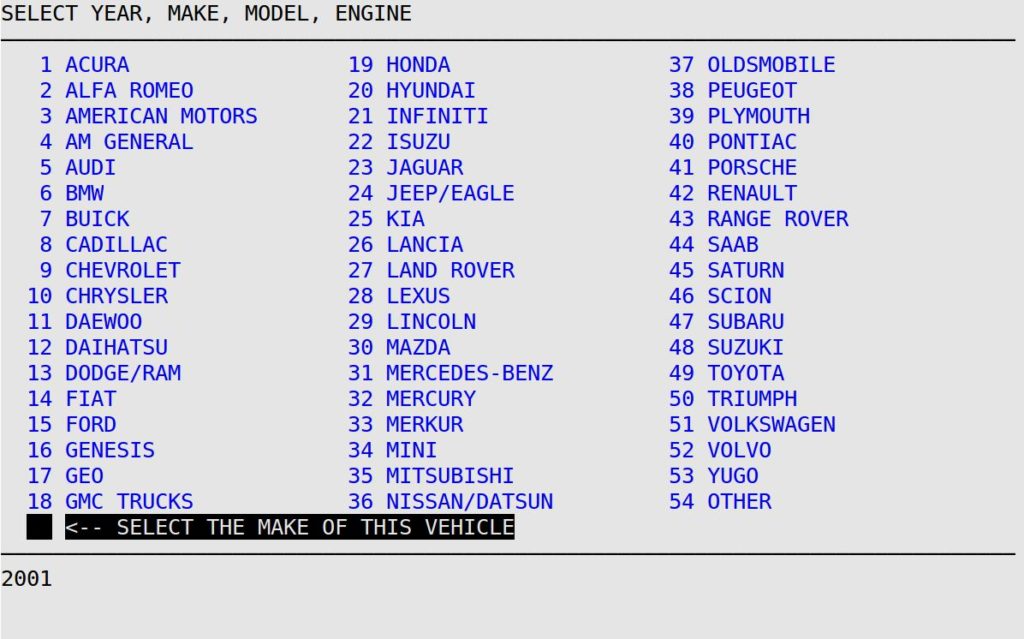
- Type 2001 for the year of the vehicle. Press [Enter] to receive a screen similar to the following.
| Note: |
When entering the make, model, and engine, you can press the up arrow key any time to return to the previous screen. |
- Type 1 for the make of the vehicle. Press [Enter] to receive the following screen.
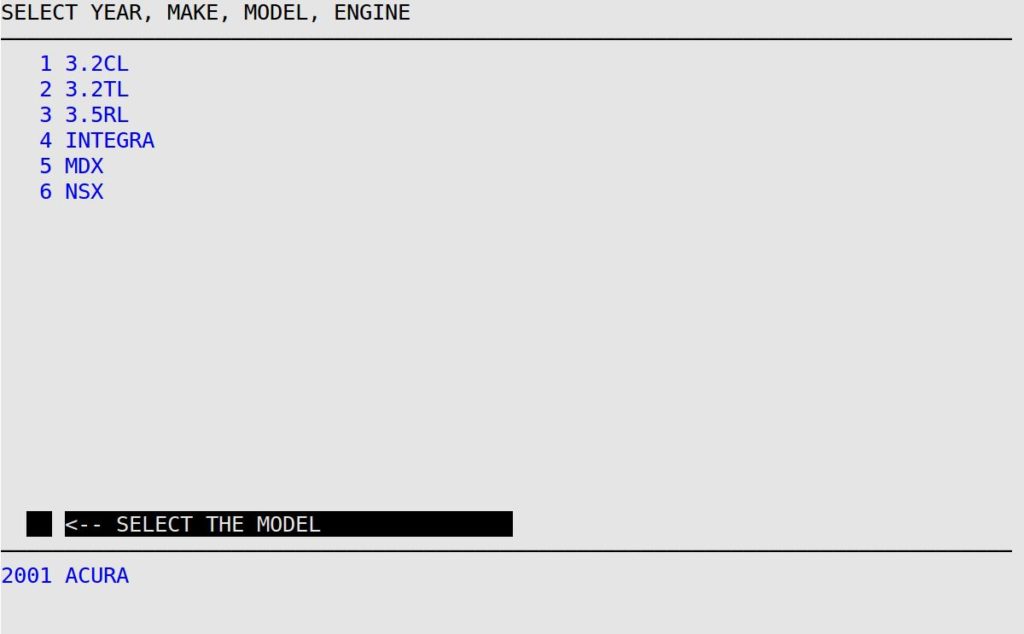
- Type 1 for the model of the vehicle. Press [Enter] to receive a screen similar to the following.
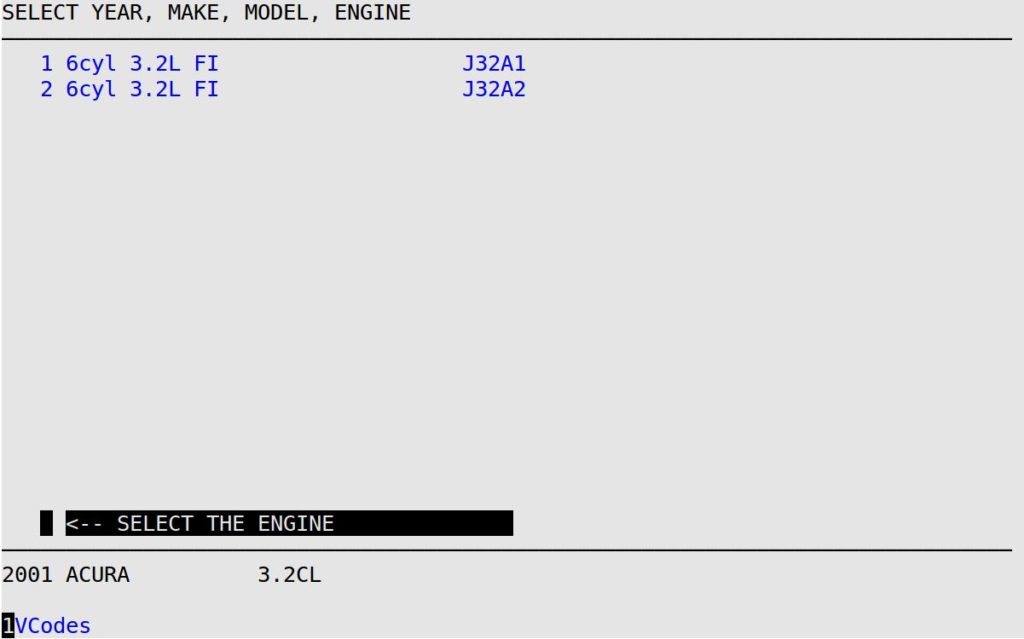
- Type 2 for the engine of the vehicle. Press [Enter] to receive the Electronic Service Manual (ESM) screen. If there are any caution notices or technical service bulletins (TSBs) for the vehicle, they are displayed here. Read the cautions and TSBs, if needed, then press [Enter] or click the Close button to continue to the main ESM screen. TSBs and Cautions can be viewed again by selecting those options from the navigation menu on the left side of the screen.
| Note: |
This popup is only available at LubeSoft version 15.22 and above. On older versions, you will have the legacy ESM PopUp. |
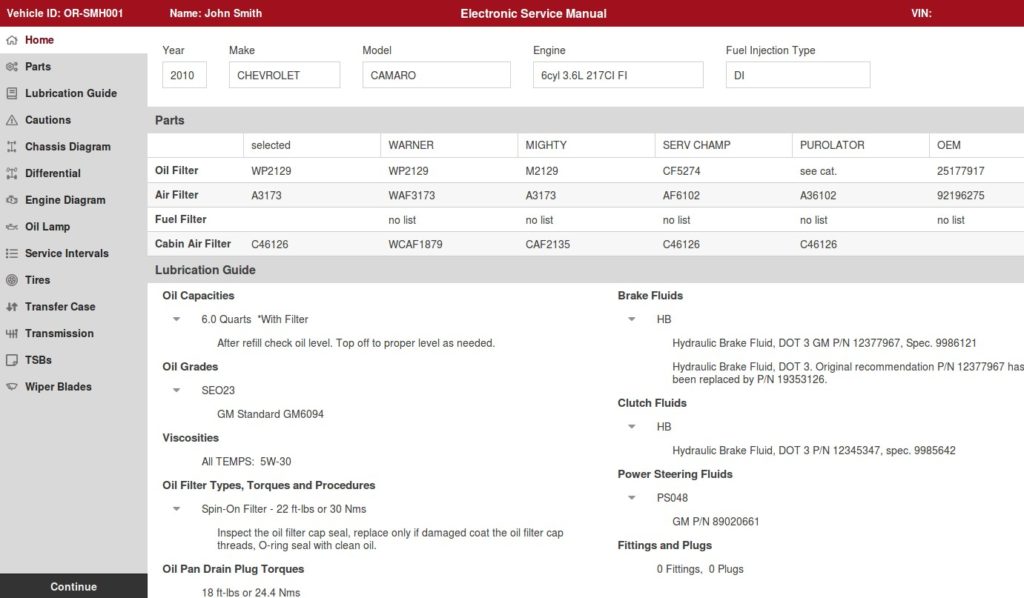
- This screen is divided into three main areas with vital information about the vehicle. Use the arrow keys, [Enter], and [Tab] or the mouse to select different options from the navigation menu on the left side of the window. If specific information is not available for the vehicle, the system will display a message when that menu option is selected. For example, No transfer case specifications available. when the Transfer Case option is selected.
- Vehicle information. This information remains visible in all the other menu options in ESM. If the vehicle information is incorrect, return to the LubeSoft® window, then press [F2] to bring up the popup list, and press G for change vehicle. Follow the on-screen prompts.
- Filter and part numbers, including OEM (original equipment manufacturer) numbers. To determine which part number to display in the selected column, the system checks the part listed for each vendor (in order from left to right). The first part number in stock is displayed. The same information, along with part numbers for breather filters and PCV valves, is available in the Parts screen.
- Chek-Chart lubrication guide. This includes fluid notes for oil, brakes, clutch, and power steering. This information is also listed in the Lubrication Guide screen.
- When you are done reviewing the ESM and Chek-Chart information, select the Continue button. This closes the browser window so you can continue invoicing in LubeSoft.
| Note: |
Wildcards can also be used for creating a quick Estimate. Instead of having to find each individual inventory item for an Estimate, you can use wildcards to give a general total for items, print the Wildcard Report and have the customer sign it. For more information about wildcards, see the Wildcard Sales Report article. |
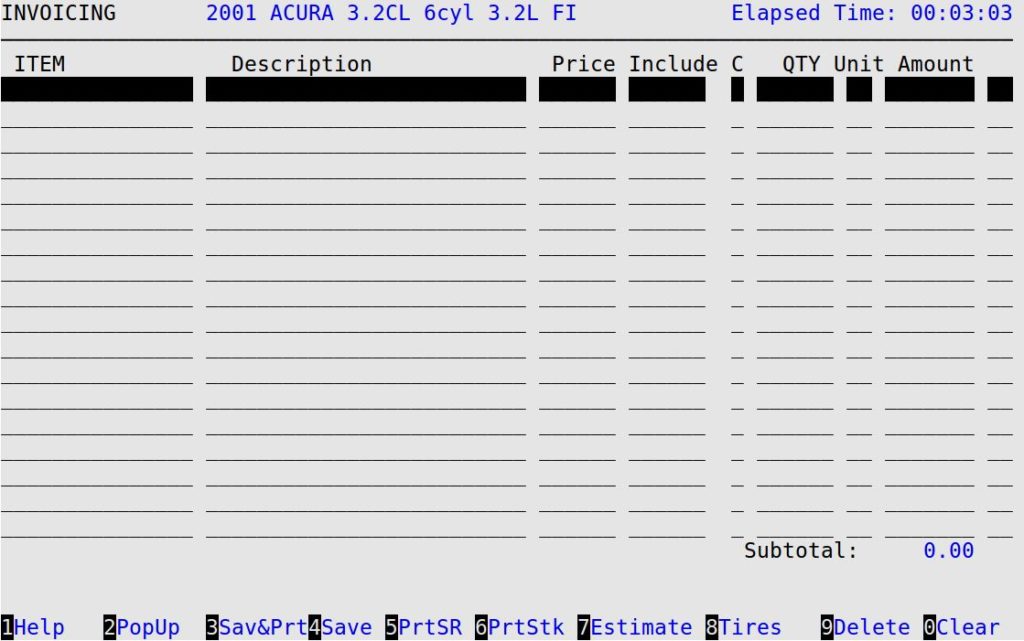
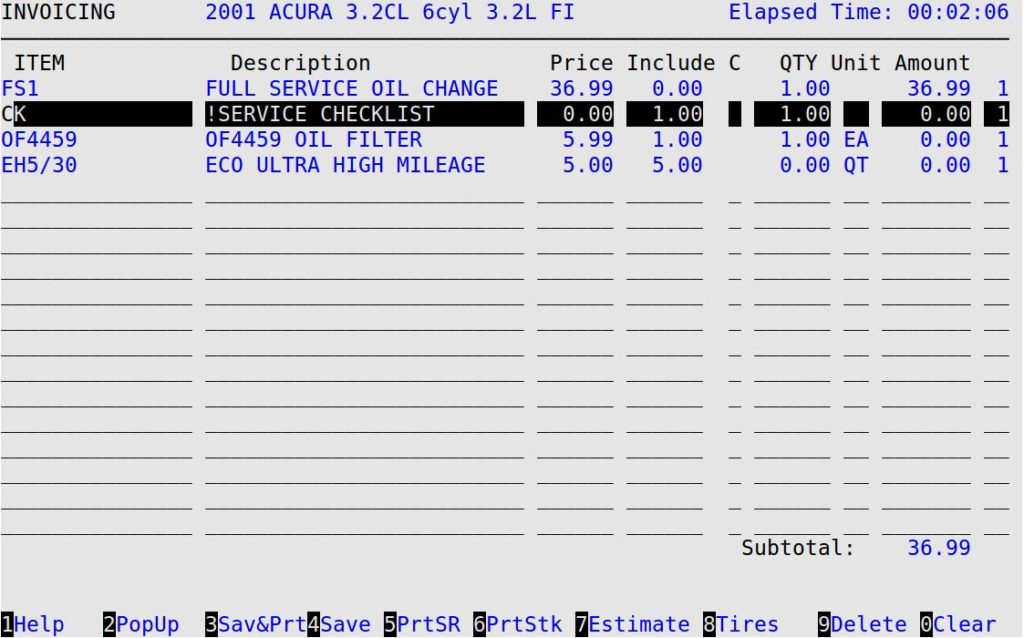
- To add a Full Service Oil Change, type FS1 (or the appropriate full service code for your shop) in the Item column.
- The system fills in the corresponding service information, including any job items or add-ons, along with corresponding information about the included items.
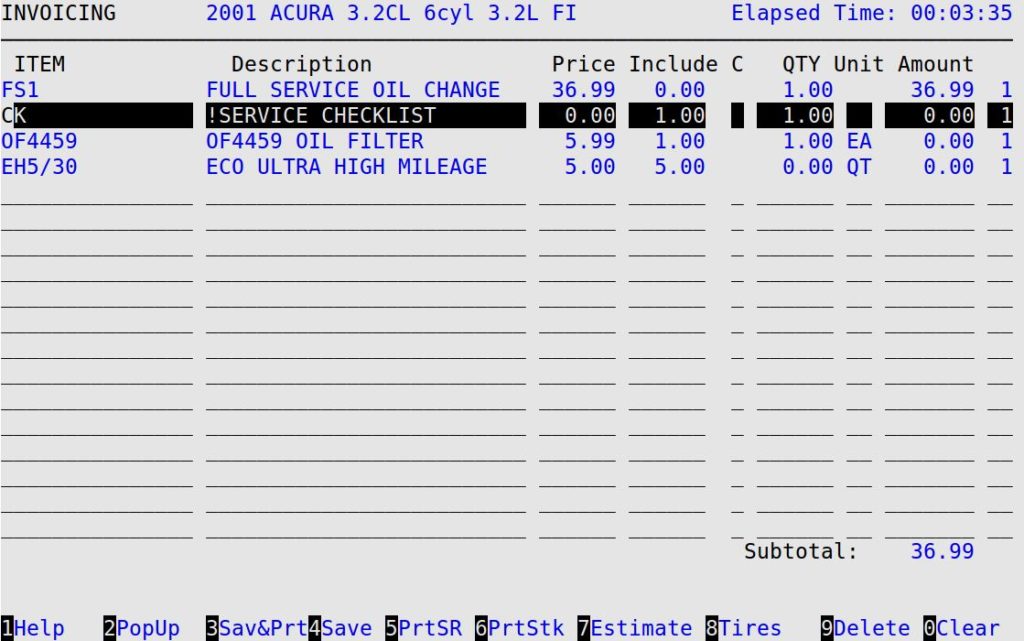
- Fill in the Price, Include, Qty, Unit, Amount, and Group fields where appropriate.
- Once you have added all of the services that you want to include on the Estimate, press [F7] to bring up the Enter Estimate Information PopUp.
- You receive the Name PopUp. Type in the customer’s name, and fill in the address and phone information.
- You receive the Mileage PopUp. Type in an appropriate mileage and press [Enter] to receive the Enter Estimate Information PopUp.
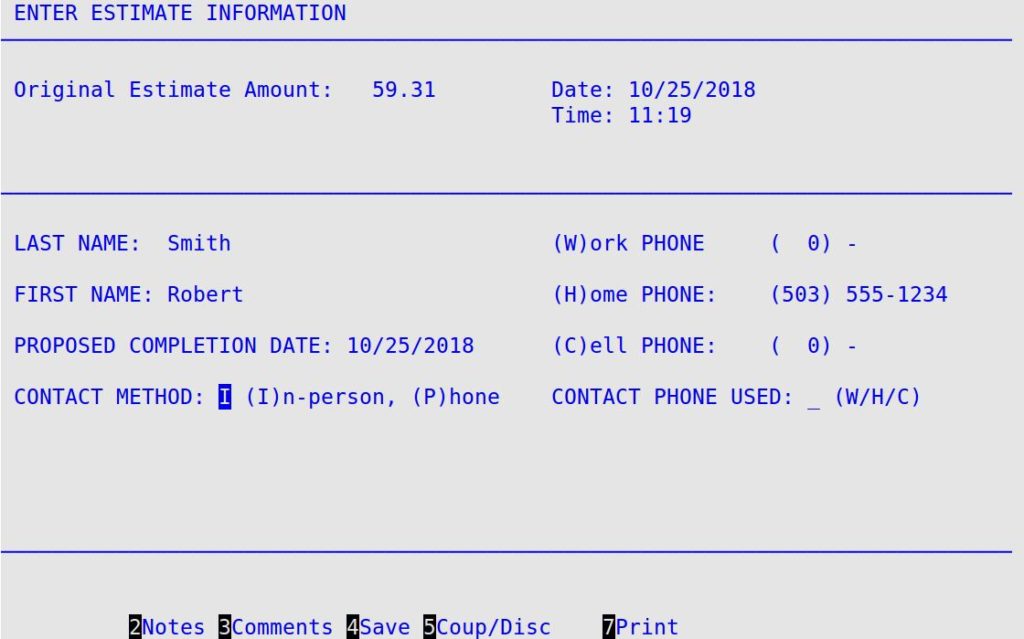
- Fill in the following fields:
Last Name, First Name
Press [Enter] to accept the last name and first name of the customer who brought in the vehicle and will authorize work to be done. (Required)
Proposed Completion Date
Press [Enter] to accept the current invoice date (MM/DD/YYYY) that you expect work to be completed on the vehicle.
(W)ork Phone
Press [Enter] to accept the work area code and phone number or type a phone number.
(H)ome Phone
Press [Enter] to accept the home area code and phone number or type a phone number.
(C)ell Phone
Press [Enter] to accept the cellular area code and phone number or type a phone number.
Contact Method (I)n-person, (P)hone
Type I to indicate the Estimate was approved by the customer in person. (Required)
Contact Phone Used
Because the Estimate was approved in person, leave this field blank.
- Press [F2] to receive the Estimate Notes PopUp.
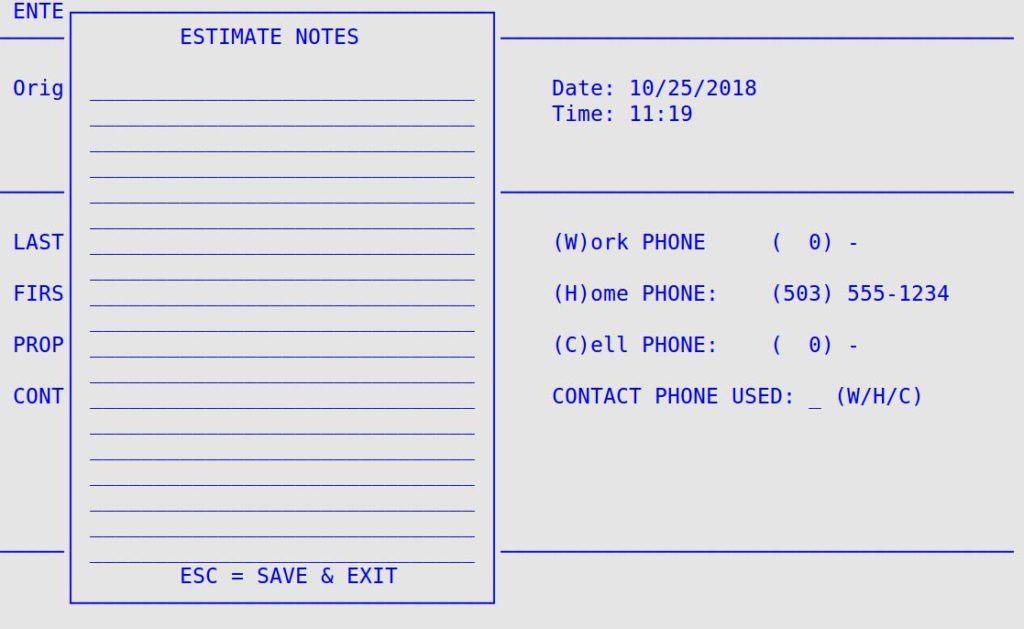
Type in any Estimate notes (up to 20 lines, 30 characters per line) and press [Esc] to return to Enter Estimate Information PopUp.
| Note: |
These comments will appear on the customer’s printed Estimate. |
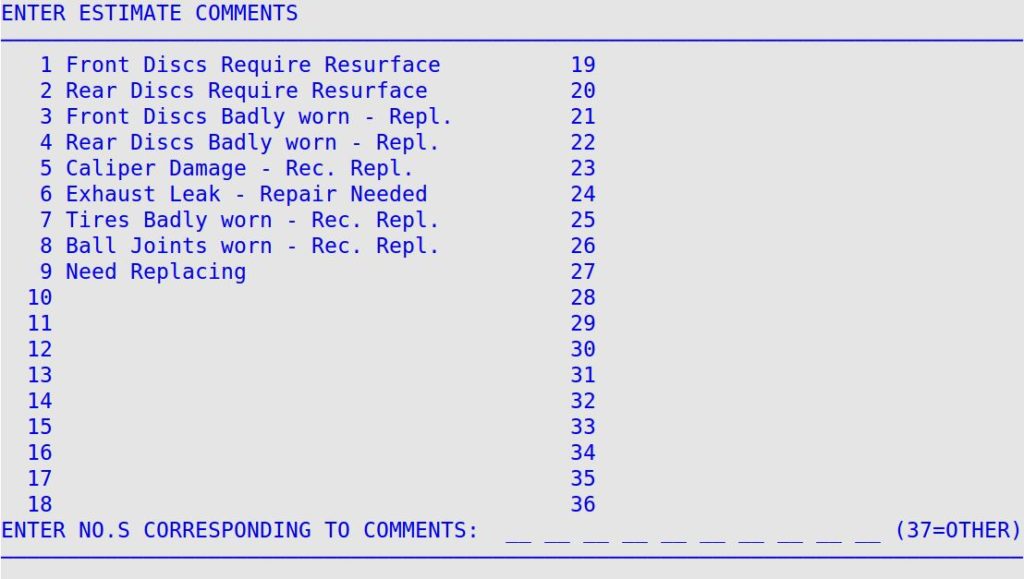
- Press [F3] to receive the Enter Estimate Comments PopUp. Type the number of the Estimate comment (similar to the ones shown below) at the bottom of the screen that you want to print on the Estimate. Make sure you type them in the order you want them to print. To return to the Enter Estimate Information PopUp, press [Enter] on a blank line.
- Do one of the following:
- To print the Estimate, press [F7]. Your entries will be saved and you return to the Enter Invoices – Invoicing screen.
- Press [F4] to save your changes and return to the Bay Invoicing Station screen.
- Press [F5] to add coupons and discounts and have any applicable taxes included in the estimate totals. When you are finished adding coupons and discounts press [F5] to print the Estimate or press [F8] to return to the Enter Estimate Information screen.
- Take the printed estimate to the customer to sign and approve the Estimate work. If the customer approves the Estimate, do one of the following:
- If no additional work is being performed, press [Esc] [Esc] to return to the Invoicing Menu. Go to the Ringing Out an Invoice with Estimate section to continue.
- If additional work is being performed, go to the Revising an Estimate section.
- If the customer does not want the work to be performed and will return at a later date, press [Esc] [Esc] to abort the work order. Type Y to abort the work order. Type the reason the work order was aborted and press [Enter]. Type Y at the Save Estimate? prompt to save the Estimate without saving the work order. When the customer returns, go to the Creating an Invoice from a Saved Estimate section.
| Note: |
The Estimate will only be saved for future use if it has been printed. |
Revising an Estimate
Let’s say as the work is being performed on the vehicle, the technician determines that additional parts and services are needed. As a result, you will need to revise the initial Estimate amount and get approval for the additional charges.
Use the following steps to revise the initial Estimate:
- On the Enter Invoices – Invoicing screen where your work order is still on the screen, add a tire repair and a set of wiper blades similar to the following example.
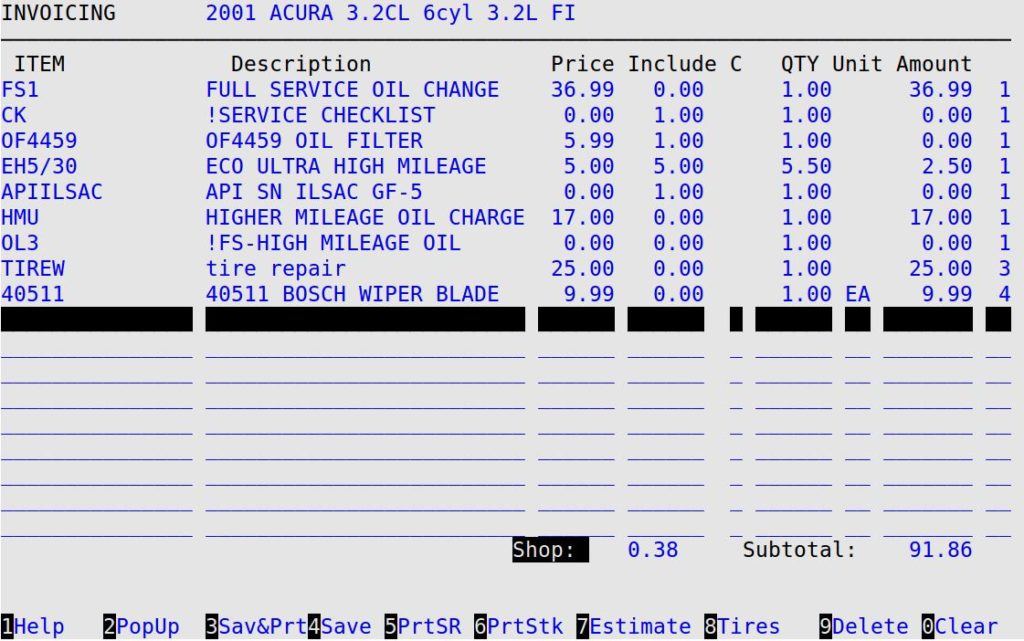
- Because the revised Estimate amount is now different from the original Estimate amount, you will need to press [F7] to pull up the Enter Estimate Information PopUp again. You receive a popup similar to the following example.
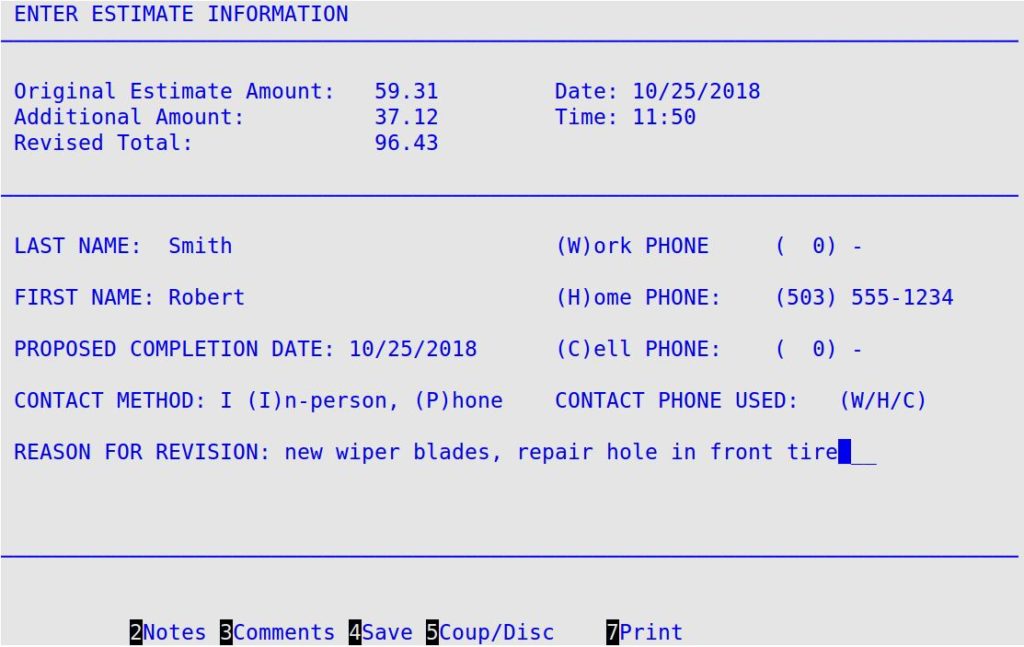
- Notice at the top of the popup there now appears an additional amount for the tire repair and wiper blade. There is also a revised total that shows the original Estimate amount, plus the additional amount.
- Arrow down [↓] to the Contact Method field and type I for in-person.
- Press [Enter] until you get to the Reason for Revision field. Type in a reason similar to the example above.
- Press [F4] to save the revised estimate and return to the Enter Invoices – Invoicing screen.
- Press [F4] to save your changes and return to the Bay Invoicing Station screen.
- Press [Esc] [Esc] to return to the Invoicing Menu.
- To ring out the invoice with the revised Estimate information, go to the next section to continue.
Ringing Out an Invoice with Estimate
Use the following steps to ring out an invoice with the original or revised Estimate information:
- On the Invoicing Menu, select Cashier Station (3) to receive the Cashier Station screen.
- Arrow down [↓] to select the work order for Robert Smith.
- Press [Enter] to select the work order and receive the Enter Invoices – Invoicing screen.
- Press [Enter] on a blank line to receive the Cashier Screen.
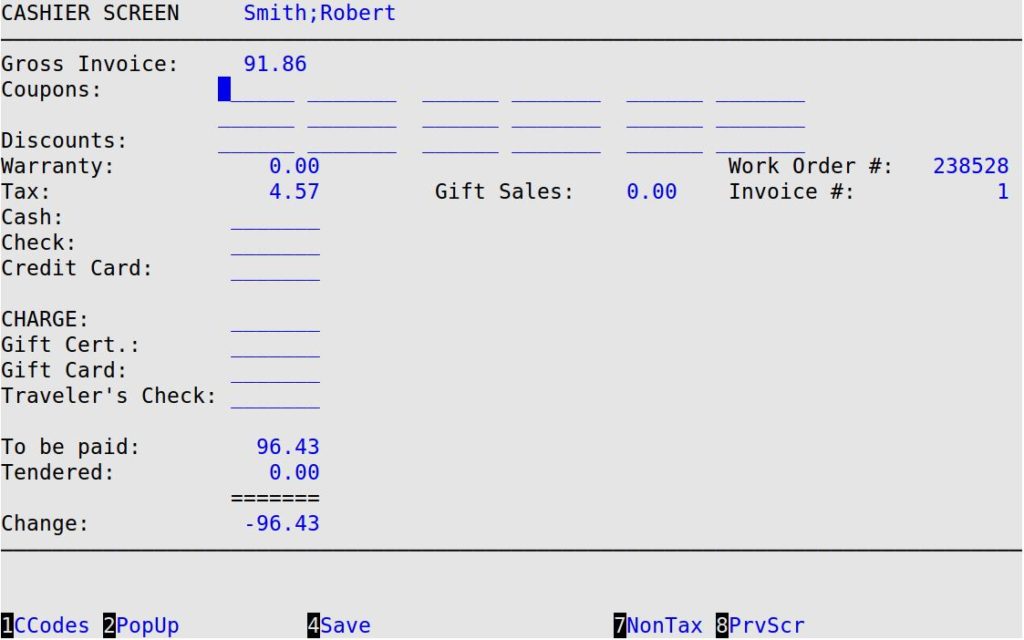
- Arrow down [↓] to the Cash field and type 55.00.
- Press [Enter] to receive the Is This Correct? prompt.
- Type Y to ring out and print his Invoice with Estimate information. You return to the Cashier Station screen.
Creating an Invoice from a Saved Estimate
Let’s say the customer decides to wait to have work done on his vehicle and returns two days later for service.
Use the following steps to create an invoice from a saved Estimate:
- On the Main Menu, select Lubrication Menu.
- Select Invoicing Menu (1).
- Select Bay Invoicing Station (1).
- On the Bay Invoicing Station screen, press [F6] to pull up the Estimate Lookup PopUp.
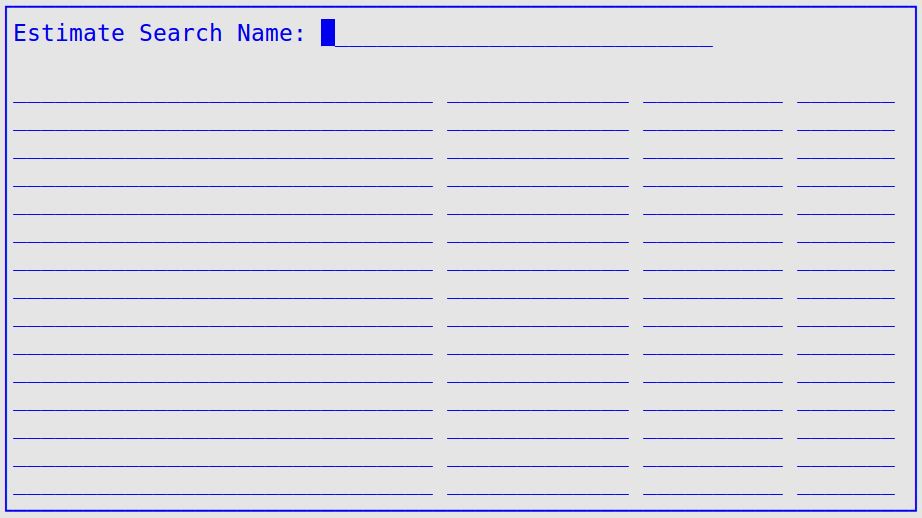
- Type Smith in the Estimate Search Name field and press [Enter]. You receive a list similar to the following example.
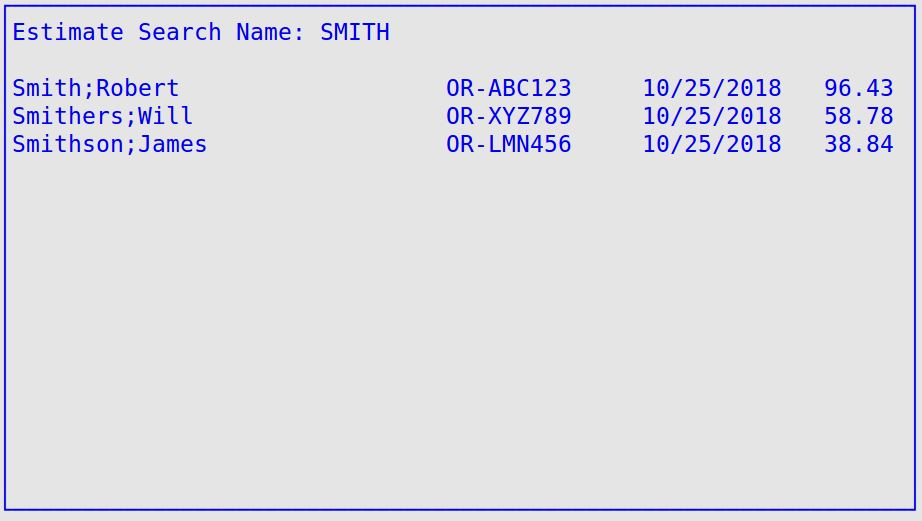
- Arrow down [↓] to highlight the estimate and press [Enter] to select it and place the vehicle in the Enter New Vehicle ID field on the Bay Invoicing Station screen.
- Press [Enter] to continue to the Vehicle Information screen.
- At the OK to continue? prompt, press [Enter] to continue.
- You receive the Electronic Service Manual (ESM) screen. If there are any caution notices or technical service bulletins (TSBs) for the vehicle, they are displayed here. Read the cautions and TSBs, if needed, then press [Enter] or click the Close button to continue to the main ESM screen. TSBs and Cautions can be viewed again by selecting those options from the navigation menu on the left side of the screen.
| Note: |
This popup is only available at LubeSoft version 15.22 and above. On older versions, you will have the legacy ESM PopUp. |

- This screen is divided into three main areas with vital information about the vehicle. Use the arrow keys, [Enter], and [Tab] or the mouse to select different options from the navigation menu on the left side of the window. If specific information is not available for the vehicle, the system will display a message when that menu option is selected. For example, No transfer case specifications available. when the Transfer Case option is selected.
- Vehicle information. This information remains visible in all the other menu options in ESM. If the vehicle information is incorrect, return to the LubeSoft® window, then press [F2] to bring up the popup list, and press G for change vehicle. Follow the on-screen prompts.
- Filter and part numbers, including OEM (original equipment manufacturer) numbers. To determine which part number to display in the selected column, the system checks the part listed for each vendor (in order from left to right). The first part number in stock is displayed. The same information, along with part numbers for breather filters and PCV valves, is available in the Parts screen.
- Chek-Chart lubrication guide. This includes fluid notes for oil, brakes, clutch, and power steering. This information is also listed in the Lubrication Guide screen.
- When you are done reviewing the ESM and Chek-Chart information, select the Continue button. This closes the browser window so you can continue invoicing in LubeSoft.

- The system fills in the corresponding service information, including any job items or add-ons, along with corresponding information about the included items.
- Fill in the Price, Include, Qty, Unit, Amount, and Group fields where appropriate.
- Do one of the following:
- If additional work is being performed, go to the Revising an Estimate section earlier in this article.
- If no additional work is being performed, press [F4] to save information and return to the Bay Invoicing Station screen. Press [Esc] [Esc] to go to the Invoicing Menu. Go to the Ringing Out an Invoice with Estimate section earlier in this article to continue.
More Information About Estimating by State
More and more states are requiring that you keep track of certain Estimate information. Because requirements vary from state to state, it is important that you review your state statutes and consult with a local professional to find out what these requirements are. It is your responsibility as a business to know what your state requirements are. Below are some examples of different state requirements and how you can address these requirements in LubeSoft if they apply to you.
- Some states require that you include a hazardous or waste removal charge statement on the printed Estimate. If this applies to your state, you can set up this statement on the Set Up Estimating screen (1-6-7-1). (See the Setting Up Estimating article for more information.) Consult your local professional if your state allows you to list a hazardous waste charge but you don’t actually get charged for them.
- Some states require that a charge is mandated by state or federal law and a description of that charge is required to appear on the printed Estimate that identifies the law and the specific amount charged under the law. If this applies to your state, you can set up this information on the Set Up Inventory Items screen (1-7-5-1). You can set up each charge as an inventory item and then include the description of that charge in the Description field of the Set Up Inventory Items screen. Select the item during invoicing and then when you print the Estimate, the description of the charge will appear. (See the Setting Up Inventory Items article for more information.)
- Some states require that you include a charge for making a repair on the printed Estimate, or if the charge cannot be predetermined, that you specify the basis on which the charge will be calculated. If this applies to your state, you can set up this information on the Set Up Inventory Items screen (1-7-5-1). You can set up an inventory item, include a description of the charge in the Description field, and type O in the Type field. That way the charge will print on the Estimate. (See the Setting Up Inventory Items article for more information.)
- Some states require that you include the customer’s intended method of payment on the printed Estimate. You can set up this information on the Set Up Inventory Items screen (1-7-5-1). You can set up each method of payment as an inventory item and then include the description of the intended method of payment in the Description field of the Set Up Inventory Items screen. Then when you print the Estimate, the description of the intended method of payment will appear. (See the Setting Up Inventory Items article for more information.)
- Some states require that you include a statement on the printed Estimate that indicates what, if anything, is guaranteed in connection with the repair work and the time and mileage period for which the guarantee is effective. You can set up this information on the Set Up Inventory Items screen (1-7-5-1) or as pre-printed text on your Estimate forms. If you choose to set up this statement as an inventory item, you can include the description of the statement in the Description field of the Set Up Inventory Items screen. Then when you print the Estimate, the statement will appear. (See the Setting Up Inventory Items article for more information.) You can also set up this information to be used as an Estimate message or comment on the Set Up Estimating screen (1-6-7-1). (See the Setting Up Estimating article for more information.)
- Some states require that you include a statement that allows the customer to indicate whether replaced parts should be saved for inspection or return. You can set up this statement as a custom comment or a message of the day. (See the Changing the Message of the Day article.)
- Some states require that you include a statement on the printed Estimate that indicates the daily charge for storing the customer’s vehicle after the customer has been notified that the repair work has been completed. If this applies to your state, you can set up this information on the Set Up Inventory Items screen (1-7-5-1). You can set up the statement as an inventory item and then include the statement in the Description field of the Set Up Inventory Items screen. Then when you print the Estimate, the statement will appear. (See the Setting Up Inventory Items article for more information.)
- Some states require that you keep records for Estimates and invoices for a specified period of time (for example, three years). If this applies to your state, we suggest that you retain paper copies of Estimates and invoices for the specified period of time. You can also keep paper copies of all Estimate activities by printing an Estimate Log (1-1-8-3) for each Estimate. (See the Estimate Revision Log article for more information.)
- Some states require that you print on an Estimate whether parts are new, used, rebuilt or reconditioned. If parts are new, used, rebuilt or reconditioned, you can indicate this in the Description field of the Set Up Inventory Items screen (1-7-5-1). Then when you print the Estimate, it will show whether a part is new, used, rebuilt or reconditioned. (See the Setting Up Inventory Items article for more information.)
- Some states require if you sublet work that you include a statement of fact on the printed Estimate that includes the estimated price. Some states also require that the final invoice include a statement that notifies the customer sublet work was done, but the specific name of the person or shop who did the work does not have to be noted. You can use the Estimate Notes PopUp to include any sublet information on the printed Estimate. (See the Using the Enter Estimate Information PopUp article for more information.)


