This option allows you to change up to 10 inventory item numbers at one time, including moving all history from the old item number to the new item number. You would use this option, for example, when a vendor changes the item numbers in the catalog.
Use the following steps to change inventory numbers:
- On the Main Menu, select Lubrication Menu.
- Select Inventory Menu (7).
- Select Utility Procedures Menu (6).
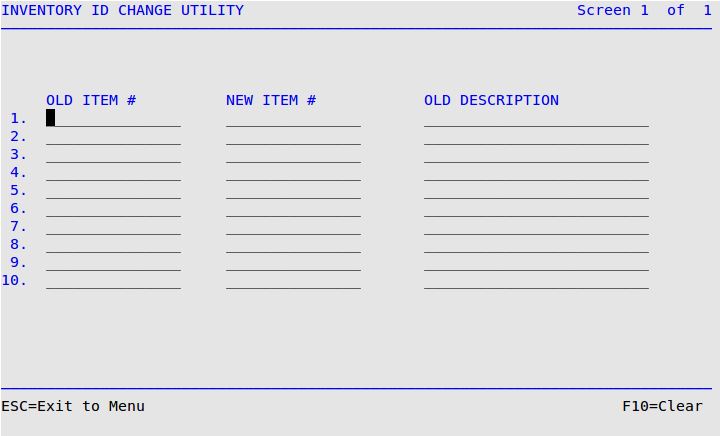
- Select Inventory ID Change Utility (6) to receive the following screen.

- Type in the current item number in the Old Item # field, and press [Enter] to move to the New Item # field. The description of the item appears in the Old Description field.
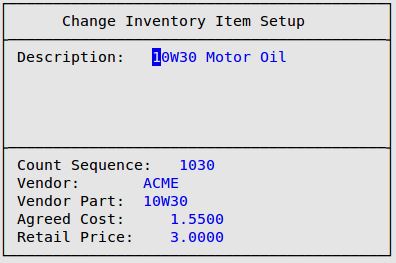
- Type in the new item number. This number must be unique and cannot be in use by any other item. Press [Enter] to receive a popup window similar to the screenshot below.

- Change any of the necessary information in this popup and press [Enter] to move to the next line. This popup appears for each item number you type.
| Note: |
When you change an inventory ID, if the existing part number for Vendor 1 and the inventory ID are identical, both numbers are replaced. |
- To move to line 2, press [Enter]. Repeat steps 5-7 for each item you want to change. You can change up to 10 items at one time.
| Note: |
You cannot enter the same inventory item twice. This prevents miscalculation of the inventory statistics. |
- When you have entered all the item numbers you want to change, press [F4] to begin the change process.
| Note: |
After you enter changes on the last line on the screen and press [Enter], the cursor returns to the first field, allowing you to change any of the information you just entered. |
- When the system has finished reindexing your inventory files, you will receive the message, Please Wait…Converting Inventory Part Numbers.
- When all of the numbers have been converted, you return to the Inventory ID Change Utility screen.
- To return to the Utility Procedures Menu, press [Esc] [Esc]. The report listing all old and new IDs automatically prints.

