The Maintain Vehicle History screen provides information about a given vehicle and allows you to view and change customer data. The system uses the vehicle ID number to retrieve the information tied to that vehicle. This information can then be modified or deleted. This screen can also be used to merge vehicle histories caused by incorrectly entering license numbers during invoicing. For steps on reprinting invoices from Maintain Vehicle History, go to the Reprinting an Invoice section below.
Remember that for each vehicle there is only one set of customer information. For example, if the Smith family sells their car to the Carson family, you must use this screen to retrieve the vehicle and change the customer information to reflect the new ownership. These changes do not affect the service history records of the vehicle.
| Note: | This screen is similar to the Vehicle Information screen in the invoicing process. You can use this screen to change most of the information that is incorrect on the Invoicing screen. |
Features available in Maintain Vehicle History:
Use the following steps to receive the Maintain Vehicle History screen:
| Note: | This screen can also be accessed from the Marketing Menu (2-4) |
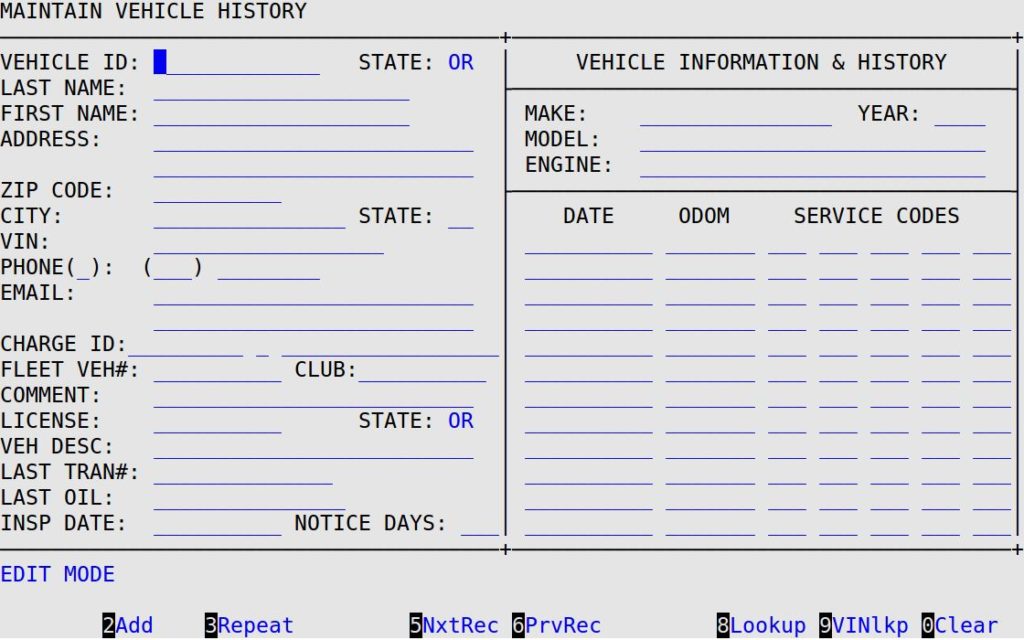
This screen allows you to add or edit vehicle information. This feature is useful when you are setting up a new charge (or fleet) customer or when you need to change vehicle information. You can enter all of the vehicle-related information before the vehicle is brought in for service.
Although the following instructions focus on editing a vehicle record, the field definitions are the same if you are adding a vehicle record (just make sure you are in Add Mode instead).
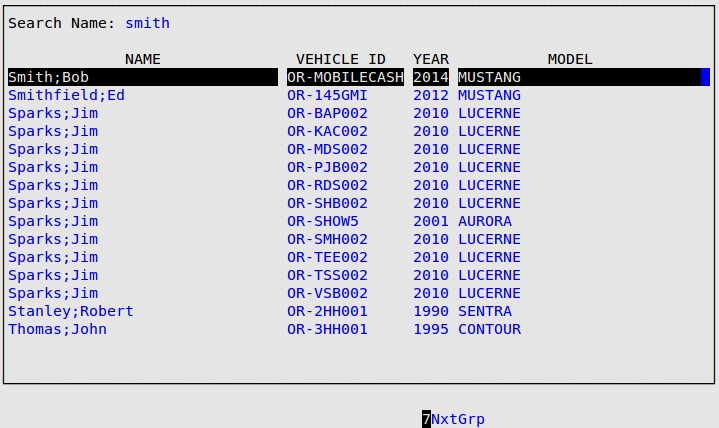
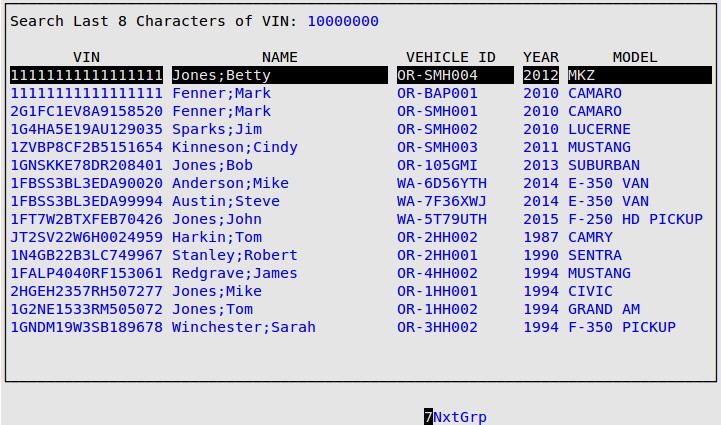
| Note: | You type the last eight characters of the VIN instead of the first eight characters because the last eight characters of each VIN are unique to each vehicle. |
| Note: | You can not edit vehicle information in Maintain Vehicle History for a vehicle that is currently being invoiced. |
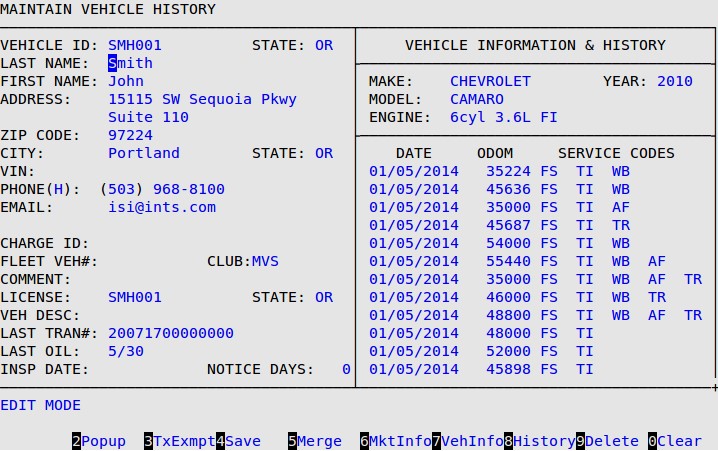
| Function Key | Description | ||||
|---|---|---|---|---|---|
| F2 – Popup | Brings up a popup box that allows you to make the following selections:
Select T, for noTe, to enter notes that pop up during invoicing. You can also enter a drop date for the note. After this date, the note does not appear when the customer comes in for the next service. Select R, for Return, to enter custom mileage and service interval days requested by the customer. These saved values are stored and will be used for all future visits by this vehicle.
Select C, for Club, to edit the Club Program ID and/or increment the Visit Count.
When your cursor is in the Program ID field, the F1 Help appears. Pressing [F1] brings up a popup displaying the list of Club Programs set up in the system. Use your arrow keys to scroll up and down in the popup. Press [Enter] to choose the highlighted Club Program and enter it in the Program ID field. You will be asked to enter your employee password to proceed.
The security level for adding or editing is explained in the article Setting Up the Center Control File. |
||||
| F3 – TxExmpt | Allows you to set up tax exempt information for a customer. For more information, see the Setting Up Tax Exempt Customers article. | ||||
| F4 – Save | Allows you to save vehicle information that has been entered on this screen. | ||||
| F5 – Merge | Allows you to merge the vehicle history from one vehicle into another. See the Merging Vehicle History article for more information.
|
||||
| F6 – MktInfo | Brings up a popup box that contains the following fields: gender, age, new customer, and miscellaneous. This information is used in the Marketing module to help you target more specific customers in your mailings. See the article Setting Up Marketing Controls for more information. | ||||
| F7 – VehInfo | Allows you to change the vehicle Year, Make, Model, and Engine on this record. You would use this if the customer transferred his old license plate to a new vehicle. The information in the upper right corner of the screen will change. | ||||
| F8 – History | Allows you to add and edit services for a vehicle to the vehicle history record. Go to step 7 for more information. | ||||
| F9 – Delete | Allows you to delete a vehicle record from your system. | ||||
| F10 – Clear | Clears the screen so you can edit another vehicle history record. |
Name, Address, ZIP/Postal Code, City, State, VIN, and Phone
The name, address, ZIP/postal code, city, state, VIN, and phone information filled in during invoicing is displayed here. The first letters in each word (except VIN) are automatically capitalized, and all other letters remain in the same case (uppercase or lowercase) that they were typed in invoicing. The Last Name and First Name fields cannot exceed 20 characters each, or 39 characters together. The City field cannot exceed 15 characters. The Primary flag in the Phone PopUp indicates the customer’s preferred method of contact. The phone number indicated by this field will be printed on the invoice, service review, and postcard.
The email information filled in during invoicing is displayed here. This field is displayed across two lines and cannot exceed 50 characters. The email field must pass a standard email address validation before it will be accepted by the system. The email address must be in the format username@domain.tld. If the email address does not meet this standard, an error message will be displayed and you will be prompted to fix the problem before proceeding. Email address validation errors that may appear are explained below:
| If you see the following message: | Then the email address… | ||
|---|---|---|---|
| Invalid email: @ symbol required | is missing the “at” symbol (@). A valid email address must contain an @ symbol. | ||
| Invalid email: cannot begin with @ symbol | starts with an @ symbol. The @ symbol cannot be the first character. | ||
| Invalid email: cannot end with @ symbol | ends with an @ symbol. The @ symbol cannot be the last character. | ||
| Invalid email: consecutive periods(.) not allowed | has two periods (.) in a row. Remove one or more of the periods. | ||
| Invalid email: <invalid character(s)> not allowed in user name | has an invalid character in the user name portion (prior to the @ symbol). The user name may only contain letters (A-Z and a-z), numbers (0-9), pluses (+), dashes (-), periods (.), and underscores (_). | ||
| Invalid email: domain must contain a period(.) | does not have a period in the domain name (after the @ symbol). | ||
| Invalid email: cannot end with a period(.) | ends with a period. The last character cannot be a period. | ||
| Invalid email: period(.) immediately following @ symbol | has an @ symbol followed by a period. There must be one or more characters between the @ symbol and the period in the domain name. | ||
| Invalid email: <invalid character(s)> not allowed in domain name | has an invalid character in the domain name. The domain name may only contain letters (A-Z and a-z), numbers (0-9), dashes (-), periods (.), and “at” symbols (@). | ||
| Invalid email: <tld> invalid per .emailcheck file. | has an invalid top-level domain (TLD). This is also known as the suffix or extension. It is the last part of the email address, after the period. The email address TLD must be listed in the .emailcheck file (if the file exists).
|
||
| Invalid email: at least two characters required in domain suffix. | has only one character for the TLD (the last portion of the email address; after the period). A valid TLD must have at least two characters. This check only occurs if there is no .emailcheck file. |
Email Opt In
Type Y or N to indicate if the customer has requested they not receive emails from you or any other third party marketing companies.
Charge ID
If applicable, type the 9-character ID of the charge account to which this vehicle is associated. The system automatically sends this vehicle’s charges to the charge customer’s account if the customer is set up to be billed. Be sure this ID is typed accurately. The description of the charge customer also appears.
You can specify whether the fleet is Local or National by typing L or N, respectively, in the field immediately to the right of the Charge ID field. All fleets are set up on the Set Up Charge Customers (1-4-2) screen.
Fleet Veh#
If applicable, type the fleet vehicle number, which is used internally by the fleet manager to identify this vehicle. It prints on the Fleet Management Report.
Club
If a Club Program has been attached to this vehicle, this field will be automatically populated with the Club Program ID.
Comment
Fill in this 25-character field with comments about the customer or vehicle. This field also shows up in the Vehicle Info popup during invoicing. (Reference only)
License
Type the 1- to 10-character license number of the vehicle. This is also the vehicle ID if you are not using an alternate ID. If you use an alternate ID, this field is for reference only. A 2-character state abbreviation appears if you are set up on screen 1 of the Center Control File to include state in the ID.
Veh Desc
Fill in a 1- to 25-character description of the vehicle, such as Red with white top. If this is filled in during Greeter Station processing, it also displays here and at the Greeter Station for future visits.
Last Tran#
The 1 to 14-digit number that corresponds to the last transaction number the vehicle was assigned. This number is automatically pulled in from invoicing. (Display only)
Last Oil
Fill in the 1- to 15-character item number of the oil used by the vehicle on its last service. During invoicing, if an oil filter and oil (type L) are within the same group (for example, a Full Service), the oil item number is saved and then automatically pulled up on the invoicing screen on the customer’s next visit.
Last Insp
Type the last inspection date (MM/DD/YYYY). The last inspection date can also be changed during invoicing, where you have the option to make it required. This field is designed to record when a vehicle is due for an inspection by the state. For example, a safety inspection or an emissions test. This information can be used in a marketing program to print reminder postcards for inspections.
Notice Days
Enter the 1- to 3-digit number of days needed before service notifications are sent to the customer. Usually, this value is 90, but it can be changed according to the customer’s driving habits. If this customer wants to be notified of the need for an oil change service, type the number of days needed before notification. If the customer does not want to be notified at all, enter 999 in this field.
Make, Year, Model and Engine
These entries in the top right corner of the screen correspond to the vehicle entered during invoicing or on the Maintain Vehicle History screen. To change a customer’s vehicle information, you must press [F7] to receive the vehicle information selection screens. This procedure works just like “building” a new car at invoicing. See the article Creating a New Vehicle Record Through the Bay Invoicing Station for more information.
For a regular ESM vehicle, you must fill in all four fields for the vehicle changes to save. For a manual ESM vehicle, you only need to change one field to change the vehicle information.
Service History Fields
On the right half of this screen is a history of the services this vehicle has received. These fields are automatically filled in when the vehicle is serviced. You can change or add to these fields if, for example, the mileage was miskeyed, or a blank service code was entered on an inventory item.
The list of service history on this screen is for display purposes only. It can only be edited from the Vehicle History Screen. For information on using this screen, go to step 7.
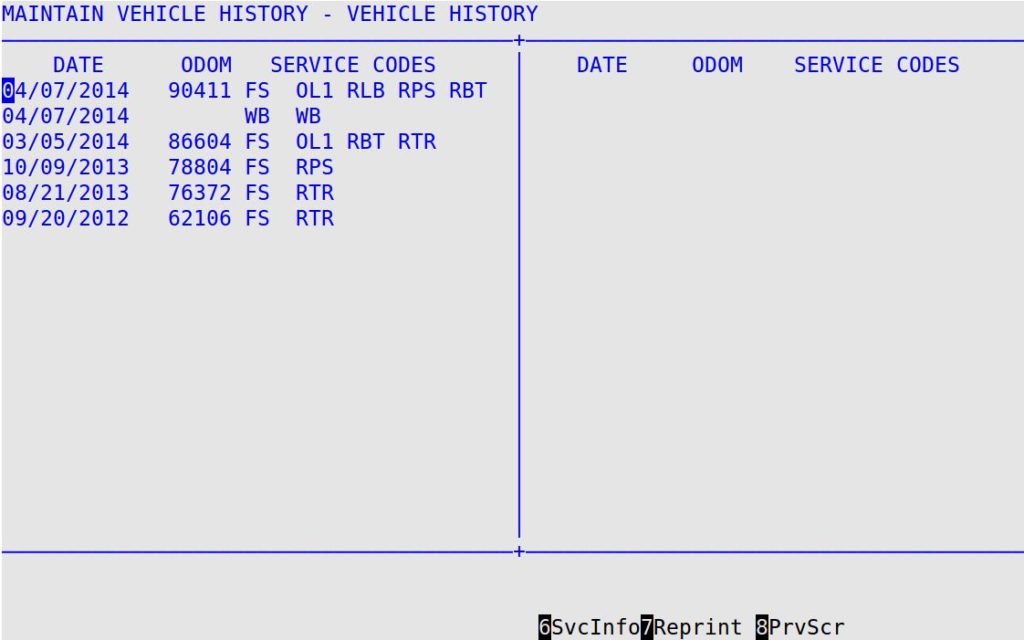
The following list contains useful tips when using this screen.
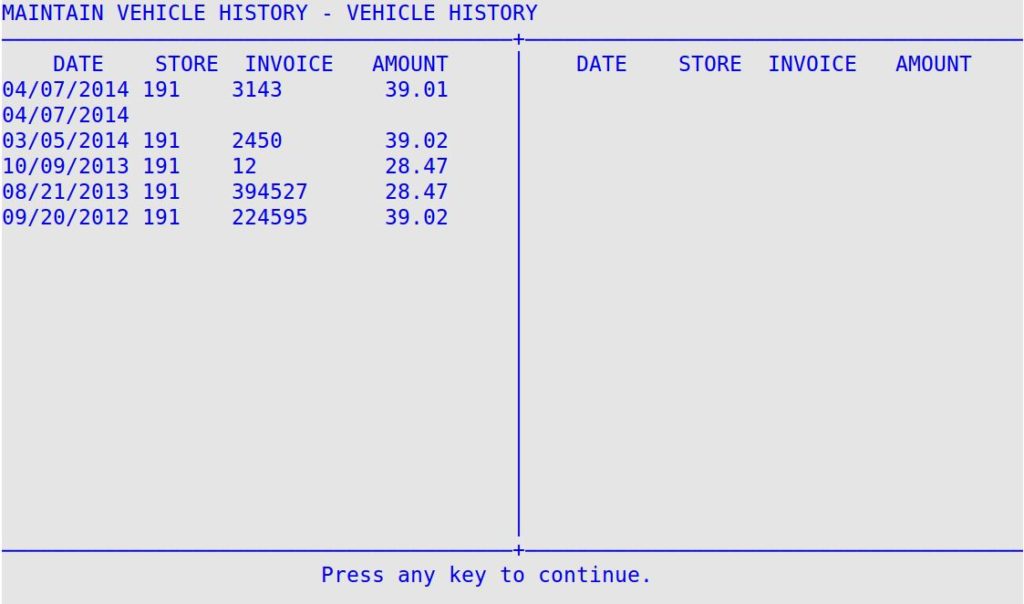
| Note: | Service history entries with the same date and blank odometer on the second history line are the same history record. The following examples explain this in detail.
Example 1 shows one visit with six service codes.
Example 2 shows two visits, with five service codes for the first visit and one for the second.
Entries with the same date and two mileage entries are two separate visits. In example 1 where there are two lines of history, if you delete the first date line, the history record is deleted, therefore removing both lines from history. If you delete the second date line, it does not remove the history. Removing the date from the second history line does nothing. You must remove the individual services from the second line of history to remove them. |
All reprints are tracked by LubeSoft and specified on the Transaction Report. This report lists the ID of the employee who reprinted the invoice and the note From Vehicle History to indicate the reprint was printed from the Maintain Vehicle History screen.
Use the following steps to reprint an invoice from the Maintain Vehicle History screen (1-4-1):
