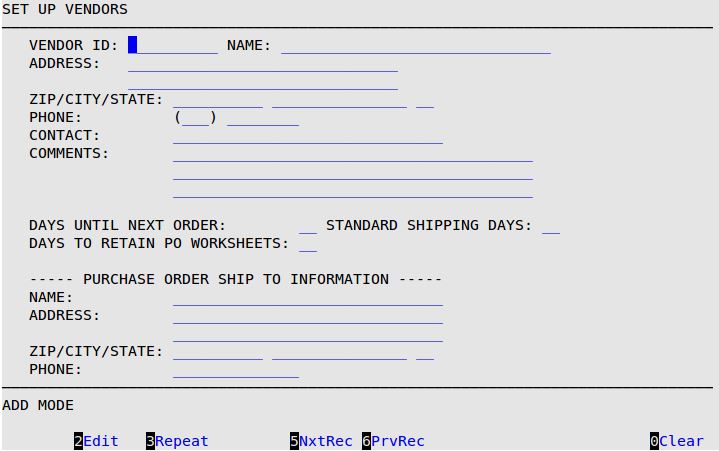
This option allows you to set up a new vendor or edit information for an existing vendor. You only need to set up this functionality if you are using the Purchase Order Module or tracking vendor information on wildcard items. If you are not using these features, you can still enter information on this screen. See the Purchase Order articles for complete information and instructions on the PO module.
Use the following steps to access the Set Up Vendors screen:

Vendor ID
Type an ID of up to 10 characters for the vendor you are updating or assign an ID to a vendor you are adding. (Required)
| Note: | Because you will use vendor information in the PO Module, the vendor IDs you enter on the Set Up Vendors screen and the Set Up Inventory Items screen must match. Otherwise, the PO Module will not work properly. |
Name
Type the name of the vendor. (Required)
Address
Type the street address of the vendor.
ZIP/City/State
Type the ZIP/postal code of the vendor. The system will automatically enter the city and state based on the ZIP/postal code you enter.
| Note: | The system will allow you to leave the ZIP and City fields blank, but the State field must be filled in before you can continue filling in the fields that follow. |
Phone
Type the area code and telephone number of the vendor.
Contact
Type the contact person’s name for the vendor.
Comments
Type any comments that apply to this vendor. (For example, No backorders accepted.)
Days Until Next Order
Type the number of days between when you need to order from this vendor. This number is strictly for your information and is not used elsewhere.
Standard Shipping Days
Type the number of days between the time you order and receive your shipment.
Days to Retain PO Worksheets
Type the number of days you want the system to keep the Purchase Order Worksheets that you will create. This number must be between 1-10 days. The system defaults to five days. The POWs are automatically deleted from the system after the number of days you specify in this field.
Purchase Order Ship To Information
Shows the name and address where the shipment is to be sent. Generally, it will be your shop’s name and address. The system automatically pulls this information from the last screen of the Center Control File (1-6-1-1). However, these fields can be edited as needed.
| Note: | If you have many inventory items with the same vendor, you can change all the items with the same vendor all at once using the Global Inventory Changes option. You can find more information about this in the article Making Global Inventory Changes. |