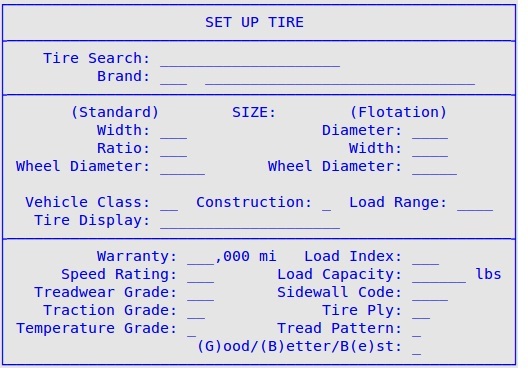
Use the following steps to set up tires:
| Note: | The Set Up Tire PopUp below is only displayed when setting up Parts. |

| Note: | You may exit the popup and return to the inventory setup screen by entering through all the fields or pressing [Esc][Esc]. Press [F6] to re-open the Set Up Tire PopUp. |
Tire Search
Type in search criteria to use for tire searches from the Bay Invoicing Station, Cashier Station, and Greeter Station.
Brand
Fill in the tire brand code or type up to the first 3 characters of the tire brand description you want to search for and press [Enter]. You can also press [F1] to receive a list of tire brands from which to select.
Width (Standard)
This is an optional field that represents the width of the tire.
Ratio (Standard)
This field is required only if width (standard) is filled in. Type in the aspect ratio of the tire size.
Wheel Diameter (Standard)
This field is required only if width (standard) is filled in. Type in the wheel diameter.
Diameter (Flotation)
This is an optional field that represents the overall diameter of the tire.
Width (Flotation)
This field is required only if diameter (flotation) is filled in. Type in the width of the tire.
Wheel Diameter (Flotation)
This field is required only if diameter (flotation) is filled in. Type in the wheel diameter.
Vehicle Class
This is an optional field used to capture the vehicle class value of the tire.
Construction
This is an optional field used to capture the construction property of the tire.
Load Range
This is an optional field used to capture the load range of the tire.
Tire Display
This field is auto-populated with data from some of the above values. You may choose to accept the auto-populated data or fill in your own. This information shows on the Tire Help screen.
Warranty
This is an optional field used to capture the tire warranty mileage.
Speed Rating
This is an optional field used to capture the tire speed rating.
Treadwear Grade
This is an optional field used to capture the tire treadwear grade.
Traction Grade
This is a required field if a treadwear grade has been entered.
Temperature Grade
This is a required field if a treadwear grade has been entered.
Load Index
This is an optional field used to capture the tire load index.
Load Capacity
This is an optional field used to capture the tire load capacity.
Sidewall Code
This is an optional field used to capture the tire sidewall code.
Tire Ply
This is an optional field used to capture the tire ply
Tread Pattern
This is an optional field used to capture the tire tread pattern. This field only allows specific entries. To view the list of entries, press [F1] on this field.
(G)ood/ (B)etter/ B(e)st
This field allows you to rate the tire as described in the title.