QuickBooks Online must be set up specifically to import the information from LubeSoft®. Use the following instructions to set up your QuickBooks Online program before importing information from LubeSoft®.
If you have already been using QuickBooks Online and would like to integrate LubeSoft® with the information you currently have set up in your QuickBooks account, call ISI Support for assistance.
Your new company needs to have specific configurations set up in order to import invoice and general ledger (G/L) data from a LubeSoft® comma-separated values (CSV) extract file.
- Do not set up taxes in QuickBooks Online.
- Enable custom transaction numbers.
- Change QuickBooks Online Products and Services from using sub-items to using categories.
- Create a special A/R offset account in the QuickBooks Online Chart of Accounts that corresponds to the QuickBooks A/R Offset account set up in LubeSoft®.
- Set Custom Products and Services up to report to the QuickBooks A/R Offset account, if you plan to import the LubeSoft® A/R file.
- Turn on the Locations feature of QuickBooks Online. (optional)
Setting Up a New Company in QuickBooks Online
QuickBooks Online Support will assist you with creating your first company within their product.
QuickBooks Online Taxes
The CSV import files already have taxes included in the data being exported from LubeSoft®.
The U.S. version of QuickBooks Online does not support importing invoice data if you have taxes turned on.
For the Canadian version of QuickBooks Online, it is suggested that you do not turn on taxes. If you do turn them on, we have pre-populated “Out of Scope” for the Item Tax Code in the A/R CSV import file for you.
Enabling Custom Transaction Numbers
Use the following steps to set up QuickBooks Online to use account numbers:
- Start on the Dashboard view.
- Click on the cog icon in the upper right corner of the screen.
- Select Account and Settings.
- Select the Sales tab on the left.
- In the section Sales form content verify the setting Custom transaction numbers is turned on.
- If the setting is not turned on, click on the setting and then on the slider element so it moves to the right. It may also make the element the color green.
- Click Save, which appears at the bottom of the Sales form content section.
- Click on Done in the lower right corner of the screen.
Using Categories for Products and Services
- Start on the Dashboard view
- Click on Sales on the left side of the screen.
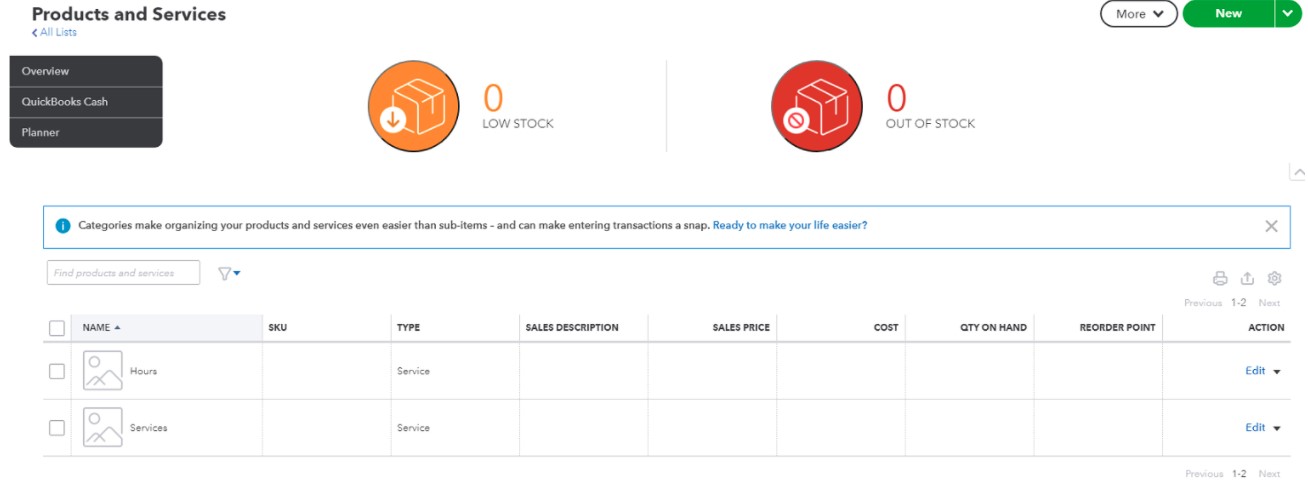
- Click on Products and services in the menu that appears near the top of the screen
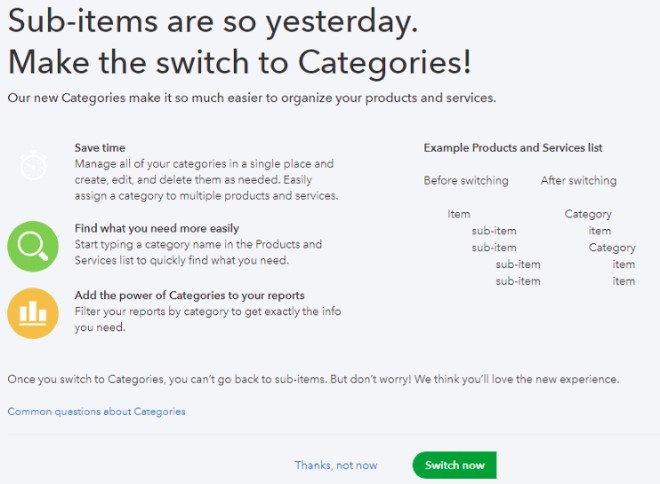
- You may see a message just above the default Hours and Services list that talks about Categories making organizing your products and services easier than sub-items. Click on the Ready to make your life easier? link.

- Click on Switch Now to switch to Categories.

- The screen will refresh automatically and take you back to the Products and Services page.
Setting Up the QuickBooks A/R Offset Account
Use the following steps to set up the A/R account that corresponds with the QuickBooks A/R Offset account that is set up in LubeSoft® :
- In QuickBooks Online, select the Accounting tab on the left.
- Choose the Chart of Accounts from the menu along the top.
- Several default accounts may already exist for you and will be listed on this page.
- Click on the New button on the upper right side of the screen..
- Select Other Current Assets for the Account Type
- Select Other Current Assets for the Detail Type
- Enter your new account name as QUICKBOOKS A/R OFFSET, or whatever you named this account in LubeSoft.
- Choose Save and Close.
| Note: |
For further information about your QuickBooks Online software, refer to the documentation you received with your QuickBooks Online account access. |
Importing Fleet Invoice Information
Specific Products and Services need to be set up in QuickBooks Online if you plan to import the LubeSoft A/R invoice file. This file contains invoice line item detail that needs to be identified to QuickBooks Online and mapped to the QuickBooks A/R Offset account that you have set up. ISI has a default product map that you can import to quickly set up these items. Contact ISI Support for assistance.
Setting Up Locations
The Locations field allows you to assign a label that identifies the A/R invoice records as having come from a specific store location. Using this feature is optional. For users who wish to use this feature, there is a Location column in the Invoice CSV import file that contains the five digit store number where the file was generated (e.g. Store 00001).
Use the following steps to set up QuickBooks Online to use Locations:
- Start on the Dashboard view.
- Click on the cog icon in the upper right corner of the screen.
- Select All lists.
- Select the Locations link.
- Click on the button labeled New in the upper right corner of the screen.
- Enter the name of the location you wish to set up in the Name entry box. This needs to match the format of the location values coming from the stores. The name of a location in the CSV file will be in the format “Store 00001”.
- Click Save, which appears at the bottom of the Location Information window.

QuickBooks Online Tips
As mentioned earlier in this document in our Third Party Software Policy, “ISI neither supports nor provides training for the use and maintenance of these third party programs.” With that in mind, we realize that in order for you to effectively use QuickBooks Online as a business tool, it is worthwhile for us to share some tips which will better ensure your success.
- When A/R transactions are imported, the customer’s accounts are created automatically, but the permanent name and billing information is not created. You must enter this information for each fleet customer on the QuickBooks Online side one time only.
- If you plan to use QuickBooks Online to track your G/L, you must:
- Set up all accounts as desired on your LubeSoft® POS system (1-6-1-4).
- Determine the correct type for each account (Bank, Income, Expense, etc.). If you are unsure of the account type, seek professional advice from an accountant.
- In QuickBooks Online, as you set up your Chart of Accounts, do not use Accounts Receivable in the Type dropdown list for any of your new accounts. QuickBooks Online will create this account automatically when you do your first fleet accounts receivable CSV file import.


