You can design up to 98 different postcard layouts with this setup screen. This flexibility enables you to send different types of postcards to selected customers. You also have the flexibility to use a basic postcard format or an advanced one. The advanced postcard format is explained below. See the Setting Up Postcard Contents – Basic article for information about the basic postcard setup.
The basic Set Up Postcard Contents option contains the features you need most in your Marketing. Sometimes, you may want increased flexibility to target a more specific group of customers. In these situations, you may want to use the advanced postcard setup feature. The next section explains each field on the advanced screens.
Use the following steps to access and use the advanced Marketing feature:
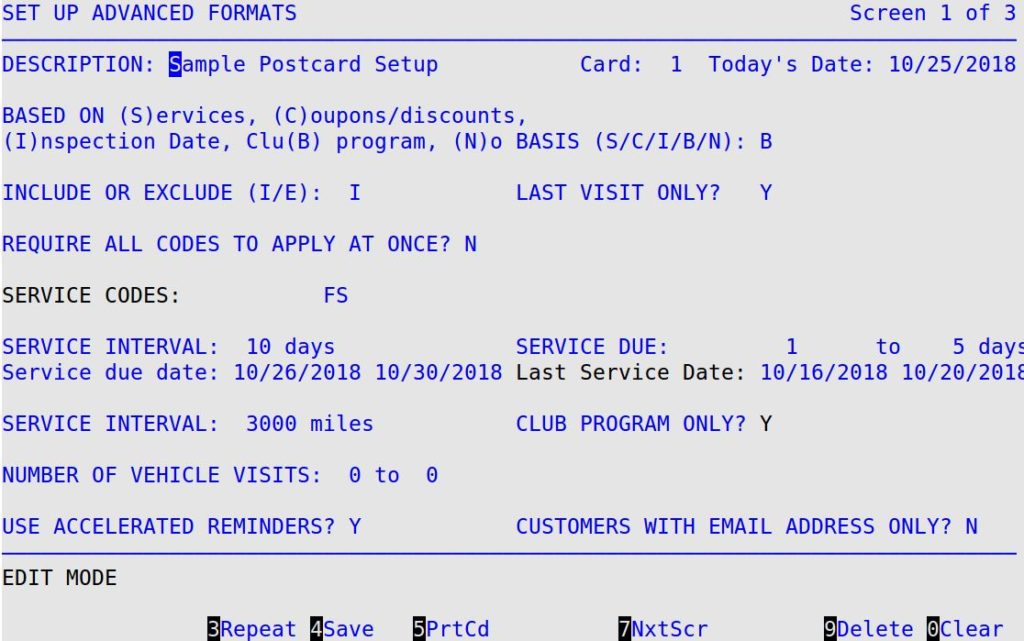
| Note: | From this screen, you can press [F5] to access the Print Codes PopUp box. In this box, you can specify printer codes to print before and after this specific postcard. These codes do not affect other postcards.
After you have entered the codes, press [Enter] to return to the Set Up Advanced Formats screen. |
Description
Fill in this 30-character field, which is available for you to describe the postcard format. This description displays when you select a format to print, or as part of the reminder indicating that there are postcards to print.
Card
The system displays the number assigned to the postcard. (Display only)
Today’s Date
The system displays the system date. (Display only)
Based on Services, Coupons/Discounts, Inspection Date, Club Program, No Basis
Type a 1-character code to indicate the basis for printing postcards. The code you enter here is the key to how your postcards are set up and determines which fields are available as selection criteria.
Codes:
Include or Exclude
Type either I or E to indicate whether you want to include or exclude the services in the Service Codes field. If you type an I, the postcards will be created for customers who have had the services you specified in the Service Codes field. If you type an E, the postcards created will be for customers who do not have the service codes you specified. (Defaults to I)
Last Visit Only
Type Y or N to indicate if you want to create postcards based on the services or coupon codes used on the customer’s last visit. If this field is set to Y, only the last service history entry for a vehicle is checked for the entered codes. (Defaults to Y)
| Note: | When setting up advanced postcards, the Number of Vehicle Visits and Last Visit Only fields are not designed to work together. The system prevents you from accidentally using them at the same time. The Last Visit Only field defaults to Y, which does not allow you to access the Number of Vehicle Visits field. If you want to use the Number of Vehicle Visits field, you have to type N in the Last Visit Only field. |
Require All Codes to Apply at Once
Type Y or N to indicate whether you want the services or coupons to have been on the same invoice. If you type Y, the vehicle must have a service that matches all codes specified to be selected on the same invoice. (Defaults to N)
Service Codes
Enter up to seven 1- to 6-character codes of the services for which this postcard will be created. The system searches Inventory History for a past service with these codes. When it finds one, it checks the date and if it is in the range of dates to be printed, it prints a postcard. These fields are only available if you type S in the Based on Services, Coupons/Discounts, Inspection Date, Club Program, No Basis field.
| Note: | You can increase the number of services included in these fields by using the wildcard feature. A wildcard is a character that represents one or more characters. The asterisk (*) wildcard is used to represent any character or group of characters that might match that position in other service codes. For example, FS* could represent FS1, FS2, FS3, etc. |
If you are not sure of the codes you want to include, press [F1] to access a list of all available service codes.
Coupon/Discount Codes
Enter up to seven 1- to 6-character codes of the coupons and/or discounts for which this postcard will be created. The system searches for a past service that used one of the coupons or discounts listed. When it finds one, it checks the date and if it is in the range of dates to be printed, it prints a postcard. These fields are only available if you type C in the Based on Services, Coupons/Discounts, Inspection Date, Club Program, No Basis field.
| Note: | You can increase the number of coupons/discounts included in these fields by using the wildcard feature. A wildcard is a character that represents one or more characters. The asterisk (*) wildcard is used to represent any character or group or characters that might match that position in other coupons or discounts. For example, AD* could represent AD10%, AD20%, AD30%, etc.
If you are not sure of the code you want to include, press [F1] to access a list of all available coupon/discount codes. |
Service Interval (days)
Enter the 1- to 3-digit number of days between services for the service codes. For other services with an interval other than the default set up in the Center Control File, specify the days suggested for that service (for example, 120 days for an air filter). Changing the value in this field automatically changes the value in the Last Service Date field. (Defaults to the value set up on the Set Marketing Controls (Marketing-8-2) screen.)
Service Due
Type the range of days (1 – 9999) for printing postcards in advance. For example, if you enter four and ten in the Service Due fields, you will be printing postcards for customers whose service is due four to ten days later. The next week when you print and send them out again, a new week’s worth of customers receive postcards. This helps you do two things.
To fill in the service due information, figure out the number of days ahead of time you need to mail the postcards and enter this in the first field. For example, to print postcards so you can mail them at least four days before the service is due, enter 4 in the first field.
In the second field, type the number from the first field, plus the additional number of days you want to include in the range. For example, to print a week’s worth of postcards, you want six additional days. Adding four and six together is 10, which is what you would enter in the second field. To print two weeks worth of postcards, you would want 13 additional days, so you would type 17 (4 + 13) in the second field. Changing these values automatically updates the value in the Service Due Date and the Last Service Date fields.
The postcard process is designed to be a weekly, monthly or semi-monthly process of mailing reminders to customers who are due for a specified service during the next week or month. For example, if you want to send out reminders to customers who are due for their 90-day full service 4 to 10 days from now, you would type 90 in the Service Interval field and 4-10 in the Service Due field. The system goes through the following process to determine which postcards to print:
Service due date
The range of future dates for the vehicle’s next service is displayed in these fields based on the information in the Service Interval and Service Due fields. (Display only)
Insp. Date Range
If you select I in the Based on Services, Coupons/Discounts, Inspection Date, Club or No Basis field, the Last Service Date field changes to Insp. Date Range, which shows a range of dates when vehicles last received an inspection. Any cars that had an inspection within those dates is selected for your postcard mailing. (Display only)
Last Service Date
The range of past dates for the vehicle’s last service is displayed in this field based on the information in the Service Interval and Service Due fields. (Display only)
Service Interval (miles or kilometers)
Enter the 1- to 6-digit recommended miles/km between services that a vehicle must have before a postcard is created. The number of miles/km that a customer has driven since the last service is a general estimate based on the driving habits of the customer. This field is used to determine accelerated reminders.
Club Program Only
Type Y or N to indicate whether you want to target those vehicles that have a Club Program attached to them.
Number of Vehicle Visits
Use these fields to print postcards targeting those customers who have received service a specific number of times. For example, if you enter a range of 1 and 15, the system selects vehicles that have been in for a visit at least once, but not more than fifteen times. If you want to mail to a specific number of visits, type the same number in both fields. For example, to mail to first time customers, type a 1 in both fields. If you leave both fields blank, the postcard mailing is not limited to the number of services.
| Note: | When setting up advanced postcards, the Number of Vehicle Visits and Last Visit Only fields are not designed to work together. The system prevents you from accidentally using them at the same time. The Last Visit Only field defaults to Y, which does not allow you to access the Number of Vehicle Visits field. If you want to use the Number of Vehicle Visits field, you have to type N in the Last Visit Only field. |
Use Accelerated Reminders
Type Y or N to indicate whether you want to target those vehicles that are driven more than the standard 1000 miles a month. LubeSoft looks at the driving history of a car and calculates the average daily mileage. It can then calculate the number of miles that have been driven since the last visit, and if this is greater than the mileage entered in the Service Interval (Miles) field, it prints a postcard. See the definition later in this section for the Minimum Interval Between Cards field for limits on number of postcards printed. (Required)
| Example: | Sam Sneed is a traveling salesman. When Sam comes in for his three month service, on the average he has already driven 6000 miles. The system evaluates his mileage from his past services and determines that he should be reminded to have his oil changed more often instead of every 90 days. The accelerated reminders feature makes sure Sam remembers to have his oil changed after every 3000 miles. |
Customers with Email Address Only?
Type Y or N to indicate whether you want to sort by customers who have an email address or not. (Defaults to N)
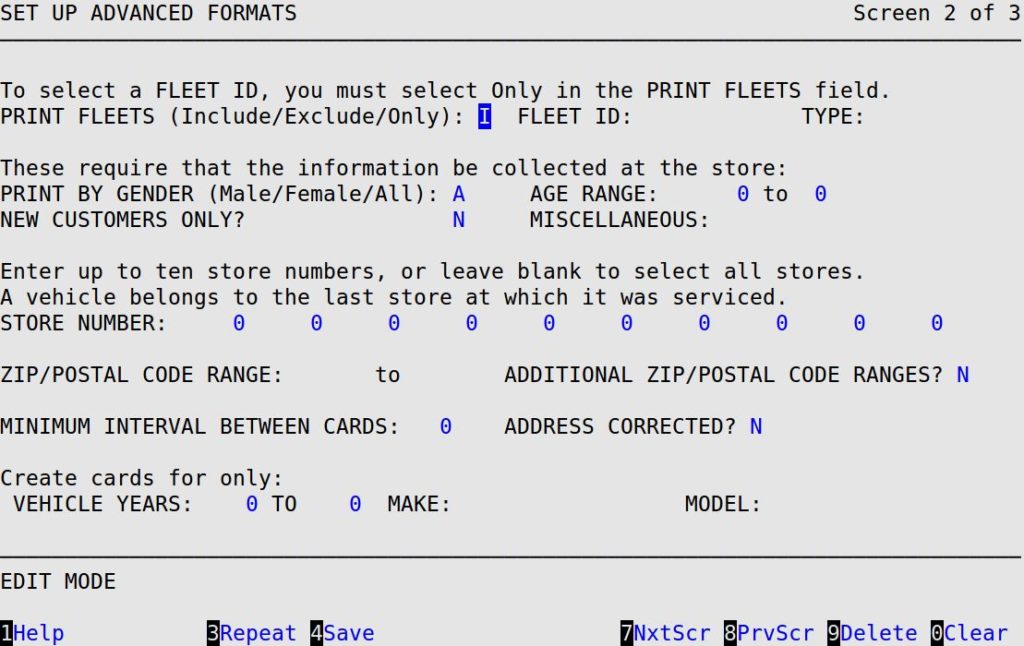
| Note: | If you press [F7] to move to the next screen, your changes will not be lost. However, you must press [F4] to save your changes before you press [Esc] [Esc]. Saving changes on one screen in a set of screens automatically saves changes to all screens in the set. A set of screens has the words Screen – of – in the upper right corner (see above). |
Print Fleets
Type I, E, or O to indicate whether you want to include, exclude, or print only fleets in your mailing. (Defaults to I)
Fleet ID and Type
If you want to print postcards for one specific fleet, type the 10-character fleet ID and the 1-character fleet type (L/C/N) in these fields. You can only access these fields if you type an O in the Print Fleets field.
| Note: | If you are not sure of the fleet IDs you want to include, press [F1] to access a list of all available fleets IDs. |
Print by Gender
Type M, F, or A to print postcards for male customers, female customers, or all customers. This field is only of value if this information has been collected during the invoicing process and must be turned on in the Marketing Controls. (Defaults to A)
Age Range
Fill in the customer age range that you want to include in this mailing. This field is only of value if this information has been collected during the invoicing process and must be turned on in the Marketing Controls.
New Customers Only
Type Y or N to indicate whether you want to print postcards for new customers. This is based on a flag in the vehicle record. This field is only of value if this information has been collected during the invoicing process and must be turned on in the Marketing Controls. (Defaults to N)
Miscellaneous
Fill in one of the miscellaneous values that is being collected at the sites. This field is only of value if this information has been collected during the invoicing process and must be turned on in the Marketing Controls.
Store Number
If you want to print postcards using data from only one store, type the number of the store in this field. If you want to print postcards using data from all of your stores, leave this field blank. This is used by central offices. The Store Number field has been expanded so you can specify up to 10 stores for which to print postcards. This gives you greater flexibility when printing postcards. When you set up or edit a postcard, enter the numbers of up to 10 stores in the available Store Number fields. As in the past, leaving this field blank causes the postcard to print for all customers in your customer database.
| Note: | If you are not sure of the codes you want to include, press [F1] to access a list of all available store numbers. |
ZIP/Postal Code Range
Fill in the two fields that allow you to select postcards within a ZIP/postal code range to print. If you need multiple ranges (for example, 21701-21702 and 21769-21772) each time, you must use the advanced postcard format. Leave blank to print for all ZIP/postal codes, which is not recommended.
| Note: | If you are not sure of the codes you want to include, press [F1] to access a list of all available ZIP/postal codes. |
Additional ZIP/Postal Code Ranges
Type Y and press [Enter] in this field to receive the following popup.
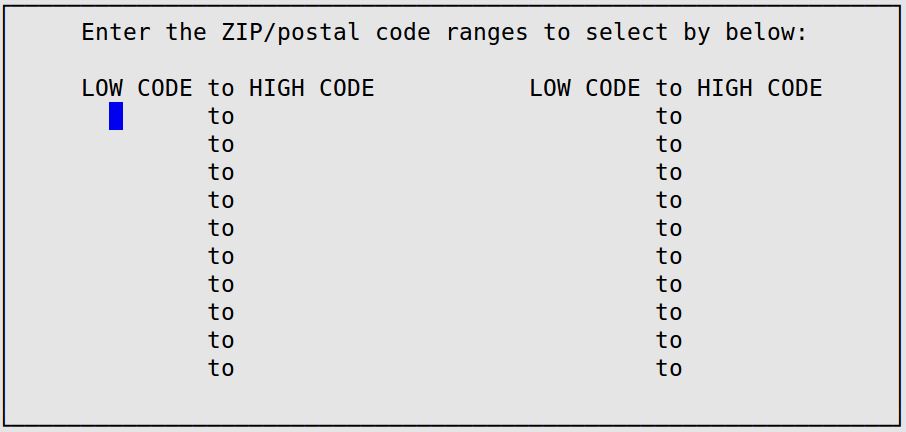
This popup allows you to specify up to 20 postal ranges as part of the selection process for printing postcards.
Fill in the Zip/postal code ranges you want to add. To return to the Set Up Advanced Formats screen, press [Enter] [Enter]. To save your changes, press [F4].
Minimum Interval Between Cards
Type a 1- to 3-digit number for the days between postcards sent to the customers. If you type 30, a customer does not receive a postcard more than once every 30 days. Leave blank to allow unlimited attempts.
Address Corrected?
This field is only for those customers who use PostalSoft address correction software. If you use PostalSoft and you only want customers whose addresses have been validated, type Y. If you do not have PostalSoft, type N in this field.
The next three fields, Years, Make, and Model, allow you to target specific vehicles for your postcard mailing.
Years
Type the year or range of years of the vehicles you want to include in your mailing. For example, if you want to mail to all 1993-1995 cars, you would type 93 in the first field and 95 in the second. If you only want to mail to 1995 cars, you would type 95 in the first field and 95 in the second. When you press [Enter] from this field, you automatically access the list of vehicle makes.
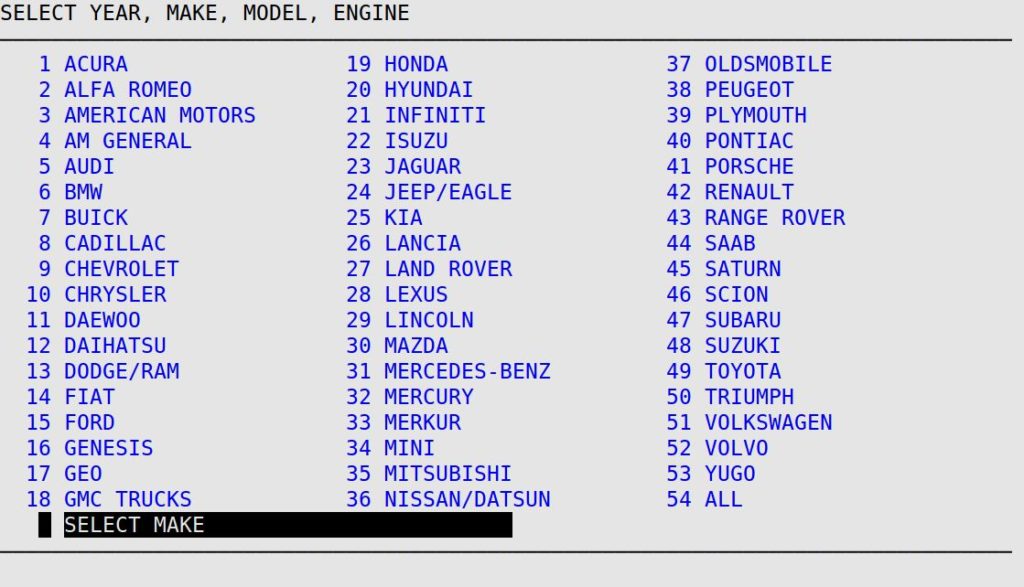
Make
To enter a vehicle make in this field, you select from a list of makes (shown below). You have two options in this field. You can select a specific make, such as Volkswagen, or you can select all makes. If you want to select all makes, type 54 at the Select Make prompt. When you press [Enter] in this field, you automatically access the list of vehicle models.
Model
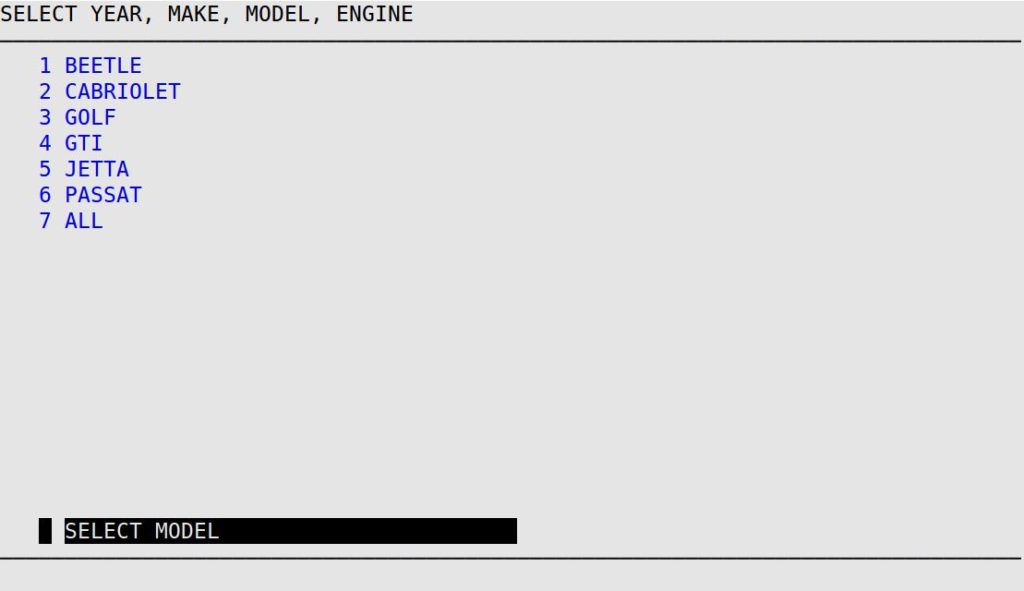
To enter a vehicle model in this field, you select from a list of models. An example for 1998 Volkswagens is shown below. You have two options in this field. You can select a specific model, such as Jetta, or you can select all models. If you want to select all models, type the number next to the word “All” (7 in the example below) at the Select Model prompt.
Number of Lines Per Card
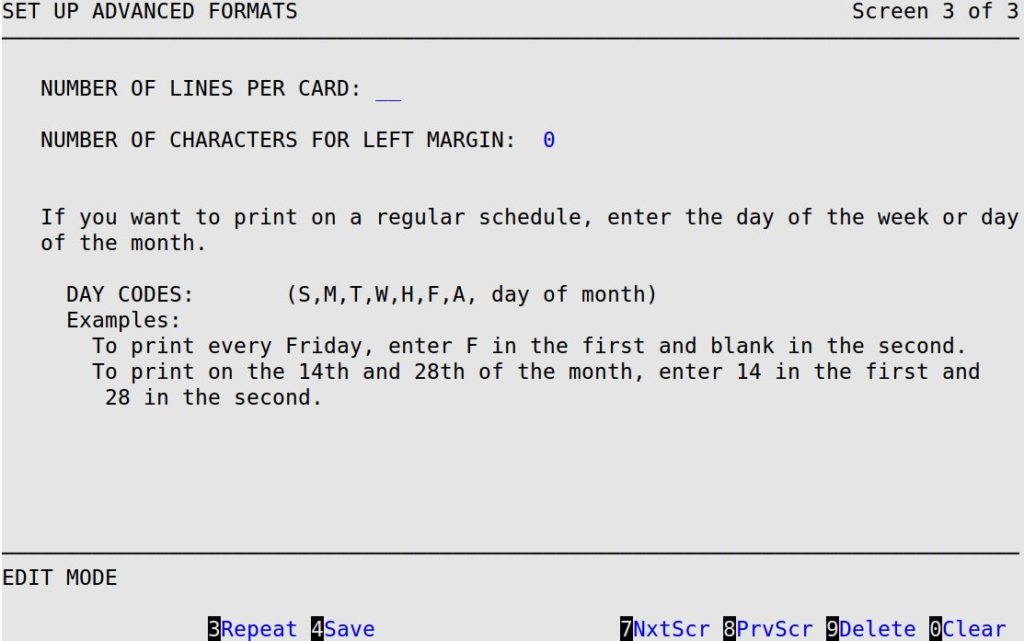
Type the 2-digit number of lines that will print on the postcard. Usually there are six lines per inch, so a four inch postcard would have 24 lines. (Required)
Number of Characters For Left Margin
Type 10 (which represents 10 characters) in this field to start printing one inch from the left. Ten characters correspond to the 10 pitch option on the front of your Okidata printer. (Defaults to 0)
Day Codes
Either type a 1-character code to select printing on a weekly basis, or a 2-digit day of the month to select printing on a monthly or semi-monthly basis. If you select one of these methods, the employee who opens the store is reminded that postcards are due to be printed today. If the postcards are not printed during the day, another reminder is displayed during closing. These postcards can be printed using the Automatic Printing option.
Codes:
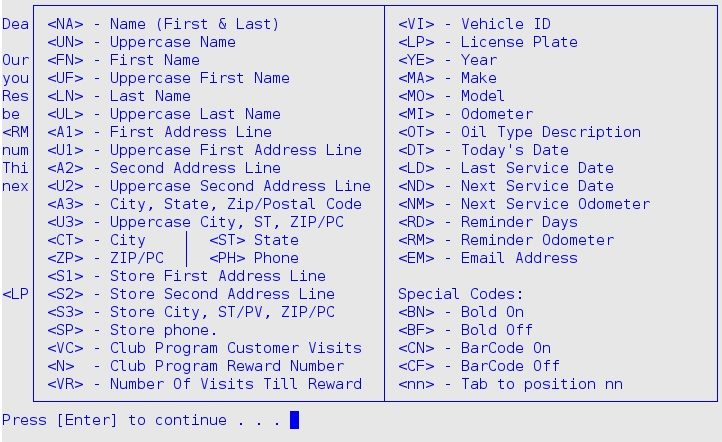
| Note: | To access this list in your Marketing module, press [F1] from the postcard entry screen.
For additional information about these codes, see the Setting Up Postcard Contents – Basic article. |
The following suggestions apply only to advanced marketing selections. Although it is not always possible to follow these, you should use them when possible to reduce the time necessary for processing a marketing printout.