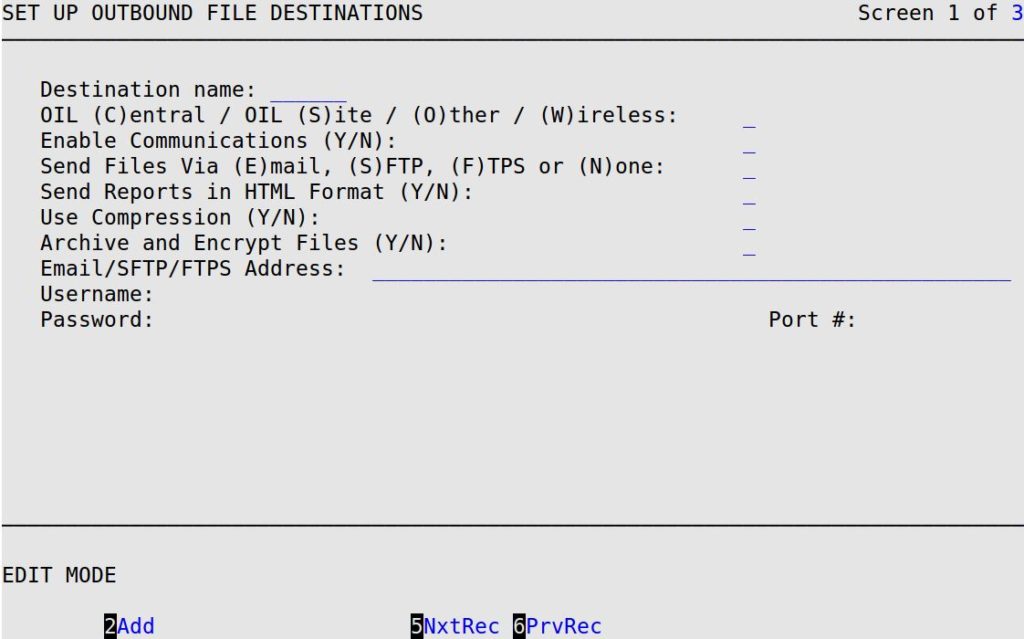
| Note: | You can also reach this screen by going to Set Up Internet Communications (Outside Communications Menu-4) and pressing Y in the Set Up Outbound File Destinations field. |

Destination name
Type a 1- to 6-character name for the connection. Each destination name must be unique so that each recipient can receive different reports and files.
OIL (C)entral / OIL (S)ite / (O)ther / (W)ireless
Select the type of destination to which the files will be sent.
Codes:
| Notes: | If you type an S in this field, you receive the informational message A Site destination will be able to automatically process only vehicle files. All other files and reports will need to be managed manually at the destination. (For example, data sharing.) The cursor will automatically move to the Enable Communications field so you can continue.
If you type an O in this field, you receive the informational message A non Central / Site destination will be unable to automatically process any files. All files and reports will need to be managed manually at the destination. (For example, data sharing.) The cursor will automatically move to the Enable Communications field so you can continue. |
Enable Communications
Type Y to send the selected reports and files during the store closing to the location shown in the Destination name field. Typing N will not prevent you from receiving email from this location if you have other email destinations set to Y. If all destinations are set to N, then communications will not be turned on at all.
Send Files Via (E)mail, (S)FTP, (F)TPS or (N)one
Select the method you want to use to send information.
Codes:
Send Reports in HTML Format
Type Y to send the reports in an HTML format for easy readability by Internet browser programs. This option is intended to make it easier for users to view reports that have been mailed to a computer that does not have ISI software on it (such as a home computer).
| Note: | In order to view non-HTML files on a computer that does not have ISI software on it, you will need ISI’s E-View product, which allows you to open, view, and save encrypted reports data. For a copy of this software, call ISI Sales at 1-800-922-3099. |
Use Compression
Type Y to compress your nightly files prior to sending them from the site to central. Using file compression improves file transfer success at stores using YAM, where phone line problems may interfere with successful transfer of numerous small files. (Default is N.)
| Note: | You can only use compression if you use YAM communications. Use Compression must also be set to Y for your store at central. |
Email/SFTP/FTPS Address
If sending files via email, type the email address where you want to send the files. The address must pass a standard email address validation before it will be accepted by the system. The email address must be in the format username@domain.tld. If the email address does not meet this standard, an error message will be displayed and you will be prompted to fix the problem before proceeding. Email validation errors that may appear are explained below.
| If you see the following message: | Then the email address… | ||
|---|---|---|---|
| Invalid email: @ symbol required | is missing the “at” symbol (@). A valid email address must contain an @ symbol. | ||
| Invalid email: cannot begin with @ symbol | starts with an @ symbol. The @ symbol cannot be the first character. | ||
| Invalid email: cannot end with @ symbol | ends with an @ symbol. The @ symbol cannot be the last character. | ||
| Invalid email: consecutive periods(.) not allowed | has two periods (.) in a row. Remove one or more of the periods. | ||
| Invalid email: <invalid character(s)> not allowed in user name | has an invalid character in the user name portion (prior to the @ symbol). The user name may only contain letters (A-Z and a-z), numbers (0-9), pluses (+), dashes (-), periods (.), and underscores (_). | ||
| Invalid email: domain must contain a period(.) | does not have a period in the domain name (after the @ symbol). | ||
| Invalid email: cannot end with a period(.) | ends with a period. The last character cannot be a period. | ||
| Invalid email: period(.) immediately following @ symbol | has an @ symbol followed by a period. There must be one or more characters between the @ symbol and the period in the domain name. | ||
| Invalid email: <invalid character(s)> not allowed in domain name | has an invalid character in the domain name. The domain name may only contain letters (A-Z and a-z), numbers (0-9), dashes (-), periods (.), and “at” symbols (@). | ||
| Invalid email: <tld> invalid per .emailcheck file. | has an invalid top-level domain (TLD). This is also known as the suffix or extension. It is the last part of the email address, after the period. The email address TLD must be listed in the .emailcheck file (if the file exists).
|
||
| Invalid email: at least two characters required in domain suffix. | has only one character for the TLD (the last portion of the email address; after the period). A valid TLD must have at least two characters. This check only occurs if there is no .emailcheck file. |
If sending files via SFTP or FTPS, type the central IP address or the site IP address to which you want to send the files. This address must be static and reachable from the Internet via the SSH protocol. For example, it can be the IP address (format ###.###.###.###) of the server or computer being connected to.
| Note: | Changes made on this screen will not affect the information on the Set Up Closing Processes (1-6-3) screen. Although both screens contain the same fields, you can enter different information on each one. Set Up Closing Processes affect the reports printed at your site, while Set Up Outbound File Destinations affect the report information you want to send out. |


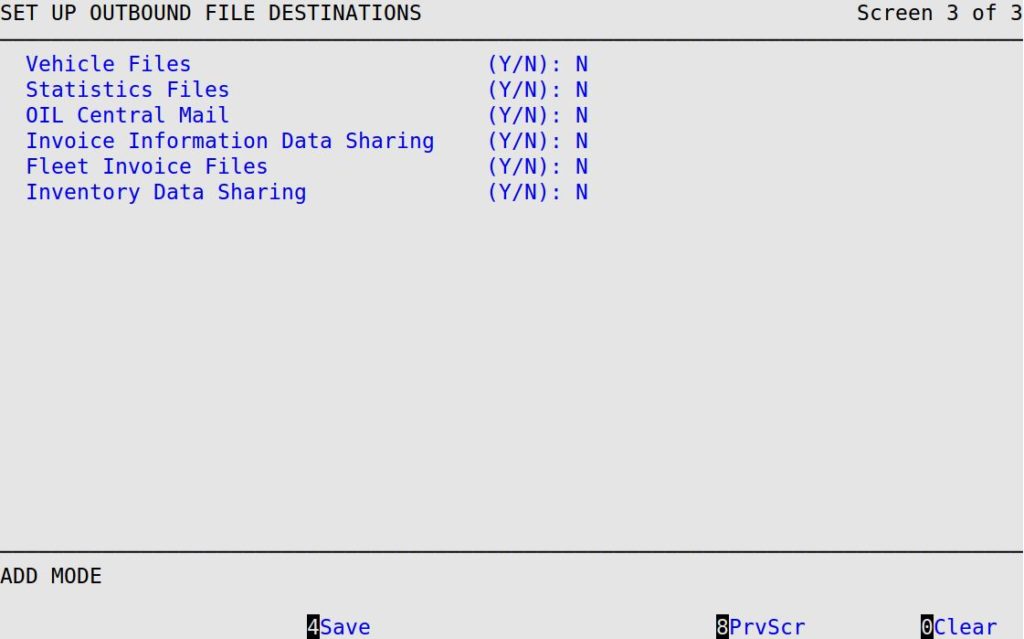
| Note: | The information that appears on this screen will depend on how you complete certain setups. However, the Fleet Invoice Files field will always appear on this screen. |
| Note: | Files will only be created if there is relevant activity. For example, if Invoice Data Sharing Files is enabled but the store does not perform a money pull, the individual money pull transaction (j) file is not created at end of day. |
Vehicle Files
These are the vehicle sharing files generated by the POS system for vehicle sharing between LubeSoft® sites. If this option is not displayed, go to the Set Up Communication Controls (3-2) screen and type D, W, or M in the How often field for Vehicle.
Statistics Files
These are the statistics files generated by the POS system for the O.I.L. central Consolidated Statistics Report. If this option is not displayed, go to the Set Up Communication Controls (3-2) screen and type D, W, or M in the How often field for Statistics.
OIL Central Mail
These are the mail files generated by the POS system during End of Day processing for the O.I.L. central. These files are in ISI O.I.L. report format. If this option is not displayed, go to the Set Up Communication Controls (3-2) screen and type D, W, or M in the How often field for Mail.
Accounting Files
These are the accounting files generated by the POS system during End of Day processing in whatever output format has been chosen in the Center Control File. This option only appears if you have an accounting system specified in the Type of Accounting System field in the Center Control File (1-6-1-1). For files to be created, Accounting must also be activated on the Set Up Accounting Options (1-6-1-7) screen.
Invoice Data Sharing Files
These files are collected from your daily Invoicing files. Type Y to create and send the invoice information (b), invoice detail information (c), extra invoice information (d), invoice coupon/discount information (e), daily revenue reconciliation activities (i), individual money pull transactions (j), individual paid ins and outs (k), invoice margin information (w), and/or checkpoints on invoice (x) sharing files during store closing. If this option is not displayed, follow the instructions for setting up data sharing and flag Invoice Information Y.
| Note: | The daily revenue reconciliation activities (i) sharing file is only created if Revenue Reconciliation Information is flagged Y in the data sharing setups. |
Statistics Data Sharing Files
These files are collected from your daily Statistics files. Type Y to create and send the statistics information (f) sharing file during store closing. If this option is not displayed, follow the instructions for setting up data sharing and flag Statistics Information Y.
Employee Timesheet Data Sharing Files
These files are collected from your Employee files. Type Y to create and send the employee timesheet (g) and/or the employee timesheet audit (h) sharing files during the store closing. If this option is not displayed, follow the instructions for setting up data sharing and flag Employee Timesheet Information Y.
Fleet Invoice Files
These files are collected from your daily Fleet Invoice files. Type Y to create the fleet invoices (1) information file. This option always appears on this screen.
Inventory Data Sharing
Type Y to create and send the inventory setup (m) and/or inventory history (n) sharing files during the store closing. If this option is not displayed, follow the instructions for setting up data sharing and flag Inventory Information Y.
Fleet Setup Data Sharing
Type Y to create and send the fleet setup (t) sharing file during the store closing. If this option is not displayed, follow the instructions for setting up data sharing and flag Fleet Setup Information Y.
Purchase Order Data Sharing
Type Y to create and send the purchase order (o) and purchase order detail (p) information sharing files during the store closing. If this option is not displayed, follow the instructions for setting up data sharing and flag Purchase Order Information Y.
Category Data Sharing
Type Y to create and send the calendar setup (r) information sharing file during the store closing. If this option is not displayed, follow the instructions for setting up data sharing and flag Category Information Y.
Employee Setup Data Sharing
Type Y to create and send the employee setup (s) sharing file during the store closing. If this option is not displayed, follow the instructions for setting up data sharing and flag Employee Setup Information Y.
Coupon/Discount Data Sharing
Type Y to create and send the coupon/discount setup (q) information sharing file during the store closing. If this option is not displayed, follow the instructions for setting up data sharing and flag Coupon/Discount Setup Information Y.
Calendar Data Sharing
Type Y to create and send the calendar setup (r) information sharing file during the store closing. If this option is not displayed, follow the instructions for setting up data sharing and flag Calendar Information Y.
GSR Usage/Status Data Sharing
Type Y to create and send the gsr usage (u) and gsr status (v) information sharing files during the store closing. If this option is not displayed, follow the instructions for setting up data sharing and flag GSR Status/Usage Information Y.
Checkpoint Data Sharing
Type Y to create and send the checkpoint setup (y) information sharing file during the store closing. If this option is not displayed, follow the instructions for setting up data sharing and flag Checkpoint Set Information Y.
Shopping Cart Data Sharing
Type Y to create and send the shopping cart (z) and shopping cart credit (1) information sharing files during the store closing. If this option is not displayed, follow the instructions for setting up data sharing and flag Shopping Cart Information Y.
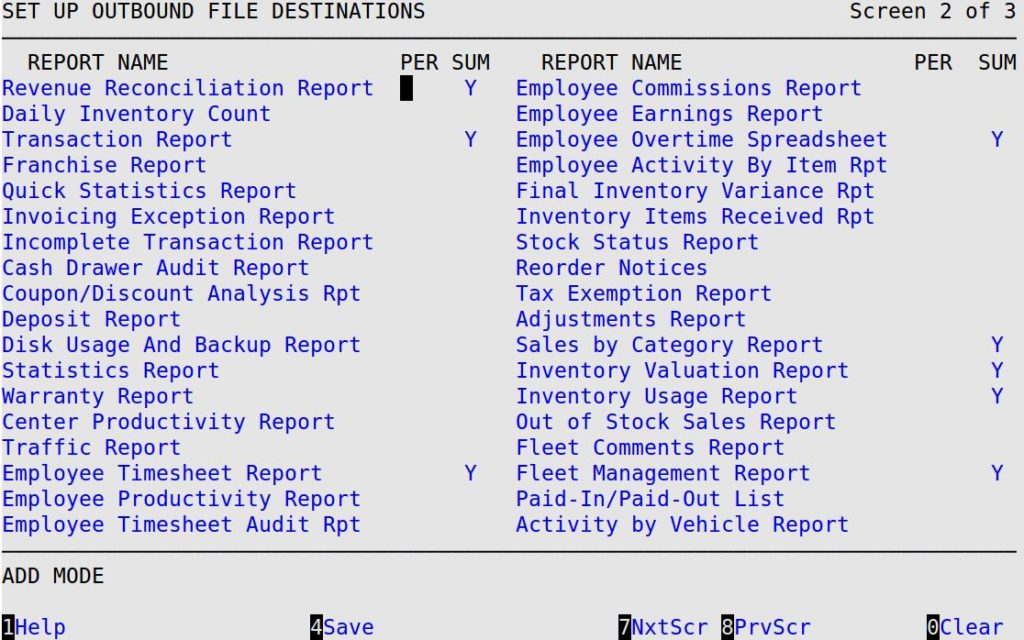
Setting Up O.I.L. Reports
You must specify the reports you want to transmit during connections between your store and the central office. To keep from filling up your hard disk drive, only mark the reports you need.
Use the following steps to set up the reports you want to transmit from your store to the O.I.L. central office:
