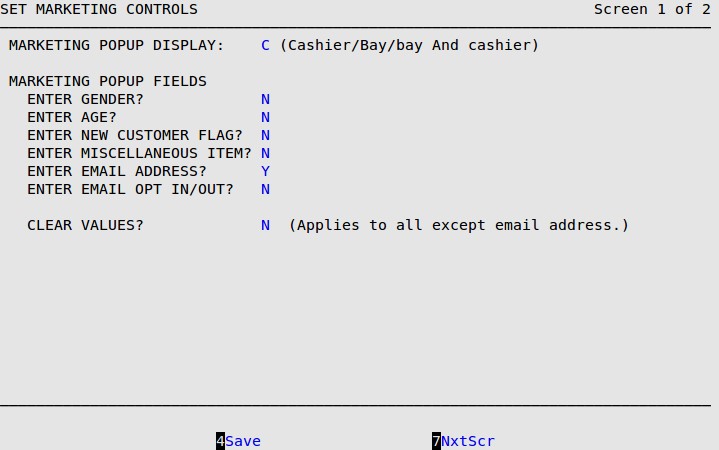
The information gathered on these screens is used to set up the Marketing Control File, which defines the daily operation of the Marketing module as well as information collection in invoicing. The Marketing Popup Field customer entries (gender, age, new customer, miscellaneous, email address, and opt in/out) can also be edited in Maintain Vehicle History, regardless of the marketing settings.
Use the following steps to set up your Marketing controls:

Marketing Popup Display
Type C to display the Marketing PopUp screen while using the Cashiering Station, after entering tender. (Defaults to C)
Type B to display the Marketing PopUp screen while using the Bay Invoicing and Greeter Stations, after the Electronic Service Manual (ESM) screen.
Type A to display the Marketing PopUp at both the Cashier and Bay Invoicing/Greeter Stations. The Clear Values setting must be N; saved information will be repopulated for returning customers.
| Note: | If all the Marketing Popup Fields are set to N, the Marketing Popup Display value is ignored and the popup will not appear during invoicing. |
Enter Gender
Type Y if you want the Marketing PopUp to include a prompt to enter the customer’s gender (Male or Female). If you do not want to require the cashier to capture this information during invoicing, type an N in this field. (Defaults to N)
Enter Age
Type Y if you want the Marketing PopUp to include a prompt to enter the customer’s age (16 to 99). If you do not want to require the cashier to capture this information during invoicing, type an N in this field. (Defaults to N)
Enter New Customer Flag
Type Y if you want the Marketing PopUp to include a prompt to enter whether the customer has been to your business before. If you do not want to require the cashier to capture this information during invoicing, type an N in this field. (Defaults to N)
Enter Miscellaneous Item
Type Y if you want the Marketing PopUp to include a Miscellaneous entry field. (Defaults to N)
Enter Email Address
Type Y if you want the Marketing PopUp to include a prompt to enter the customer’s email address. (Defaults to N)
Enter Email Opt In/Out
Type Y if you want the Marketing PopUp to include a prompt to opt the customer in to receive emails from you or third-party marketing companies. If you do not want to require the cashier to capture this information during invoicing, type an N in this field. This setting is exported along with the customer data in the Invoice Information (b) share file and some third-party marketing exports. (Defaults to N)
Clear Values
Type Y to clear the values and not pre-populate the Marketing PopUp with saved information for the customer. If you do not want to save the entries for the customer, type a Y in this field. (Defaults to N)
| Note: | If Marketing Popup Display is set to A, the system does not allow Clear Values to be set to Y. This is to prevent values entered in the popup at Bay Invoicing from being cleared when the popup appeared again in Cashier. |

| Note: | If you press [F7] to move to the next screen, your changes will not be lost. However, you must press [F4] to save your changes before you press [Esc] [Esc]. Saving changes on one screen in a set of screens automatically saves changes to all screens in the set. A set of screens has the words Screen – of – in the upper right corner (see above). |
Default Service Interval
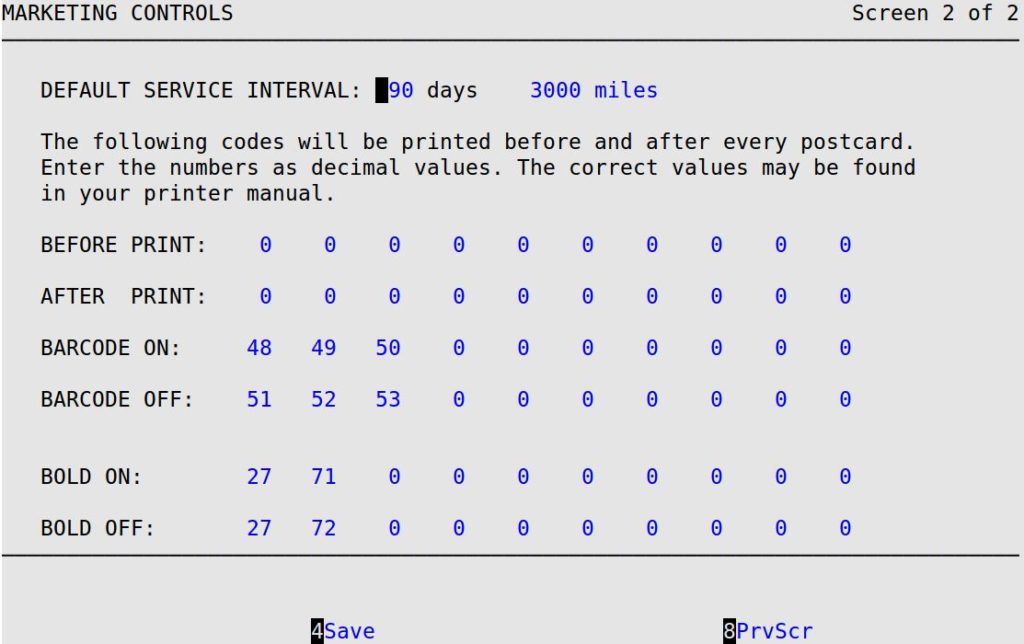
Fill in the 3-digit number of days (for example, 90 for Full Services) and the 4-digit number of miles (for example, 3000 for Full Services) that your store suggests for the time interval between services. The service interval information entered here is used as default information on the Set Up Postcard Contents screen.
Before Print and After Print
Enter the codes you want to send to your printer before and after the printing starts. Check your printer manual for the codes for your printer. If you are using an Okidata or other printer running the IBM Proprinter printer emulation, the chart below lists the printer codes you can use. If you have an Okidata 182 or 184, these fields are usually left blank.
Leave this field blank to use the default printer codes found on the Set Up Printer Controls (System Set Up Menu-1).
| To Print | Use These Codes | To Print | Use These Codes |
|---|---|---|---|
| 10 characters per inch | 18 | 6 lines per inch | 27 65 12 27 50 |
| 12 characters per inch | 27 58 | Utility print | 27 73 1 |
| 17 characters per inch | 15 | Near letter quality print | 27 73 3 |
| 8 lines per inch | 27 48 |
Barcode On
Enter the codes you want to send to your printer when the <CN> code is encountered. Check your printer manual for the codes for your printer.
Barcode Off
Enter the codes you want to send to your printer when the <CF> code is encountered. Check your printer manual for the codes for your printer.
 |
Printing barcodes is only available on printers that support this feature. If you print barcodes on a printer that does not support the barcode technology, you will have “garbage” on your postcards. We recommend the Okidata 590, which provides the ability to print postal bar codes. |
Bold On
Enter the codes you want to send to your printer when the <BN> code is encountered. Check your printer manual for the codes for your printer.
Bold Off
Enter the codes you want to send to your printer when the <BF> code is encountered. Check your printer manual for the codes for your printer.