You can set up charge accounts for charge or cash customers who have fleet accounts in the Set Up Charge Customers (1-4-2) menu option. Charge customers can decide to charge the services or pay for them by cash, check, or credit card. Multiple vehicles may be assigned to a single charge account ID.
Before you begin entering customer records, you should establish a customer identification format that is appropriate for your company. One way is to compile a list of your customers and then use the first two or three letters of the customer name followed by a three-digit number.
The letters make it easy to remember the approximate alphabetical position of a particular customer in the file, and the three digits can retain the alphabetical order of the customer name with respect to other customer names that begin with the same letters.
For example, a list of customers might include Robert Construction, Romana Interiors, and Roth Packaging. If you assigned customer numbers RO100 for Robert Construction, RO150 for Romana Interiors and RO200 for Roth Packaging, it would be easy to remember that these customer records are located in the RO section of the Charge Customers File, and the three-digit number would maintain the alphabetical order of the customers within that section. Notice the gaps left between the numbers to allow for the addition of new customers in the future.
If you prefer to use more complete names such as Robert and Roth instead of RO200, you can use all letters for the customer name. However, this approach could make it more difficult to retain a strict alphabetical listing as new customers are added to the file.
| Note: | You may also change the customer ID of an existing fleet from this menu option, if needed by using the [F5] ChngID hotkey.
You may delete an existing fleet with the [F9] Delete hotkey. |
Use the following steps to add or edit a charge (fleet) customer record:
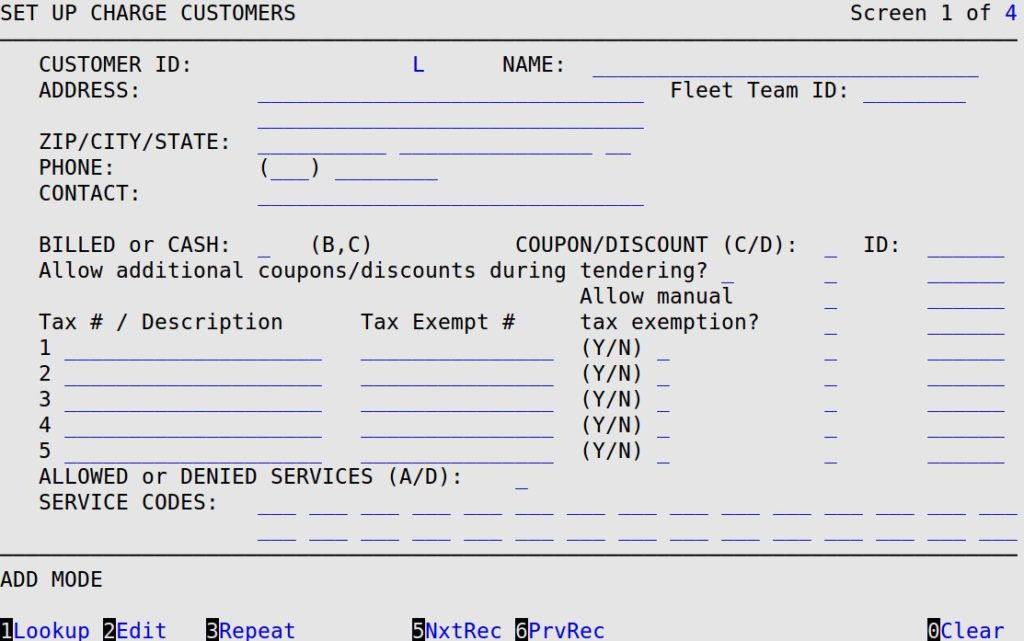
Customer ID
Type the 1- to 9-character charge customer identification code.
| Note: | If you do not know the customer ID for an existing charge customer, press [F1] from the Customer ID field to receive the Fleet Lookup. Enter the last name of the fleet customer and then arrow down to select the record you want. Press [Enter] to fill in the Customer ID and Type fields automatically. |
After the Customer ID field, fill in whether the charge customer is a local or national fleet. Type L for local fleets or N for national fleets. The ability to assign a national fleet type was designed for users with multiple stores who manage national fleets at a central office. Unless your store has national fleets, you should keep all fleet types as local. (Defaults to L)
Name
Fill in a 1- to 30-character customer name. This is usually the business name.
| Note: | If you are editing an existing fleet, you may change the customer ID or delete the fleet entirely once the cursor is in the Name field or beyond. Use [F5] to change the ID or [F9] to delete the fleet. These actions can not be undone! |
Fleet Team ID
For stores using the Fleet Team integration, enter the Fleet Team ID in this field.
Address
Enter the customer’s street address in these two 30-character lines.
ZIP/City/State
Enter the customer’s ZIP/postal code, city, and state/province in these three fields.
Phone
Enter the customer’s area code and telephone number in this 10-digit field.
Contact
Type the 1- to 30-character name of the individual to contact when you do business with this customer.
Billed or Cash
Type B if the charge customer is to be billed on an account for the service or C if the charge customer must pay cash at the time of service.
Allow additional coupons/discounts during tendering?
Type Y or N to indicate whether the charge customer is allowed to use additional coupons or discounts during invoicing.
Coupon/Discount (C/D)
Type C (coupon) for a fixed dollar amount fleet discount or D (discount) for a percentage amount fleet discount.
| Note: | When you are setting up a charge customer and you want to attach a coupon or discount to that fleet, you can press [F1] from the ID field to receive a popup. You can select a coupon or discount from this popup that has already been set up. For example, if you have entered a C in the Coupon/Discount field, the popup only contains a list of the valid coupons (that do not contain an expiration date) for fleets. Similarly, if you entered a D in the Coupon/Discount field, the popup only contains a list of the valid discounts for fleets.
You can attach a coupon or discount that is not yet effective to a charge customer. If you do, the coupon or discount will not appear during Invoicing because the coupon or discount is not yet valid. We allow you to do this so that they can set up a fleet to start on a certain date and have the coupon automatically applied. Under normal circumstances you would not want to do this. You cannot have duplicate coupons or discounts set up for the same fleet. You can have a maximum number of 6 coupons and 3 discounts. The system will alert you if you exceed these numbers. |
ID
Enter an ID of a valid coupon or discount that has not expired. For example, if you enter a C in the Coupon/Discount field and a 100 in this field, the system assigns the coupon with the ID 100. If you enter a D in the Coupon/Discount field, the system assigns the discount with the ID 100. Press [F1] to pull up a list of valid codes. You set up these coupons and discounts on the Set Up Coupons/Discounts (1-6-2-2) screen. See the Setting Up Fleet Coupons/Discounts article for more information.
Tax Exempt #
Fill in the tax exemption numbers for up to five different tax types. Each field corresponds to the respective tax type that is set up on screen 2 of the Center Control File (see the article Setting Up the Center Control File). You must either press [Enter] or [↑] or [↓] through the tax fields to move to the next column.
Allow manual tax exemption?
Enter a Y to allow the cashier to enter a one-time tax exempt number for this tax for the customer at cashout. The tax exempt number will not be attached to the vehicle or the fleet. This option can only be accessed at ring-out if the fleet does not already have a tax exempt number for the same tax.
Allowed or Denied Services (A/D)
Type A (allowed) or D (denied) to indicate whether the services specified in Service Codes are allowed or denied.
| Note: | During invoicing, if a vehicle is already attached to a fleet with allowed or denied services, then as soon as an item has been entered on the line of the invoice, the service codes will be checked. If it is denied (D), or if allowed services (A) have been specified and the item is not allowed, a message will show at the bottom of the screen. You will not be able to continue past that line on the invoice without either changing the fleet requirements or removing the service.
If a fleet is not attached to an invoice until the Cashier station, then the service codes will be checked when the invoice is cashed out. If a billed fleet is paying by some tender other than charge, a warning will appear, but the invoice can still be cashed out if it does not meet requirements. However, if it is a cash fleet, or if it is a billed fleet paying by charge, the invoice will not be able to be cashed out until the service requirements are met. |
Service Codes
Enter up to two hundred 1- to 3-character valid service codes allowed or denied for this customer. A popup will appear after the first thirty service codes are entered where you will be able to continue entering service codes. To exit the popup screen, press [Esc] [Esc] or press [Enter] on a blank field.
During the invoicing process, the customer can only be sold the allowed services. These services are service codes such as FS, not categories or jobs. Leave these fields blank if all services are allowed for this customer.
If you have chosen (A) for Allowed Services above and want to enter a job as an allowed service, you must also enter the different components of the job that have service codes attached to them. For example, if your full service includes oil and an oil filter, you must include all three codes in the Service Codes field (for example, FS, OIL, and OF). All inventory items sold during invoicing must have service codes in order for them to be validated against the allowed services. See Setting Up Inventory Items for more information.
Charge ID
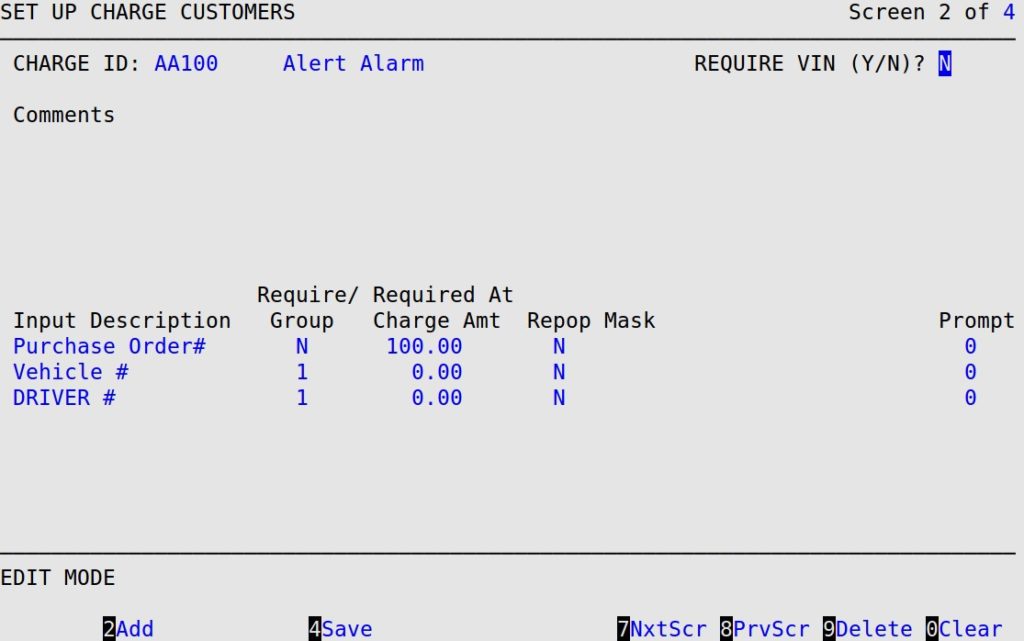
The system automatically displays the charge ID and name. (Display only)
Require VIN (Y/N)?
Type Y if you want to require a VIN in order to invoice a customer attached to this fleet. (The VIN must be entered and saved on the vehicle record via the VIN PopUp on the Bay Invoicing screen.)
| Note: | If you use ISI’s Accounts Receivable module and enter your VIN in the Input Descriptions field, you must continue to enter it in this field, even if you type Y in the new Require VIN (Y/N) field. If you remove the VIN from the Input Description field and use ISI’s A/R module, the VIN information will not print on customer statements. |
Comments
Fill in up to six 70-character lines of comments that apply to this customer and the drivers. These could be instructions to technicians, instructions to the cashier, or a list of prohibited services, for example. Comments are displayed during invoicing on the Fleet Requirements screen.
Input Descriptions
Fill in a 1- to 15-character description of required and optional parameters for the fleet customer at the time of service. For example, a customer may insist that her drivers have a purchase order. Other information that can be required or recommended (optional) is VIN number, client company name, etc.
Require/Group
Type Y to indicate the input is a required entry for this fleet customer. This information is only required at the Cashier’s Station when cashing out a billed or cash fleet customer. If required items are not entered, you cannot cash out the invoice.
Type N if the information is preferred, but not required.
Type a number from 1 to 9 to identify the input item as part of a group of input items. A response must be entered for at least one of the input items before the work order can be cashed out.
| Note: | Any Input Descriptions (required items) that are entered when the charge customer is invoiced are transferred to the ISI A/R module (if you have it installed on your system) and printed on the customer’s statement. |
Required At Charge Amt
Enter the minimum invoice dollar amount where the input item response is required. Below this amount, the input response is optional.
Repop
Type Y if you want to repopulate the response with the same information the cashier entered during the customer’s last visit. Otherwise, type N.
Mask
Fill in up to nine (1- to 24-character) masks for the required information. Press [F1] to bring up the Help screen, which provides instructions for entering the mask correctly.
 |
If you set up a mask in this field for an item and the response entered during invoicing does not match the format set up here, you will not be able to cash out the invoice. |
Prompt
Enter a number from 0 to 4. Leave the field set to 0 if you do not use Merchant Partners integrated credit card processing. Values other than 0 are sent to the credit card processor during cash out for Merchant Partners integrated credit card processing. (The credit card processor type is set up in the Center Control File.) This is only applicable for WEX, Voyager, Fuelman, Fleet One, Visa Fleet, and Mastercard Fleet. (Defaults to 0)
Charge ID
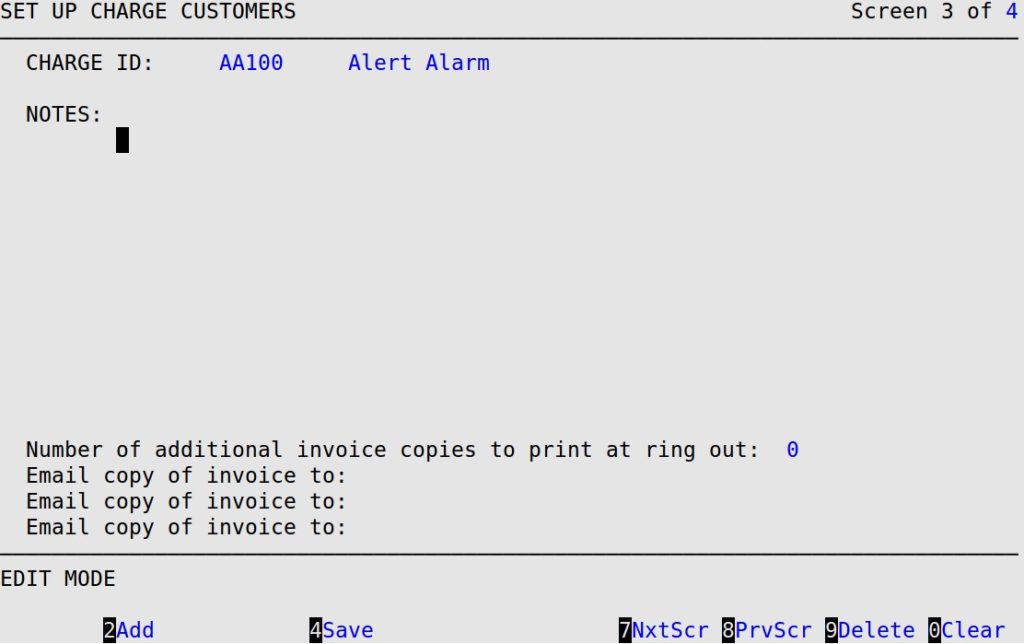
The system automatically displays the charge ID and name. (Display only)
Notes
Type up to ten lines of 50 characters of invoicing comments, such as instructions to the technicians. These appear as a pop-up during invoicing in the Fleet Requirements screen.
Number of Additional Invoice Copies
Type the number of additional invoice copies to print at ring out (0 to 9). For example, if the Center Control File is set to print 2 invoice copies and this field is set to 1, then 3 copies of the invoice will print at cash out for this fleet customer.
Email Copy of Invoice To
Enter up to 3 email addresses where you want to send invoices for this fleet. Invoice emailing must be enabled in Invoice Email Options for the system to be able to send emails.
Alternate Remit To Address
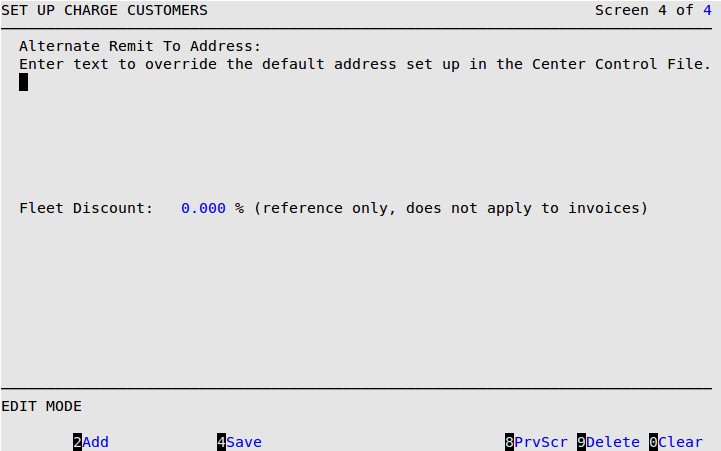
Type up to six lines of 40 characters each of the remit-to address to which this fleet should send payments. This information will print on invoices for this fleet. Leave blank to use the remit-to address set up on screen 7 of the Center Control File (1-6-1-1).
Fleet Discount
Type in an amount from 0.000 to 100.000%. This does not affect invoices or billing.
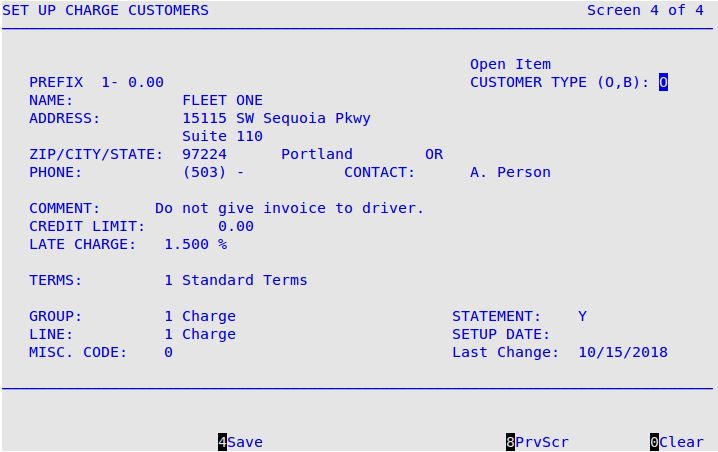
Prefix
The system automatically enters the prefix. It defaults to the numbers set up in A/R Control File. It can be manually overridden if desired.
Credit Limit
This field appears on the Accounts Receivable Activity screen, and allows you to establish a customer’s credit limit.
Late Charge
This field defaults to the value set up in Basic options (A/R Control File). It can be overridden here if desired. This late charge can be applied to each of the aging periods set up in the Basic options.
Terms
Enter the Terms Code selection for this customer that was set up in the A/R Set Up Payment Terms (Accounts Receivable Menu-4-6) screen. The Description fills in automatically; verify that this is the Terms Code selection you want.
Group
Enter the number of the group assigned in the A/R Account Groups screen. Charges (type 1) and payments (type 6) default automatically to these pre-filled numbers. The group description fills in automatically; verify that these are the selections you want.
Line
Enter the number of the line assigned in the A/R Account Groups screen. Charges (type 1) and payments (type 6) default automatically to these pre-filled numbers. The line description fills in automatically; verify that these are the selections you want.
Misc. Code
The Misc. (Miscellaneous) Code provides an additional way to generate reports and analyze information. You can assign up to two characters.
Statement
Enter Y or N to specify whether or not you want to print statements for this customer. (Defaults to Y)
Setup Date
The system automatically enters the Entry Date as set up on the Set Accounting Period screen. It can be manually overridden if desired.