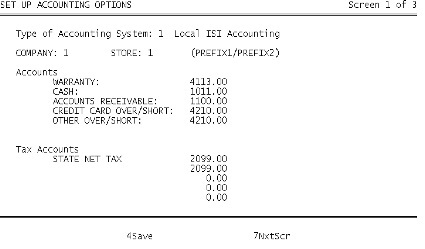
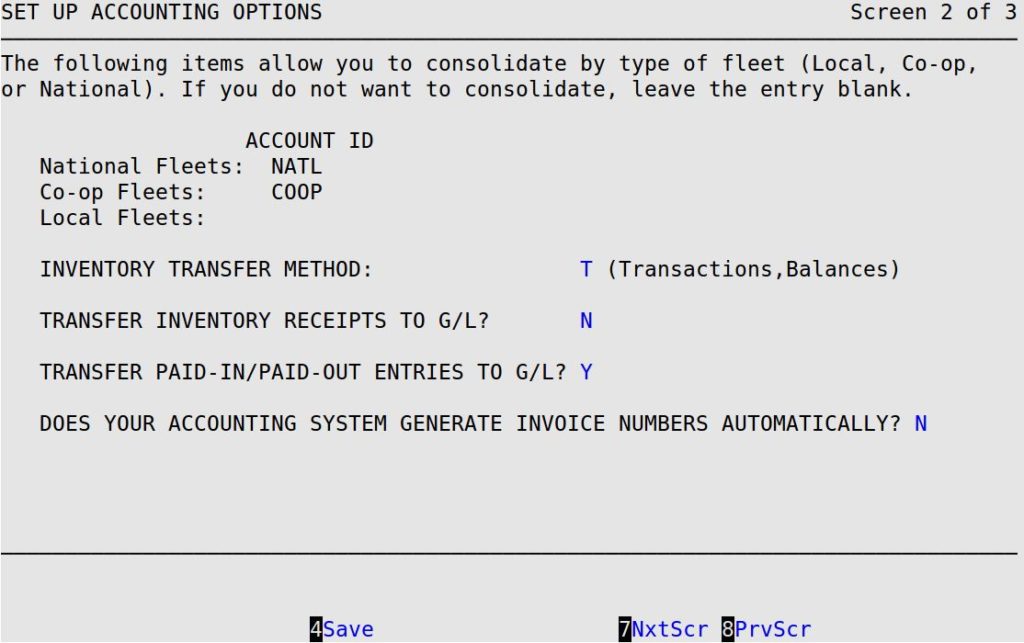
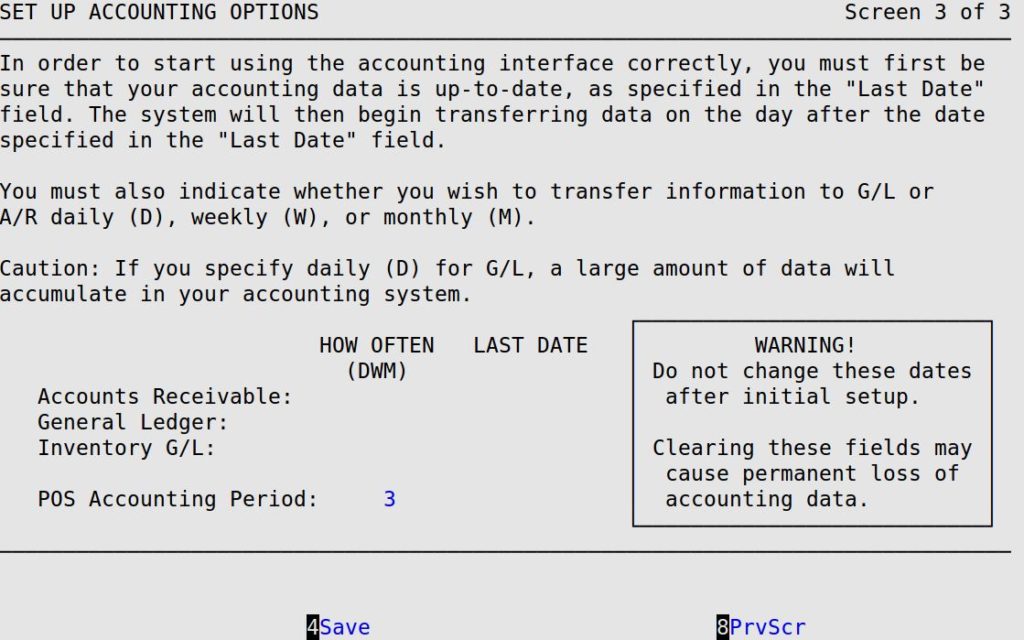
The Set Up Accounting Options screens contain important information specific to accounting. If your LubeSoft system does not electronically interface with a third party accounting system, you do not have to fill in these screens. These screens define the specific accounting system you use, and the account information for interfacing the POS functions with the other accounting system.
Use the following steps to set up your Accounting options:

| Note: | If you receive the message Accounting type must be selected, you must return to screen 1 of the Center Control File (1-6-1-1) and fill in the Type of Accounting System field. |
Company
This is the number you assign to the entire corporation. The company and store numbers are used throughout the system to identify the business and individual stores within the business. The availability of different store numbers allows for multi-site operations to be individually monitored within the overall operation.
| Note: | If you use Solomon, the Company field is used for the database code. |
Store
Type a 1- to 5-digit store number. If you are part of an O.I.L. Central Office network, you cannot have the same store number at two different sites. If you use either the Solomon or Mas90 interface, when you press [Enter] to move past this field, you receive one of the following boxes.


Accounts
Fill in account numbers for each of the five listed accounts. These account numbers must match the account numbers in Set Up General Ledger Accounts (1-6-1-4). See the Setting Up General Ledger Accounts article for more information. If you choose to change these account numbers, you must first change the corresponding account numbers in the Set Up General Ledger Accounts (1-6-1-4) option. If an account is not set up, an Invalid base account – chart of accounts message is printed. These accounts and suggested account numbers are listed below.
| 4113 | Warranty |
| 1011 | Cash Amount |
| 1100 | Accounts Receivable |
| 4210 | Credit Card Over/Short |
| 4210 | Other Over/Short (Includes cash, checks, gift certificates, traveler’s checks, paid-ins, paid-outs, and charges.) |
| 1105 | QuickBooks A/R Offset (for QuickBooks Pro users only) |
| 1016 | Credit Card Over/Short Offset (for QuickBooks Pro users only) |
| Note: | If all credit cards report to the same account, the credit card account can be used here. If all credit cards do not report to the same account, use a different account number. |
| Note: | If you use the QuickBooks Pro® Interface, you have two extra account fields to set up titled QuickBooks A/R Offset and Credit Card Over/Short Offset. For more information about the QuickBooks Pro Interface, see the QuickBooks articles. |
If you use QuickBooks, all accounts with the same number (cash account, sales, etc.) will be consolidated. To view them separately each item will need to have a different account number.
Tax Accounts
On screen 2 of the Center Control File, you set up the taxes that are used at your location. In this field, you need to fill in the account numbers to which you want these taxes reporting. These account numbers must match the account numbers in the Set Up General Ledger Accounts (1-6-1-5) option.

| Note: | If you press [F7] to move to the next screen, your changes will not be lost. You must press [F4] to save your changes before you press [Esc] [Esc]. Saving changes on one screen in a set of screens automatically saves changes to all screens in the set. A set of screens has the words Screen – of – in the upper right corner (see above). |
Account IDs
These fields are used to consolidate your national and local fleets by fleet type into a single user-specified account. (Co-op Fleets are not currently available.) This allows you to transmit your fleet data across the accounting interface. If you do not want to consolidate your fleets, leave the Fleets fields blank. If you want to consolidate your fleets, call ISI Customer Support for help.
| Note: | When you set up a fleet, you specify whether the fleet is local or national. You do this in the Customer ID field on the Set Up Charge Customers (1-4-2) screen. For more information, see the Setting Up Charge Customers article. |
Inventory Transfer Method
Indicate whether you want to transfer by transaction or balance. The Transaction Transfer Method sends all transactions to G/L. The Balances Transfer Method sends the final balance for the month multiplied by the cost to G/L. ISI suggests you use the Transaction Transfer Method because it is easier to track individual transactions. If you use ISI Accounts Receivable, this field does not apply to you.
Transfer Inventory Receipts to G/L
Transfer Paid-In/Paid-Out Entries to G/L
Type Y or N to indicate whether you want to transfer inventory receipts or paid-in and paid-out entries to General Ledger. If you selected B (balances) for the Inventory Transfer Method, the Transfer Inventory Receipts to G/L option is not available.
| Note: | The Transfer Inventory Receipts to G/L option does not apply if you are using the Solomon Btrieve Accounting System (option 4) or ISI Accounts Receivable. |
Does Your Accounting System Generate Invoice Numbers Automatically?
This field is only for those users who are set up with a Solomon Interface. Type Y or N to indicate whether your Solomon Accounting is set up to generate invoice numbers automatically.
| Note: | If you type Y in this field, no invoice number information is transferred in your A/R interface file. If you do not use the Solomon interface, make sure you have an N in this field. |

Accounts Receivable
Type a D, W or M to indicate that you want A/R interface information created on a daily, weekly or monthly basis (D is the most common entry in this field). The system starts transferring information the day after the date in the Last Date field. Do not change this date except during the initial setup.
General Ledger
Type a D, W or M to indicate that you want G/L interface information created on a daily, weekly or monthly basis. The system starts transferring information the day after the date in the Last Date field. Do not change this date except during the initial setup. This field is not available if you use ISI Accounts Receivable.
| Note: | The G/L information is transferred according to how you specify. But, the G/L inventory cost of goods information is only transferred once a month. |
Inventory G/L
Type a D, W or M to indicate that you want inventory G/L interface information created on a daily, weekly or monthly basis. The system starts transferring information the day after the date in the Last Date field. Do not change this date except during the initial setup. This field is not available if you use ISI Accounts Receivable.
| Note: | This field is not available to you if you use the Solomon Accounting software package, which is set to automatically transfer on a monthly basis. |
POS Accounting Period
Type the number of the current accounting period in your POS system. This number should match the current month of your fiscal year. For example, if it is July and you are on a January to December fiscal year, your accounting period would be 7.
| Note: | If you have invalid account numbers in your system and you are trying to turn on the Accounts Receivable or General Ledger interface(s), the following popup will appear.
Type Y to print the Account List. Look for invalid account numbers on this report. An account is invalid if it has not been set up in the Chart of Accounts. After you have made the changes, repeat steps 2 through 10. |