There is a detailed and summary version of the Revenue Reconciliation Report.
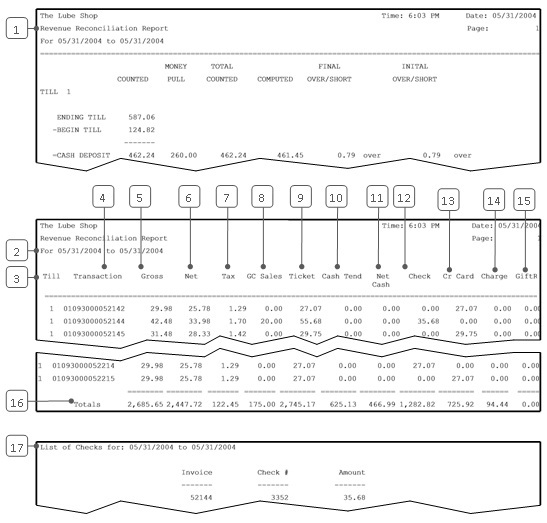
The detailed section of the Revenue Reconciliation Report is a list of transactions by invoice number. For each date requested, a list prints for each till. For each sales transaction, the following information is reported:
At the end of the list, totals are included for all the transactions for the day. This line includes total daily figures such as the daily gross and net sales amounts.
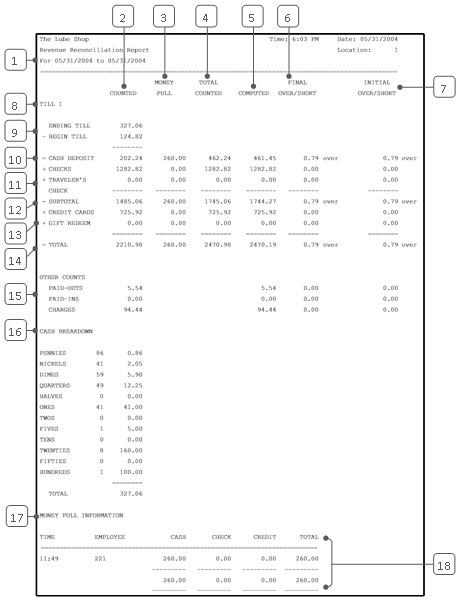
The summary Revenue Reconciliation Report provides you with the information you need to reconcile the ending till and verify the amount in your cash drawer at the end of the day. The first section of the report is a balance sheet that compares the till count with the amount your system computed for the till contents. In the Counted column, the reported amounts include the following:
The Money Pull column has similar information about all the money pulls for the day, and the Total Counted column is the sum of the Counted and Money Pull columns. The amount calculated for the closing till is shown in the Total Computed column. Over/short amounts are shown for both the final and the initial count entered during the close, so you can see how the initial and final counts differed.
The Other Counts section shows additional counts related to the till balance. These are important for reconciling your till balance with your net sales for the day. For example, paid-ins and paid-outs do not appear in net sales figures although they impact the till balance. Fleet charges appear in net sales but not in your actual income for the day. The report also includes a cash breakdown to show how much of each denomination was in the closing till. It has a section that shows each money pull for the day, including the time, the employee and the amounts taken during the pull. The total amounts correspond to the Money Pull column above.
If you print this report for one day, a List of Checks and Credit Cards is automatically included. See the List of Checks and Credit Cards article for a detailed explanation of this list.
Use the following steps to set up and request a Revenue Reconciliation Report:
| Field | Definition | ||
|---|---|---|---|
| Range of Dates | Fill in the beginning and ending dates for the range you want to include on your report. Leave blank to print information for the current day only.
|
||
| Print Time on Report | Printing the time helps you identify the most current report when the same report is printed more than once during a day. This field defaults to Y to print the time on the report. If you do not want the time to print on a report, type N. We recommend that you always print the time on a report. | ||
| Summary Only | To print the summary version, enter Y in this field. Enter N to print the detailed report. We recommend printing a summary report under normal conditions. Print a detailed report only if you need detailed information in a report. | ||
| Duplex | This field appears for terminals that have report type 2 enabled in the Set Up Printer Controls screen. Duplex mode enables printing on both sides of the paper.
|
||
| Landscape | This field appears for terminals that have report type 2 enabled in the Set Up Printer Controls screen. It prints horizontally on the paper. | ||
| Number of Printed Lines per Page | This value tells the computer how many lines to print on each page of the report. A typical 11-inch page can contain up to 66 lines, but this field defaults to 60 to allow three-line margins at the top and bottom of the page.
|
||
| Total Number of Lines per Page | This field indicates the length of the paper in the printer. A typical 11-inch page contains 66 lines. Your system interprets a 0 or 66 in this field to mean that standard 11-inch paper is loaded in the printer. Because a 66 causes a form feed to take more time, accepting the default, 0, is recommended. | ||
| Print Report To | This field tells the computer where to send the report. The following list contains the different selections available for this field.
|
||
| Command Line Options | The line at the bottom of the screen contains commands to print the report and to save or change the report settings.
|
You can set up this report on the Set Up Closing Processes screen (1-6-3) to print automatically during closing processes. If you select the detailed report to print automatically, you get the summary version as part of the report.

| Callout | Item | Description |
|---|---|---|
| 1 | Revenue Reconciliation Report – Summary Version | The first page of this report is the same as the summary version of the Revenue Reconciliation Report (see below). |
| 2 | Date Range | Range of dates for the report information. |
| 3 | Till | Number of the till where the customer was cashed out. |
| 4 | Transaction | Transaction number. The first six digits identify the date in the YYMMDD format (for example, 030930 refers to 09/30/2003). The remaining figures identify the invoice number. |
| 5 | Gross | Amount of the service before taxes, coupons, warranties or discounts. |
| 6 | Net | The gross amount minus coupons, warranties and discounts. |
| 7 | Tax | Total tax on the invoice amount. |
| 8 | GC Sales | Shows the dollar amount of gift sales if a gift certificate/card was sold on the invoice. |
| 9 | Ticket | Ticket total, which equals the net amount plus tax and gift sales.
Ticket = Net + Tax + Gift Sales |
| 10 | Cash Tend | Cash tendered. Amount of cash tendered during the transaction. |
| 11 | Net Cash | Net amount of cash received. |
| 12 | Check | Amount received for the transaction in the form of a check. |
| 13 | Cr Card | Credit card. Amount billed to a credit card for the transaction. |
| 14 | Charge | Amount charged to a fleet account for the transaction. |
| 15 | GiftR | Amount received for the transaction in the form of a gift certificate/card. |
| 16 | Totals | Total amount for each column. |
| 17 | List of Checks and Credit Cards | A List of Checks and Credit Cards is included when this report is run for one day. |


| Callout | Item | Description |
|---|---|---|
| 1 | Date Range | Range of dates for the report information. |
| 2 | Counted | Amounts counted at closing. |
| 3 | Money Pull | Amounts removed during money pulls. |
| 4 | Total Counted | Amounts counted plus money pull amount.
Total Counted = Counted + Money Pull |
| 5 | Computed | Calculated till contents, based on the day’s transactions. |
| 6 | Final Over/Short | Difference between the final till count and the computed till contents.
Initial Over/Short = Initial Counted – Computed |
| 7 | Initial Over/Short | Difference between the initial till count by the employee and the computed till contents.
Initial Over/Short = Initial Counted – Computed |
| 8 | Till # | Till number. |
| 9 | Ending Till | Ending till count. Cash amount in the till at closing. |
| Begin Till | Beginning till count. Cash amount in the till at the beginning of the day. | |
| 10 | Cash Deposit | Cash deposit amount. This is the difference between the beginning and ending till.
Cash Deposit = Ending Till – Begin Till |
| 11 | Checks | Total dollar amount of checks. |
| Traveler’s Check | Total dollar amount of traveler’s checks. | |
| 12 | Subtotal | Sum of cash deposit, checks and traveler’s checks.
Subtotal = Cash Deposit + Checks + Traveler’s Checks |
| 13 | Credit Cards | Total dollar amount of credit card slips. |
| Gift Redeem | Total dollar amount of gift certificates/cards redeemed. | |
| 14 | Total | Sum of subtotal, credit cards slips and gift certificates/cards redeemed.
Total = Subtotal + Credit Cards + Gift Redemptions |
| 15 | Other Counts | Other counts related to the till balance. |
| Paid-Outs | Total amount of paid-out transactions. | |
| Paid-Ins | Total amount of paid-in transactions. | |
| Charges | Total amount of fleet charges. | |
| 16 | Cash Breakdown | Cash in ending till, shown by denomination and in total. The total should be the same as the Ending Till amount above. |
| 17 | Money Pull Information | Information on all money pulls for the till, including the time, the employee ID and the amounts of cash, checks or credit slips. These are the amounts entered by the employee at the time of the money pull. The total of each money pull is also shown. |
| 18 | Money Pull Summary | Totals of cash, checks and credit slips removed in all the money pulls, and the overall total of the money pulls for the till. These totals should correspond to the numbers in the Money Pull column above. |
| 19 | List of Checks and Credit Cards | A List of Checks and Credit Cards is included with the Revenue Reconciliation Report when it is run for one day. |
This report is used to help balance the till at the end of each day, so it should be run on a daily basis. If you print the detailed report, you automatically receive all the information on the summary report. You can check this report against the Transaction Report to see how your net sales and till total compare. The till should always be balanced carefully. However, you can expect that on some days there are small differences between the initial and final count, and some days the till will probably be off slightly. Be aware that a perfect balance every day may be an indication of improper balancing procedures.
The detailed section of this report provides you with an invoice-by-invoice account of sales. You should use this report whenever the summary page shows a till discrepancy, such as an uncorrected shortage or overage in the till. By comparing the numbers on this report to each invoice, you can pinpoint the transaction where the discrepancy occurred. Also check the transaction list to make sure that no invoices are missing.
If an invoice you need to investigate is missing, you can get a copy through the Reprint Invoice option (1-1-8-1). You can also use the Vehicle History Report (1-4-4) to identify all the vehicles and services for the day.
To research the information on this report, you can use the Deposit Report and Cash Drawer Audit Report for cross-reference. A log of individual sales transactions is available on the detailed version of this report, as well as on the detailed Transaction Report. You can print the Midday Till Closing Report to get similar information when you run a midday till close. You can also run this report for more than one day. For example, you could print the report for a week to get the money pull totals for the entire week. The cash breakdown does not print on a report created for more than one day.