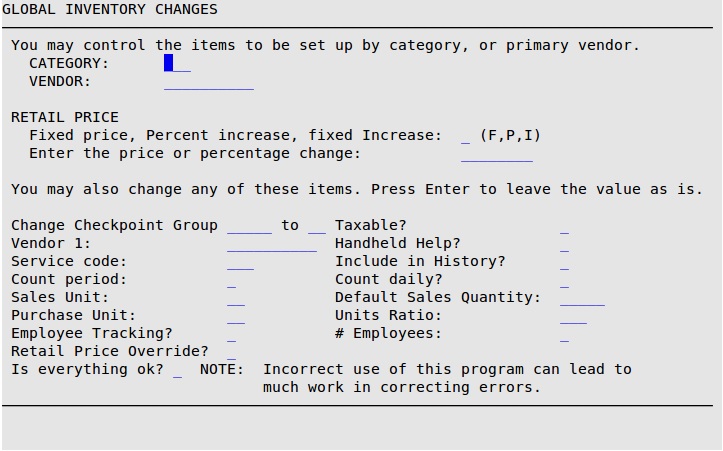
This option is used to quickly change information entered in fields for many inventory items at the same time. You cannot change fields to blank.
Use this option carefully as it can take hours to correct problems caused by improper use.
Use the following steps to make global inventory changes:

Category
Type in the inventory category you want to change. For example, to change all air filters, you would type AF. (Required)
Vendor
If you want to limit your changes to the products supplied by one of your primary vendors, enter the name of the vendor. An example of when you would use this is if all air filters from one vendor had a 5% price increase. Leave blank to make changes to items for all vendors.
Fixed Price, Percent increase, Fixed Increase
Type one of the following 1-character codes to indicate the method you want to use to change the retail price.
Codes:
Enter the Price or Percentage Change
Fill in the price (if you selected F or I in the previous field) or percentage (if you selected P in the previous field) amount of the price change.
Change Checkpoint Group_____to__
Fill in these two fields to change Checkpoints to a given response automatically when this item is added to a Work Order. For example, you can set up the system to automatically change the AIR FILTER checkpoint response to REPLACED when an air filter is sold. The first entry corresponds to the checkpoint group code, as defined on the Set Up Checkpoints screen. The second entry corresponds to the number of the response defined for this particular Checkpoint in the same screen. For example, entries of AF and 2 would tell the system that upon a sale of this item, change all checkpoints with a group code of to response #2.
Vendor 1 (Only for use with the Purchase Order Module)
Type the vendor name you want associated with the inventory items.
| Note: | When the Use Purchase Orders? field in the Center Control File (1-6-1-1) is marked Y, any vendor you add must already be on the Vendor List you created on the Set Up Vendors screen (1-7-5-5). See the article Setting Up Vendors for complete instructions on setting up vendors. |
You may also change any of these items:
The following fields correspond to those in Set Up Inventory Items, and are replaced only if you make an entry on this screen. Leaving these fields blank on this screen will not blank out the fields on the Set Up Inventory Items screen. For more information about these fields, see the Setting Up Inventory Items article.
|
|
|
|
|
|
|
|
|
|
|
|
|
|
|
| Note: | Retail Price Override field is skipped unless the feature has been activated. |
| Make sure your information is correct before you type Y, because the changes are not reversible. |
| Note: | To make sure the changes were made, look up the edited information or the items changed on the Set Up Inventory Items (1-7-1-2) screen. |