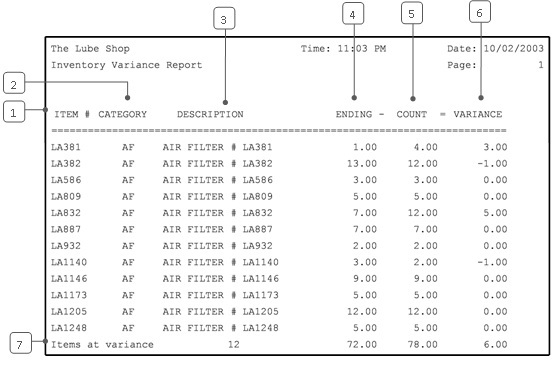
The Inventory Variance Report prints as a part of the Take Inventory process. It lists items for which the actual count and the system count are different. Both counts are shown and the variance is calculated.
The Count number is your physical count and the Ending number is the system count. If Ending is greater than Count, the variance is negative and you have less inventory than expected.
This report prints automatically after entering inventory counts in the Enter an Inventory Count option (1-7-4-2).

| Callout | Item | Description |
|---|---|---|
| 1 | Item # | Identification number of the inventory item. |
| 2 | Category | Category of the item. |
| 3 | Description | Inventory item description. |
| 4 | Ending | Ending quantity on hand according to the system. |
| 5 | Count | Quantity entered from physical inventory count. |
| 6 | Variance | Difference between count and ending columns.
Variance = Count – Ending |
| 7 | Items at Variance | Total number of items listed and the totals in each column. |
When you receive this report, you should follow up by correcting all counts that are incorrect. To do this, first check the counts you entered against the Inventory Count Worksheet. If you mis-keyed an entry, you should correct it through the Enter an Inventory Count function (1-7-4-2). If the entry is right, go back to the shelf and recount the item to make sure the physical count is correct. Then, if necessary, use the Adjust Inventory On Hand screen (1-7-4-3) to correct the count.
You may want to keep this report for a time. You can see if a low count on one report was followed by a high count on the next. This might indicate that the inventory was briefly misplaced. A large number of missing items may also be the result of inventory shrinkage.
Use the Final Inventory Variance Report for a second record of items at variance that also shows the adjustments made to correct them. Other reports with quantity on hand information include the Stock Status Report and the Inventory Valuation Report.