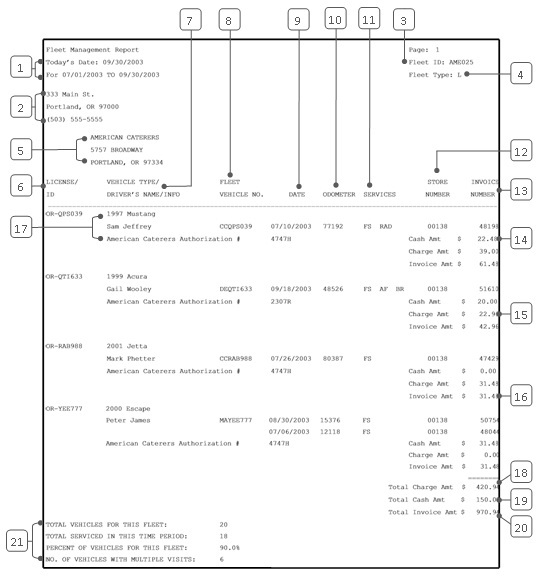
The detailed Fleet Management Report is a list of vehicles serviced for a fleet customer. It includes a list of services and charges for each vehicle that came into your store, and the total charge for all services, broken down by cash (paid at time of service) and charge amounts. The detailed report prints fleet-specific information if your system is set up to request any at the time of service. This report also lists the vehicles that have not been serviced during the specified time period and is designed to be inserted in a window envelope and mailed to the fleet manager. This report is not designed to be used as a billing tool. The top section of the report indicates the dates covered on the report, as well as the date the report was created.
The fleet vehicle number, vehicle type and driver’s name are shown, along with the following for each visit:
| Note: | The fleet-specific information that prints below each driver’s name is part of the setup established for each fleet. It can be set up to be required or optional at the time of service. The Total column indicates the total of the charges on the report. |
The last four lines near the bottom of the report show the following items:
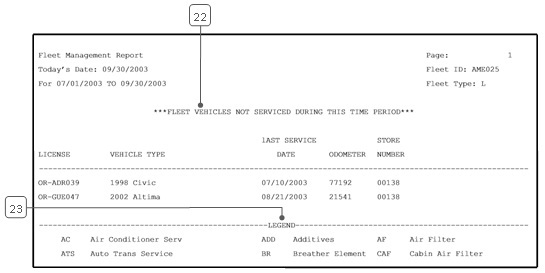
The bottom of the report shows any vehicles not serviced during the time period for which the report was run. It shows the following information:
All of this information helps you or the fleet manager track vehicles needing service, services performed at your store and the account charges.
The last section for each fleet is a legend of the most common abbreviations of service codes listed in the Service column. This helps the fleet manager determine the service codes listed in the report.
For information about the detailed version of this report, go to the Fleet Management Report – Summary article.
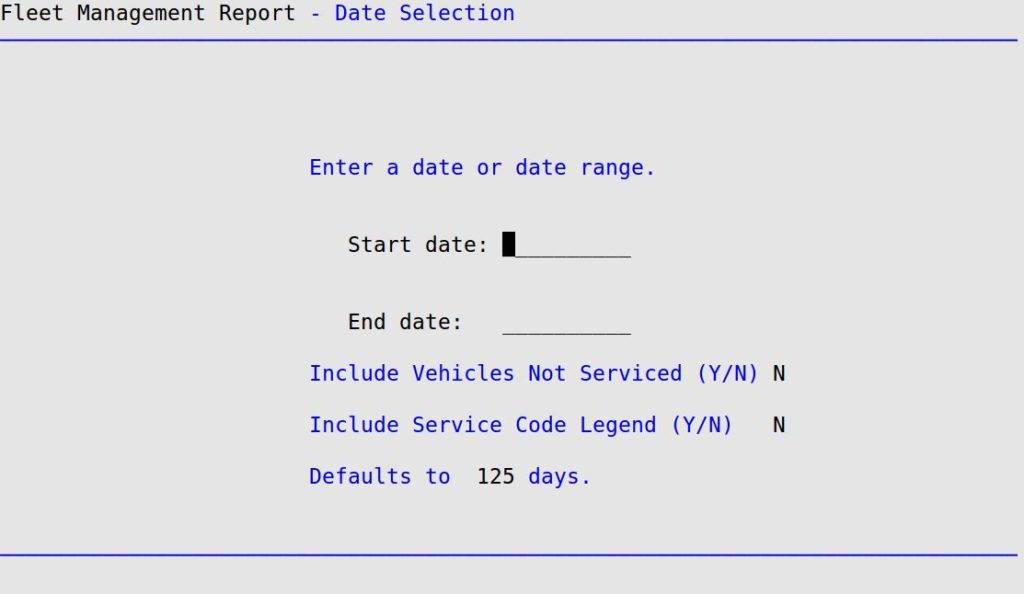
Use the following steps to print a Fleet Management Report:
| Note: | This screen can also be access from the Marketing Menu (2-5). |
| Field | Definition | ||
|---|---|---|---|
| Fleet ID | Charge customer identification number or range of numbers. Leave blank for all. | ||
| Fleet Type | Type an L for local fleets or an N for national fleets in both fields. Leave blank for both fleet types. | ||
| Summary Only | This field appears for reports with both detailed and summary versions. Enter N to print the detailed report. We recommend printing a detailed report only if you need detailed information. | ||
| Duplex | This field appears for terminals that have report type 2 enabled in the Set Up Printer Controls screen. Duplex mode enables printing on both sides of the paper.
|
||
| Landscape | This field appears for terminals that have report type 2 enabled in the Set Up Printer Controls screen. It prints horizontally on the paper. | ||
| Number of Printed Lines per Page | This value tells the computer how many lines to print on each page of the report. A typical 11-inch page can contain up to 66 lines, but this field defaults to 60 to allow three-line margins at the top and bottom of the page.
|
||
| Total Number of Lines per Page | This field indicates the length of the paper in the printer. A typical 11-inch page contains 66 lines. Your system interprets a 0 or 66 in this field to mean that standard 11-inch paper is loaded in the printer. Because a 66 causes a form feed to take more time, accepting the default, 0, is recommended. | ||
| Print Report To | This field tells the computer where to send the report. The following list contains the different selections available for this field.
|
||
| Command Line Options | The line at the bottom of the screen contains commands to print the report and to save or change the report settings.
|

You can also set up this report on the Set Up Closing Processes screen (1-6-3) to print automatically during closing processes.
| Note: | For a vehicle to be included on this report, the vehicle record must include a fleet ID number. This can be included when you enter a new vehicle or add to a vehicle record on the Maintain Vehicle History screen (1-4-1). |


| Callout | Item | Description |
|---|---|---|
| 1 | Today’s Date | Date report was created. |
| Date Range | Range of dates for the report information. | |
| 2 | Store Address | Your store name and address. |
| 3 | Fleet ID | Fleet identification number. |
| 4 | Fleet Type | Type of fleet. Shows L for local fleets or an N for national fleets. |
| 5 | Fleet Address | Mailing address of the fleet. |
| 6 | License/ID | License number (and state code if used) and alternate vehicle ID (if used) of each fleet vehicle. |
| 7 | Vehicle Type/ Driver’s Name/Info | Shows vehicle type of fleet vehicle, as well as name of the driver who brought the fleet vehicle in for the last service. |
| 8 | Fleet Vehicle No. | Vehicle ID assigned to the vehicle by the fleet manager. |
| 9 | Date | Date of service, with the most recent service listed first. |
| 10 | Odometer | Odometer reading at the time of service. |
| 11 | Services | Service codes of the services performed. Can display up to 12. |
| 12 | Store Number | Number of the store that serviced the fleet vehicle. |
| 13 | Invoice Number | Invoice number of the service |
| 14 | Cash Amt | Amount of the invoice paid at the time of service. Payment at time of service could be cash, check, credit card, gift certificate or traveler’s check. |
| 15 | Charge Amt | Amount of the invoice billed to a fleet account. |
| 16 | Invoice Amt | Total amount of the invoice. |
| 17 | Fleet-Specific Information | Information included at the time of service. This may be required or optional information such as purchase order, VIN number, company name, etc. You specify the input descriptions when you set up the fleet customer on the Set Up Charge Customers screen (1-4-2). |
| 18 | Total Charge Amt | Total dollar amount billed to a fleet account on all invoices |
| 19 | Total Cash Amt | Total dollar amount on all invoices paid at time of service. |
| 20 | Total Invoice Amt | Total dollar amount of charges on all invoices. |
| 21 | Total Vehicles for this Fleet | Number of vehicles attached to this fleet as of the date this report was run. |
| Total Serviced in this Time Period | Number of vehicles serviced during the time period of the report. | |
| Percent of Vehicles for this Fleet | Percent of the total vehicles in this fleet serviced during the time period of the report. | |
| No. of Vehicles with Multiple Visits | Number of vehicles that made more than one visit during the time period of the report. | |
| 22 | Fleet Vehicles Not Serviced During This Time Period | Shows the license, vehicle type, last service date, odometer for any fleet vehicles not serviced during the specified time period. For each vehicle not serviced, this report also shows the store number at which the vehicle was last serviced. |
| 23 | Legend | Shows most common abbreviations of service codes listed in the Service column. |
This report can be provided as a service to the fleet customer. The report is full of information that can be helpful to the fleet manager, such as the driver of each vehicle serviced and the services performed on each vehicle. You can also use this report to help yourself keep track of sales and services for each fleet. It also shows you if there were any fleet vehicles that were not serviced during the specified time period. This can aid you in marketing and customer service efforts and can serve as a reminder to fleet managers if certain vehicles are not coming in for service on a regular basis. To help you with your marketing efforts, you should run the report regularly for every fleet you serve.
The fleet-specific information is a useful feature of the fleet setup. You can request information for each fleet that will be helpful to you or the customer. For example, you can require an authorization number for each vehicle serviced. The detailed report is the best one to use if you want to print such information. Otherwise, the summary report can be used.
This report can help you to identify inactive fleets so that you can direct your marketing and customer service efforts. You may also notice that only a few of a fleet’s vehicles are receiving regular service. This might prompt you to call the fleet manager to make sure that person is aware of the situation.
The Fleet Comments Report is another fleet management report that can be used for your own information or sent to the fleet customer. It contains service comments noted for vehicles in the fleet. You may want to send both these reports at the same time.