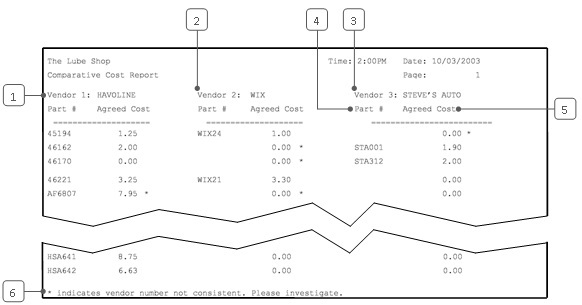
The Comparative Cost Report lists the costs of individual inventory items for up to three vendors. These costs are entered for each item through the Set Up Inventory Items function.
The report has three columns. The first is for the primary vendor, the next is for the second vendor and the last is for the third vendor. The vendor names at the top of the columns are the primary, second and third vendors for the first listed item. Within each category, items are listed in order according to the part number of the primary vendor. This part number is usually also the system inventory number. The part numbers are shown along with the agreed costs for each vendor.
While an item may have different part numbers for the second and third vendor, the parts themselves are the same for all three columns. To find the three costs for a part, identify the part you want in the first column and then look straight across the page.
Use the following steps to set up and submit a Comparative Cost Report:
| Note: | In order for this report to be accurate, all inventory items must have the three vendors set up in the same order for each item in a category. For example, Fram must be vendor 2 for all air filters. Items are set up in Set Up Inventory Items (1-7-1-2 or 1-7-5-1). |
| Field | Definition | ||
| Category | Enter the particular category if you want to limit the information on the report. Leave blank to print all categories. | ||
| Primary Vendor | Type your primary vendor that you want to compare with other vendors. The primary vendor is the vendor listed in the Vendor 1 field on the Set Up Inventory Items screen for an item. | ||
| Print Time on Report | Printing the time helps you identify the most current report when the same report is printed more than once during a day. This field defaults to Y to print the time on the report. If you do not want the time to print on a report, type N. We recommend that you always print the time on a report. | ||
| Duplex | This field appears for terminals that have report type 2 enabled in the Set Up Printer Controls screen. Duplex mode enables printing on both sides of the paper.
|
||
| Number of Printed Lines per Page | This value tells the computer how many lines to print on each page of the report. A typical 11-inch page can contain up to 66 lines, but this field defaults to 60 to allow three-line margins at the top and bottom of the page.
|
||
| Total Number of Lines per Page | This field indicates the length of the paper in the printer. A typical 11-inch page contains 66 lines. Your system interprets a 0 or 66 in this field to mean that standard 11-inch paper is loaded in the printer. Because a 66 causes a form feed to take more time, accepting the default, 0, is recommended. | ||
| Print Report To | This field tells the computer where to send the report. The following list contains the different selections available for this field.
|
||
| Command Line Options | The line at the bottom of the screen contains commands to print the report and to save or change the report settings.
|

| Callout | Item | Description |
|---|---|---|
| 1 | Vendor 1 | Primary vendor set up for the item. |
| 2 | Vendor 2 | Second vendor set up for the item |
| 3 | Vendor 3 | Third vendor set up for the item. |
| 4 | Part # | Part number according to the vendor. The primary vendor’s part number should be the same as the system inventory number. |
| 5 | Agreed Cost | This vendor’s cost for the item. |
| 6 | * | Indicates vendor number not consistent. This means that the vendor for this item in this column is not the same as the vendor named at the top of the column. |
This report is useful to compare costs for each item you sell. It allows you to identify the vendor with the lowest cost for a particular item. In order to do this, you need to have multiple vendors set up for each item. It is best to have the same primary, second and third vendor for all items in a category. That way all the costs in a column correspond to the vendor at the top of the column.