
The Barcode Report shows you which inventory items are set up with barcodes to be sold or scanned on the Lube Handheld. If you do not have a Lube Handheld and a barcode scanner, this report will not show any information. It shows selected information from the Set Up Inventory Items screen (1-7-5-1), including the following:
Use the following steps to print a Barcode Report:
| Field | Definition | ||
| Category | Enter the particular category if you want to limit the information on the report. Leave blank to print all categories. | ||
| Item Number | Fill in an inventory item number or a range of item numbers. Leave blank for all. | ||
| Print Time on Report | Printing the time helps you identify the most current report when the same report is printed more than once during a day. This field defaults to Y to print the time on the report. If you do not want the time to print on a report, type N. We recommend that you always print the time on a report. | ||
| Duplex | This field appears for terminals that have report type 2 enabled in the Set Up Printer Controls screen. Duplex mode enables printing on both sides of the paper.
|
||
| Landscape | This field appears for terminals that have report type 2 enabled in the Set Up Printer Controls screen. It prints horizontally on the paper. | ||
| Number of Printed Lines per Page | This value tells the computer how many lines to print on each page of the report. A typical 11-inch page can contain up to 66 lines, but this field defaults to 60 to allow three-line margins at the top and bottom of the page.
|
||
| Total Number of Lines per Page | This field indicates the length of the paper in the printer. A typical 11-inch page contains 66 lines. Your system interprets a 0 or 66 in this field to mean that standard 11-inch paper is loaded in the printer. Because a 66 causes a form feed to take more time, accepting the default, 0, is recommended. | ||
| Print Report To | This field tells the computer where to send the report. The following list contains the different selections available for this field.
|
||
| Command Line Options | The line at the bottom of the screen contains commands to print the report and to save or change the report settings.
|
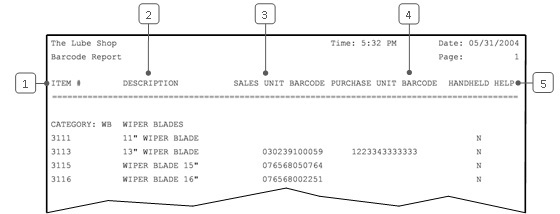
| Callout | Item | Description |
| 1 | Item # | Identification number of the inventory item. |
| 2 | Description | Item description |
| 3 | Category | Inventory category, followed by the items set up in that category. |
| 4 | Sales Unit Barcode | Barcode associated with the unit of measure used when the item is sold. For example, an item may be sold individually (EA). |
| 5 | Purchase Unit Barcode | Unit of measure used when the item is purchased. For example, an item may be purchased by the case (CS). |
| 6 | Handheld Help | Indicates whether this item is set up to appear in the drop-down lists on the Handheld. |
This report is used to verify inventory items set up to be scanned on the Lube Handheld. You should print it periodically to review which inventory items have barcodes attached to them, as well as which inventory items you want to appear in the drop-down lists on the Handheld. For each item that you want to appear in the drop-down lists, you need to type Y in the Handheld help field on the Set Up Inventory Items screen (1-7-5-1). Check new items carefully to make sure that each field is correct.

