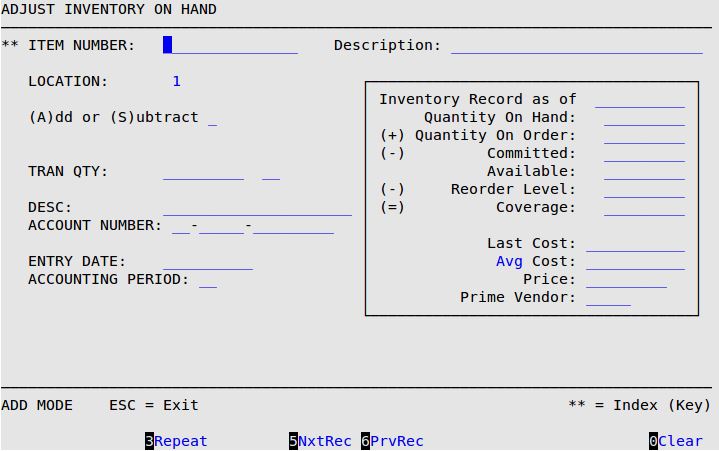
The daily invoicing process subtracts items automatically as you sell them from inventory. The Receive Inventory process increases the inventory item quantities. The Adjust Inventory on Hand option can be used to add or subtract quantities of items to bring the system inventory quantities into balance with the physical count. This screen is identical to the Adjust Inventory On Hand (1-7-7-1) screen in the Adjustments Menu.
Use the following steps to adjust your inventory:

Item Number
Type the 1- to 15-character item number you are adjusting. You can only adjust item numbers that are parts, oil or supplies (types P, L, or S).
| Note: | This field is marked by two asterisks (**), which indicates that the scroll order on this screen is determined by this field when the cursor is in it. For more information on scrolling, see the article Information Entry Screens. |
Description
The system automatically fills in the brief description of the item number. (Display only)
Location
The system automatically fills in the number of the location where you are adjusting inventory items. (Display only)
(A)dd or (S)ubtract
Type A to add to or S to subtract from the current quantity on hand.
Tran Qty
Type the quantity by which you want to adjust the item. This quantity cannot be zero (0). Specifically, the quantity to add to or subtract from the present quantity on hand.
| Note: | If you enter a zero or negative transaction quantity, you receive a Numeric entry out of range error message. Preventing zero and negative quantity errors improves the accuracy of your Inventory Valuation Report. |
Unit Cost
This field appears if you are adding. It defaults to the average cost if the type is average, standard cost if standard, and last cost if LIFO or FIFO. Unless you are using standard cost, you may specify the costs of items being adjusted into stock.
Desc
Type a brief description of why you are adjusting this item. (Reference only)
Account Number
Type the account number of the item in the format of the Accounting prefix followed by the account number. For example, 1-0.00-5201, the expense account for shrinkage. The system defaults to the shrinkage account specified in Set Up Categories (1-7-5-3).
Entry Date
Type the date (MM/DD/YYYY) you are entering the inventory changes into the system.
Accounting Period
Fill in the 2-digit accounting period. Usually this is the number of the current month. The system defaults to the inventory account period set up in Set Up Company Information (System Setup Menu-5).
| Note: | You must use the Update Inventory (1-7-4-4 or 1-7-1-4) option for the changes to take effect on reports. The Inventory File is automatically updated during the End of Day process. |