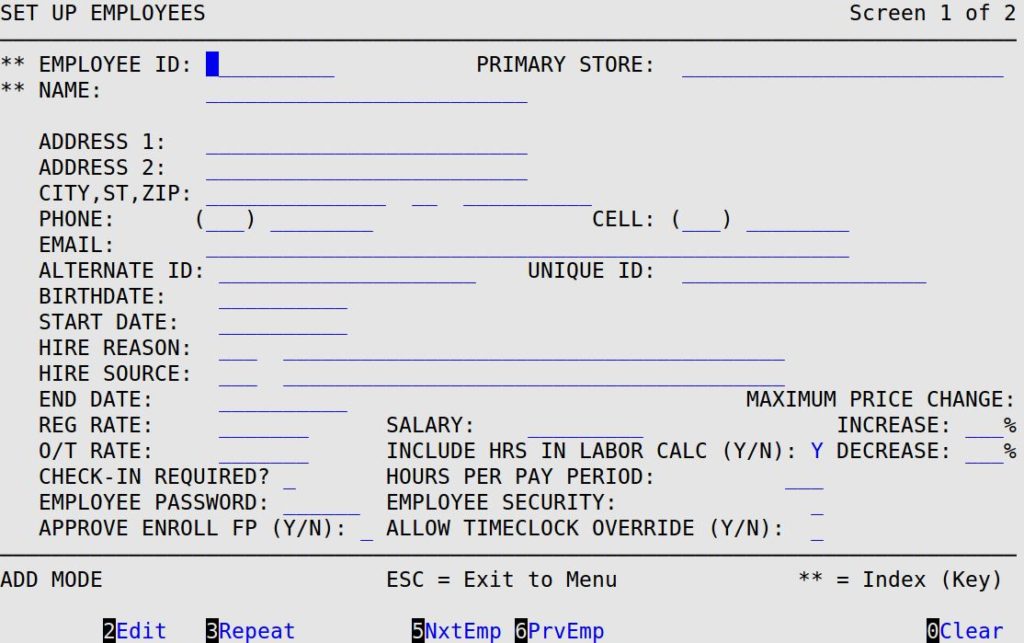
You must set up an employee record for each employee who works in the center. This record contains personal and salary information necessary for the system to work properly.
Use the following steps to set up employee information:

Employee ID
Type a 1- to 6-character unique employee ID. For example, you could use the employee’s initials. See the Changing an Employee ID article for information on changing IDs for your employees. (Required)
| Note: | This field is marked by two asterisks (**), which indicates that the scroll order on this screen is determined by this field when the cursor is in it. For more information on scrolling see the article Using the Screens. |
Primary Store
Enter the store name where the employee primarily works. (Reference only)
Name
Fill in up to 25 characters of the employee’s name (Last Name; First Name).
| Note: | This field is marked by two asterisks (**), which indicates that the scroll order on this screen is determined by this field when the cursor is in it. For more information on scrolling see the article Using the Screens. |
Address 1
Fill in up to 25 characters of the employee’s street or mailing address.
Address 2
Fill in up to 25 characters for the second line of the employee’s street or mailing address. Use this field if the address does not fit on the first line.
City, ST, ZIP
Enter the 14-character city name, 2-character state or province abbreviation and ZIP/postal code of the employee.
Phone
Type the area code and phone number of the employee.
Cell Phone
Type the area code and phone number of the cell phone of the employee.
Type the email address of the employee.
Alternate ID
Fill in the alternate ID of the employee.
Unique ID
This is a unique ID used by the fingerprint scanner.
Birthdate
Fill in the employee’s date (MM/DD/YYYY) of birth.
Start Date
Specify the start date (MM/DD/YYYY) of the employee.
Hire Reason
Type the 3-character code to indicate why the employee was hired. Press [F1] for a list of valid codes.
Hire Source
Type the 1- to 3-character code to indicate how the employee applied for the position. Press [F1] for a list of valid codes.
End Date
Specify the date (MM/DD/YYYY) this employee’s employment ended. Only fill in this field if an employee has been terminated.
Reg Rate
Fill in the hourly rate for hourly employees.
O/T Rate
Fill in the overtime rate if the employee is considered an hourly employee. (Reference only)
Salary
Type the annual salary if the employee is considered a salaried employee.
Check-In Required?
Type Y or N to indicate whether this employee must clock in and out of the system. (Defaults to Y)
Employee Password
Fill in a unique password (up to 6 characters) for the employee. (Required)
| Note: | The employee password feature is designed to add security to the LubeSoft system. These passwords should be changed regularly to keep the system as secure as possible. You have the option to specify how long you want your employees to keep a password before they are required to change it. On screen 3 of the Center Control File, the number you type in the Time Between Password Changes field determines the number of days before employees are forced to change their password. |
Approve Enroll FP
Type Y or N to indicate if this employee should have permission to authorize employees to enroll new fingerprint scans.
Include Hrs in Labor Calc
Type Y or N to indicate whether you want to include the working hours of the employee in the calculation of the labor worked. This field is for salaried employees only. (Defaults to Y)
Hours Per Pay Period
Fill in the number of hours (up to 3 digits) this employee is expected to work in a pay period. This field is required for salaried employees only. (Required)
Employee Security
Enter the 1-digit code from 0 to 9 to indicate the minimum security level this employee needs in order to access the Lube Handheld and Graphical Service Review Setups. (Defaults to 0)
Allow Timeclock Override
Type Y to indicate whether this employee has the capability to override other employees clocking in prematurely from paid breaks or lunch. Otherwise, type N.
Maximum Price Change Increase
Enter in the maximum % (0-999) that the employee is allowed to increase an applicable item’s price by during invoicing. If the price of an item that is being changed is negative, the increase % will be used to calculate an increase in dollar value based on the original price.
Maximum Price Change Decrease
Enter in the maximum % (0-100) that the employee is allowed to decrease an applicable item’s price by during invoicing. If the price of an item that is being changed is negative, the decrease % will be used to calculate a decrease in dollar value based on the original price.

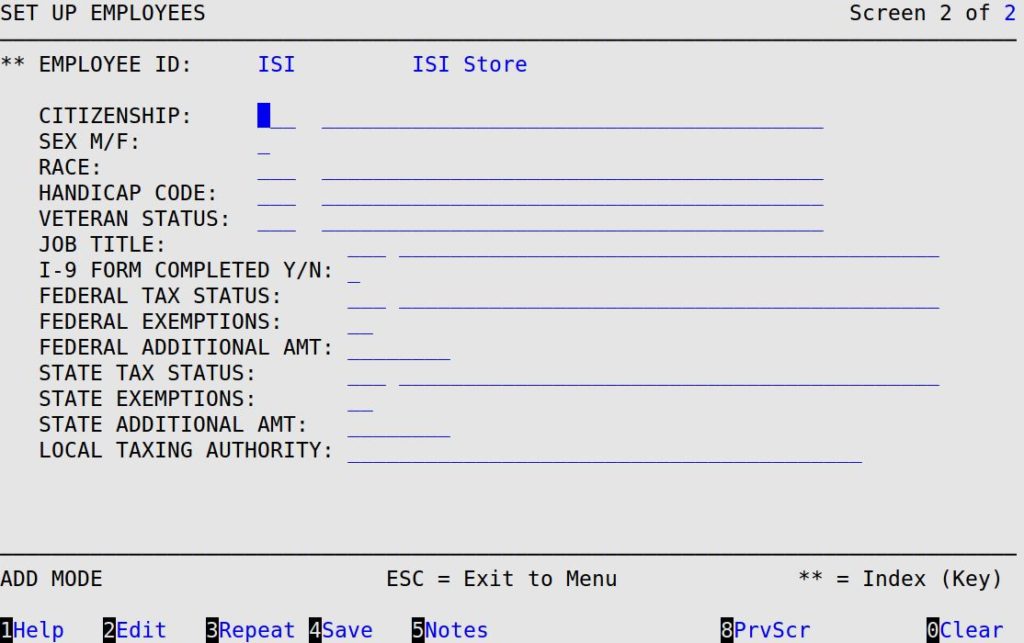
| Note: | If you press [F7] to move to the next screen, your changes will not be lost. However, you must press [F4] to save your changes before you press [Esc] [Esc]. Saving changes on one screen in a set of screens automatically saves changes to all screens in a set. A set of screens has the words Screen – of – in the upper right corner (see above). |
Citizenship
Type the 1- to 3-character code to indicate the citizenship of the employee. Press [F1] for a list of valid codes.
Sex M/F
Type M or F to indicate whether the employee is male or female, respectively.
Race
Type the 1- to 3-character code to indicate the race of the employee.
Codes:
Handicap Code
Type the 1- to 3-digit code to indicate whether the employee is handicapped.
Codes:
Veteran Status
Type the 1- to 3-digit code to indicate the veteran status of the employee.
Codes:
Job Title
Enter the 1- to 3-character code for the job title of the employee.
Codes:
I-9 Form Completed
Type Y or N to indicate whether the I-9 form has been completed for this employee. This must be Y for an employee to be active. (Defaults to Y)
Federal Tax Status
Fill in the 1- to 3-character code to indicate the federal tax status of the employee.
Codes:
Federal Exemptions
Fill in the number of state exemptions for the employee. This number must be between 0 and 10. (Defaults to 0)
Federal Additional Amt
Specify the amount of additional federal withholding the employee has requested. This amount is per pay period. You receive a warning if this amount exceeds $1,000.
State Tax Status
Type the 1- to 3-character code to indicate the state tax status of the employee.
Codes:
State Exemptions
Enter the number of state exemptions for the employee. This number must be between 0 and 10. (Defaults to 0)
State Additional Amt
Fill in the amount of additional state withholding the employee has requested. This amount is per pay period. You receive a warning if this amount exceeds $1,000.
Local Taxing Authority
Fill in the 40-character field that is available for local tax information.