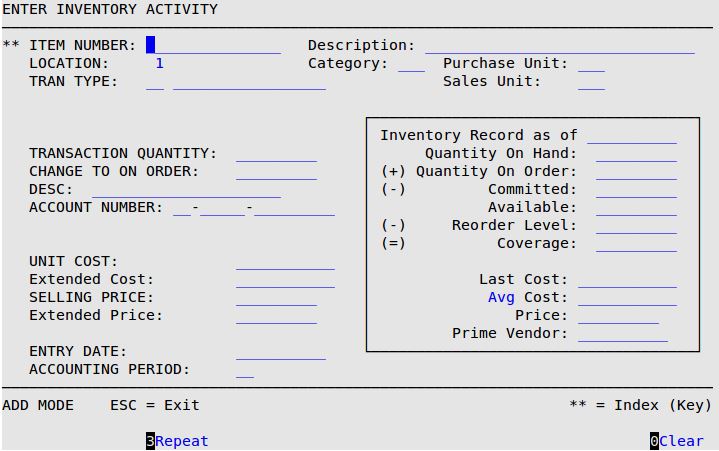
The daily invoicing process automatically subtracts items from the inventory quantity as you sell them. The Receive Inventory process increases the inventory quantity. Because so many changes in inventory could result in some input errors, the Enter Inventory Activity option allows you to make changes, such as adjustments to inventory on hand, inventory on order, damaged and obsolete items, and other inventory activity.
Use the following steps to enter inventory activity:

| Note: | The information contained in the box on the right side of the screen is for display only. |
Item Number
Type the 1- to 15-character item number for which you want to adjust inventory information. You can only adjust items that are parts, oil or supplies (types P, L, or S).
| Note: | This field is marked by two asterisks (**), which indicates that the scroll order on this screen is determined by this field when the cursor is in it. For more information on scrolling, see the article Information Entry Screens. |
Description
The first line of the description of the item number. (Display only)
Location
The number of the location for which you are adjusting inventory items. (Display only)
Category
The category of this item. (Display only)
Purchase Unit
The unit at which you purchased this item. (Display only)
Sales Unit
The unit at which you sell and inventory this product. (Display only)
Tran Type
Type the 2-digit code that indicates to the system the kind of transaction you want to perform. Press [F1] for a list of valid transaction codes. See the article Transaction Types for a description of the transaction types.
| Note: | The system will skip over some of the following fields because they are not available for certain transaction types. The Vendor and Reference # fields are only available for Receipt-type entries. |
Transaction Quantity
Type the quantity of the transaction in sales units (for example, QT for quarts and CS for case). Do not type a negative number.
Change to On Order
Fill in the amount by which you are changing the quantity on order. When you enter this field, notice that the number in the box is updated.
Desc
Fill in a free-form comment about the adjustment.
Account Number
The default account number that is displayed in this field should be correct. If there is not an account number, specify one so your General Ledger entry is correct. If an account number is required, as is the case for transaction types 11, 12, 15, and 51, specify the expense account to be affected. This account number should be in the format of the accounting prefix followed by the account number. For example, 1-0.00-5201 is the default expense account for shrinkage.
Vendor
Fill in a vendor or press [F1] and select a vendor from the list. Vendors can be set up in the Set Up Vendors menu (1-7-5-5). See the article Setting Up Vendors for more information.
Reference #
Fill in the invoice number for the inventory shipment received. This field allows you to track invoice numbers for inventory shipments received. This field will print on the Inventory Items Received Report and the Receive Inventory Report.
Unit Cost
Fill in the cost per sales unit of the inventory item.
| Note: | If you use the Standard inventory costing method, you can only specify a cost for transaction type 51. If you use a costing method other than Standard, you can specify a cost for transaction types 21, 22, and 51. The inventory costing method is set up in the Center Control File (1-6-1-1). |
Extended Cost
The system displays the unit cost multiplied by the transaction quantity. (Display only)
Selling Price
Fill in the price per sales unit.
Extended Price
The system displays the extended price, which is the selling price, multiplied by the transaction quantity. (Display only)
Entry Date
Type the entry date (MM/DD/YYYY) if different than the current date to which the field defaults.
Accounting Period
This defaults from the Inventory Accounting Period set up on the Set Up Company Information screen (System Setup Menu-5). Once set, it is updated at the end of each month.
| Note: | Entries to change the cost or price of an item are not effective until after the inventory is updated. You should not update your inventory while invoices are being processed! |
| Note: | If a Return to Vendor transaction was entered, you will be prompted to select the number of copies of the Return to Vendor Report to print. Enter a number between 0 and 9. |