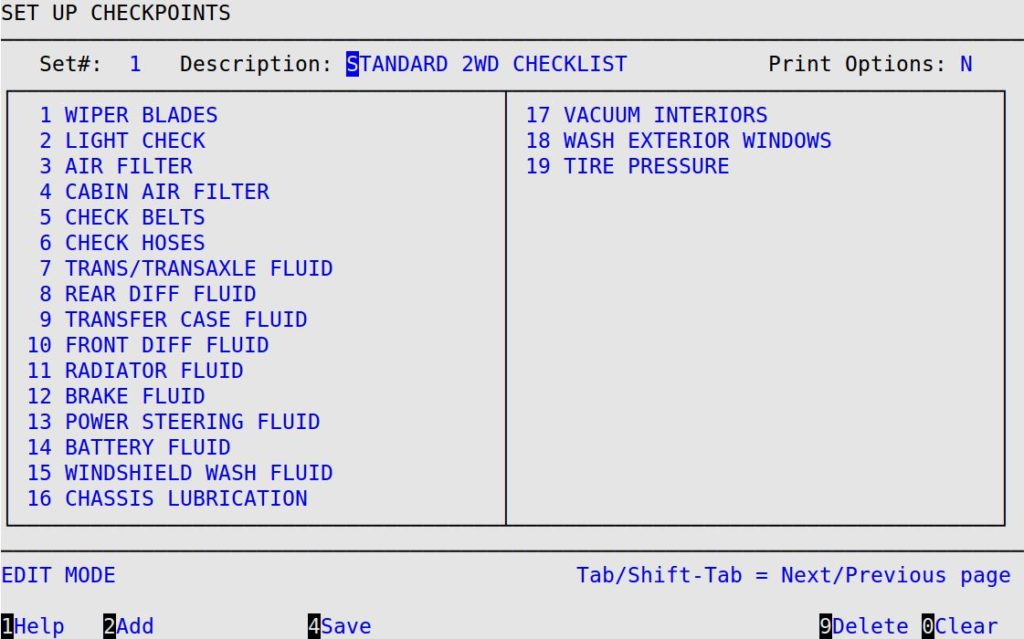
This menu allows you to define up to 99 checklists, or checkpoint sets, to ensure every step of a service or inspection is completed. For example, many stores have a standard 20-point checklist included in full services. Try to keep your checkpoint sets consistent so they are easy for employees to use. For example, if Oil Filter appears in multiple checkpoint sets, set it up as checkpoint 1 in each set.
When you create a checkpoint set, include a checkpoint for each step a bay technician goes through when performing that service. Each checkpoint set may have up to 99 checkpoints. Because these checkpoints and responses may be configured to print on the invoice, they should be clear and concise. Only Plain Paper Invoice formats support printing multiple checkpoint sets or more than 20 checkpoints. Call ISI Customer Support for assistance changing your invoicing format.
After you set up a checkpoint set, create a corresponding inventory item with the Type set to K. For instructions on setting up an inventory item, see the article Setting Up Inventory Items. When the item is sold on a work order, the checkpoint set automatically appears and prompts the technician to select a response for each checkpoint. To ensure the checkpoint sets are included in a service, add the inventory item to the job. See the Job Items and AddOns article for instructions.
Use the following steps to set up checkpoint sets:

| Function Key | Description |
|---|---|
| 2Add/2Edit | Switch between Add Mode and Edit Mode. |
| 4Save | Save any changes to the checklist. |
| 5CkPtUp | Move the highlighted checkpoint up a line in the checklist. |
| 6CkPtDn | Move the highlighted checkpoint down a line in the checklist. |
| 7AddCkPt | Add a new checkpoint. It will appear at the bottom of the checklist. |
| 8DelCkPt | Delete the highlighted checkpoint. |
| 0Clear | Clear the checklist from the screen. Any changes are discarded. |
Set#
Enter a unique number from 1 to 99 to identify this checklist.
Description
Type up to 30 characters to describe the checklist.
Print Options
Use one of the following 1-character codes to indicate whether to print the text from the Description field (above) on the invoice and/or print the checkpoint set on the Checklist Report.
Codes:

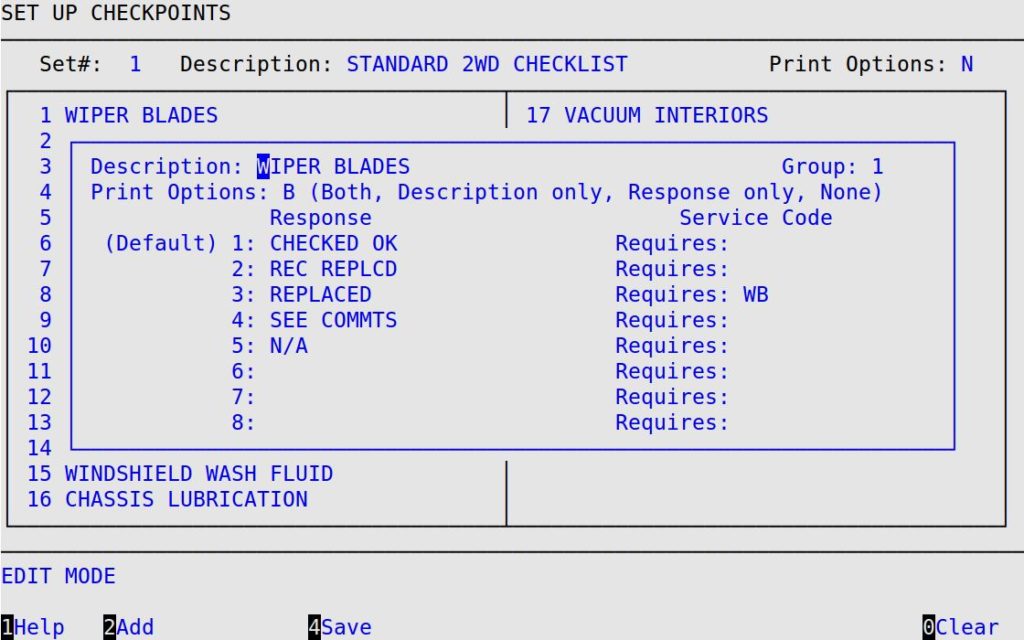
Description
Type up to 40 characters in this field to describe the checkpoint. This description is displayed in Bay Invoicing and may print on the invoice and Checklist Report, depending on the Print Options setting.
Group
Type up to 5 characters in this field to identify the checkpoint. For example, AF. When an inventory item with a matching Checkpoint Group is added to a work order, the system can automatically select a response for the checkpoint.
Print Options
Use one of the following 1-character codes to indicate whether to print the description and/or response on the invoice.
Codes:
Response
Type up to eight 20 character responses that can be selected during invoicing. We recommended setting the most common response as the first response. This is the default, which is automatically displayed during invoicing. If no responses are set up, the checkpoint is skipped during invoicing.
You may include up to three custom entry fields per response. Use ^ to denote an entry field followed by # (numeric) and/or * (any character) to specify field type and maximum length. Entry field length is determined by the count of all characters used to define the field. For example, if you type Front PSI: ^# for your response, you may type up to 2 numbers (e.g. 35) during invoicing. The invoice will print Front PSI: 35 as the response. If your response is ^***^##, you may type up to 4 characters followed by up to 3 numbers during invoicing.
Service Code
Type up to three characters to specify a service code for each response. An item with a matching service code must be sold on the work order to allow the corresponding response to be selected during invoicing. For example, if the selected response requires the service code AF but an air filter was not sold on the work order, the system displays the message Checkpoint: AIR FILTER shows AF and automatically returns to the invoicing screen so you can add an air filter or change the checkpoint to the correct response.