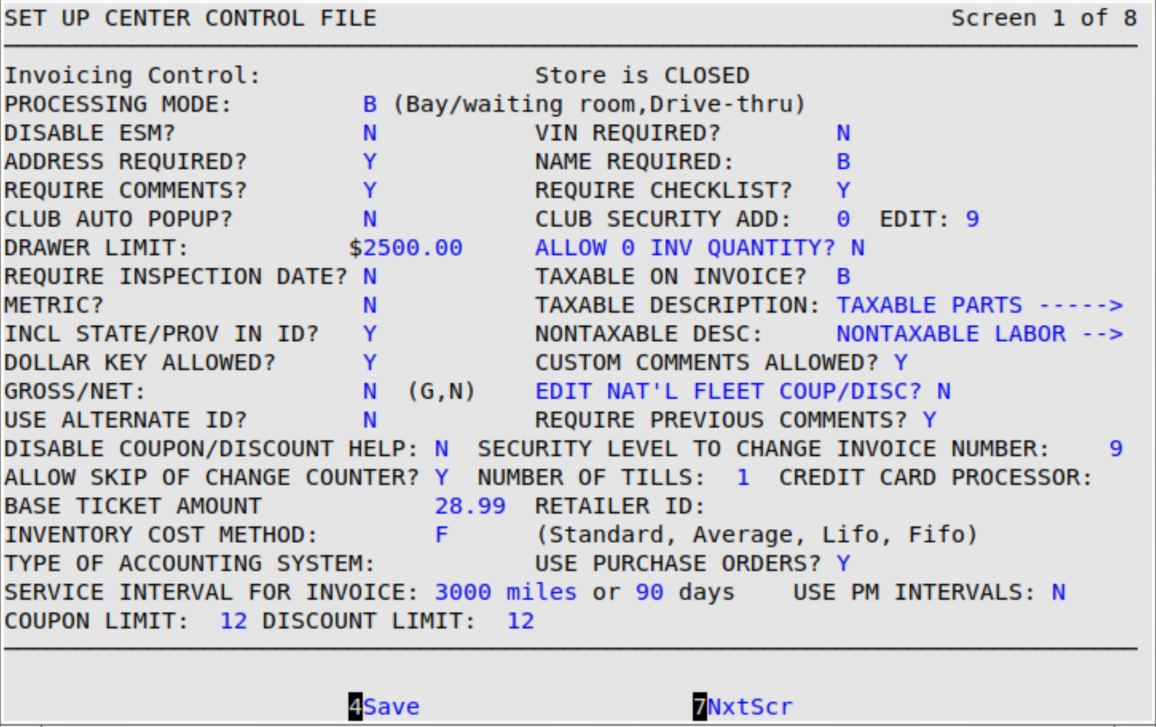
The information in the Center Control File gives you control over how the software fits with your operation.
Use the following steps to access the Center Control File setups:
| Function Key | Description |
|---|---|
| Esc Esc | Press [Esc] [Esc] to discard your changes and return to the Lubrication Basic Setup Menu. |
| 1Help | This option is displayed when your cursor is in a field that has additional information available, such as the Tire Help field on screen 4. Press [F1] to view the popup for that field. |
| 4Save | Press [F4] at any time to save your changes. Saving changes on one screen in a set of screens automatically saves changes to all screens for that menu option. |
| 7NxtScr | To move to the next screen, press [F7]. This key only shows up on the screen if there are additional screens available. |
| 8PrvScr | To move to the previous screen, press [F8]. This key is not displayed if there are no previous screens available. |
Processing Mode
LubeSoft offers two processing modes. You need the password of the day to switch between modes. Call ISI Support for assistance. Codes:
Disable ESM?
Type Y if you do not want the ESM screen to pop up automatically on the bay terminals during invoice processing. The ESM screen contains Chek-Chart information and filter part numbers. Type N to make the ESM pop up automatically.
VIN Required?
Select if and when the VIN PopUp appears during invoicing. Codes:
Address Required?
Type Y to require the address of the customer to be entered during invoice processing. This address information can be used to market to your customers. Type N if you do not want to require an address for the customer. You can still enter a customer address “on-the-fly” at any time during invoicing by using the Name PopUp.
| Note: | The Name Required field controls if and when the Name PopUp automatically appears during invoicing. For example, if Name Required is N, the popup will not automatically appear during invoicing and the vehicle invoice can be cashed out without a name or address. |
Name Required?
Use one of the following 1-character codes to indicate when specifically you want the name of the customer entered during invoicing.
Codes:
Require Comments?
Type Y if you want the comments screen to display automatically for every invoice. This reminds your technicians to include any comments. To allow the technicians to include comments using the pop up menu or the Comments hot key only when they feel it is necessary, type N.
Require Checklist?
Type Y if you require your technicians to complete the checklist (also called a checkpoint set). If you don’t want the checklist required, type N.
Club Auto PopUp

Club Security Add/Edit
Enter the 1-digit code from 0 to 9 in the Add and Edit fields to indicate the minimum LubeSoft employee security level required to add a Club Program to a vehicle or Edit the Club Program ID and/or visit count for a vehicle.
Drawer Limit
Fill in the maximum amount of currency, checks and traveler’s checks you want in each cash drawer. When this amount is exceeded, you receive a notice on the Cashier Station screen. To get rid of this message, use the Money Pull feature on the Cashier Selection screen to remove enough money to bring the balance below the drawer limit.
Allow 0 Inv Quantity?
Your system will not process an invoice with a zero quantity for oils and jobs. This field allows you to control whether invoices can be processed with zero quantities for all other items. Enter Y to allow zero quantities on invoices for all items except oils and jobs (items of type L and type J). Enter N to not allow zero quantities on invoices for any items.
| Note: | When an invoice with a disallowed zero quantity oil item is sent to the Cashier Screen, you receive the following error message: Quantity cannot be zero. To cash out the invoice, enter the correct non-zero quantity for the item. |
Require Inspection Date?
Type Y if you want the system to require an inspection date during invoicing. If not, type N. If required, a popup box appears during Invoicing to prompt the technician to enter the date the vehicle is scheduled to be inspected. This field is designed to record when a vehicle is due for its next inspection required by the state or province, for example a safety inspection or an emissions test. You can print postcards based on the inspection date.
Taxable on Invoice?
Use one of the following 1-character codes to indicate whether you want to print a line on the invoice that specifies the amount of the total that was taxed. For example, some states tax on parts and not on labor. In this case the total tax for parts would print on the invoice. It is a good idea to ask your accountant or state/province taxing authority about taxing regulations to determine whether you need to print the taxable amount on the invoice.
Codes:
| Note: | The taxable and nontaxable amounts shown on the invoice are for tax type number 1 only. Taxes with type number 1 are defined on screen 2 of the Center Control File in the Type field. Other taxes may have different taxable and nontaxable amounts. These amounts are not printed on the invoice. |
Taxable Description
Type up to 20 characters in this field to describe the invoice amount that is taxable for tax type #1. This description prints on the invoice if the Taxable on Invoice field contains a Y or a B. For example, Taxable.
Nontaxable Desc
Type up to 20 characters in this field to describe the invoice amount that is not taxable for tax type #1. This description prints on the invoice if the Taxable on Invoice field contains a B. For example, Non-Taxable.
Metric?
If you operate your lube center in a country where metric measurements (liters and postal codes) are used instead of English measurements (gallons and ZIP/postal codes), type Y. For centers in the United States, type N.
Incl State/Prov in ID?
Type Y to include the state or province in the vehicle ID or license of a vehicle. If you use the vehicle license plate for an ID, the state/province is attached to the front of the Vehicle ID field. If you use alternate IDs, the state/province is attached to the front of the License field.
Dollar Key Allowed?
Type Y to use the Exact Change key at the Cashier Station so you can enter the exact dollar amount when the customer is paying for an invoice with a check, credit card, charge or gift redemption. The Exact Change key is not available for cash transactions. Type N to disable this option.
| Note: | Depending on the bank processor you use, the Exact Change key will activate for gift redemptions. |
Custom Comments Allowed?
Although LubeSoft’s comment feature allows you to choose up to 7 comments from a list of 54 to include on a customer’s invoice, sometimes you need more flexibility. The custom, or on-the-fly, comment feature allows you to include a comment on an invoice and the Service Comments Report that is specific to one customer for one visit. Type Y to turn on the custom comments option. (Defaults to N)
To make sure the option is on, go to the Comments popup in invoicing. If the words (55=OTHER) appear in the bottom right-hand corner of the screen, then the option is on. For more information, see the Using the Comments Popup article.
| Note: | Whether you print or reprint invoices, the on-the-fly comments are printed in the same order as they were entered during invoicing. Also, the on-the-fly comments appear on invoices reprinted from archive disks. |
Gross/Net
Type either G for gross or N for net to choose the basis for which LubeSoft will calculate information. If you indicate gross, calculations are based on the gross amount (or sub-total) on an invoice. If you indicate net, calculations are made on the gross amount minus all coupons, discounts and warranties. This field affects the store ticket average and the information in the View Daily Stats and Transaction Report.
Edit Nat’l Fleet Coup/Disc?
Type N to indicate that only the Category and Account Number fields on the Set Up Coupon/Discount screen can be changed for a national fleet. Enter Y to allow all the fields on the Set Up Coupons/Discounts screen to be changed for a national fleet. Local fleets have no limitation for the fields that can be edited on the Set Up Coupons/Discounts screen.
Use Alternate ID?
If you are not using license plate numbers as vehicle IDs, type Y. If you use license plate numbers for vehicle IDs, type N.
| Note: | If Use Alternate ID is N, and Incl State/Prov in ID is N, the license number is always the vehicle ID. |
Require Previous Comments
Type Y if you want to require the Previous Service Comments screen to appear during invoicing. This allows your bay technicians to view service comments from a customer’s previous invoices when they return for service. (Defaults to N)
Disable Coupon/Discount Help
Type Y to disable the coupon and discount help lists on the cashier screen. The cashier will still be able to enter or scan coupon and discount IDs, but they will not have access to the search list. (Defaults to N)
Security Level to Change Invoice Number
If you want to increase security and limit a user from changing the invoice number on the cashier screen, set the number to any number greater than 0. This will prevent users from changing the invoice # unless they have a security level greater than or equal to the level you designate. It will also limit them from restarting the invoice number count from reprint invoice, and they will not be prompted to enter or edit the next or last invoice number during start and end of day. (Defaults to 0)
| Note: | This function is not recommended if you are using invoice forms with pre-printed invoice numbers. |
Allow Skip Of Change Counter?
If you allow your employees to fill in the total cash drawer amount, instead of requiring them to enter individual coin and currency counts during the End of Day and Midday Till Closings, type Y. If you want to force entry for each denomination of currency, type N.
Number Of Tills
Type the number of cash tills in your center. At Bay/Waiting Room centers, this number is always one (1), since there is only one cash till. A Drive-Thru center usually has the same number of tills as bays.
Credit Card Processor
If your credit card system is integrated with the POS system, type the code of your credit card processor. If you manually process credit cards by entering the credit card type, account, expiration, and authorization on the POS system, leave this field blank. If you have a new credit card processor, you must call ISI Customer Support for setup information.
Codes:
Base Ticket Amount
Fill in the amount of your base ticket, which is the standard average ticket amount. This is used in the Quick Statistics, Franchise, and Activity by Vehicle reports to calculate the difference between the average ticket amount and the base ticket amount (this is also called “dollars over base”).
Retailer ID
This is only used for some credit card processors and prints on the invoice.
Inventory Cost Method
Use one of the following codes to specify which of the four methods you use to determine the cost of your inventory. If you are an O.I.L. ™ site, the inventory cost method you enter here must be the same as the inventory cost method specified at your central office.
Codes:
Type of Accounting System
From the list displayed on the screen, select the accounting system used at your store. For example, if you have QuickBooks Pro® set up at your store, select 7- QuickBooks. Leave this field blank if you do not use an accounting system. If you use an accounting system, you must specify it here in order to access the Set Up Accounting Options screen.
Use Purchase Orders?
Type Y if you want to use the Purchase Order Module. You must type Y in this field in order to access the module. If you do not want to use the PO Module, leave N as the default in this field.
Service Interval For Invoice
These intervals are used to print the next recommended service date and mileage on each customer’s invoice or stickers. It is also used in the marketing module to prepare service reminder postcards.
This field can be used in several different ways. It is important to note that if you have stored custom service intervals set up on the vehicle record, those stored numbers will take priority and will be used for all future visits by this vehicle. (Refer to Using Maintain Vehicle History for more information on setting up custom service intervals.)
To set up a service interval for oil changes only, enter the return miles and return days that you want to apply. We recommend entries of 3000 miles and 90 days.
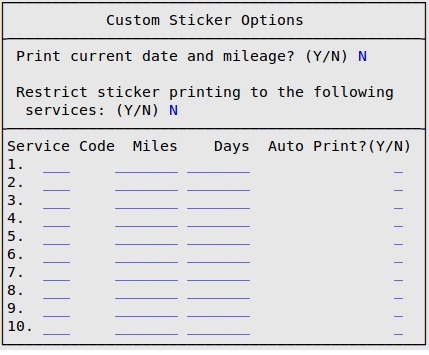
To set up service intervals for several services (not just oil changes), enter zeros in both the Miles and Days fields and press [Enter]. You receive the following popup.
| Note: | If you have more than one service on an invoice, the system will default to the service interval for the first service that appears on the invoice. |
To set up service intervals for a specific service, fill in the following fields:
Print Current Date and Mileage?
When enabled the standard return mileage and date will be replaced with the current mileage and date on a Thermal AutoSticker.
Restrict Sticker Printing to the Following Services
When enabled at least one of the service code listed below must be on the invoice for a Thermal AutoSticker to print.
Service Code
The service code you enter in this field must match one of the service codes of the items set up on the Set Up Inventory Items screen.
Miles
Type the number of miles recommended between services for the previously entered service code.
Days
Type the number of days recommended between services for the previously entered service code.
Auto Print? (Y/N)
To automatically print a Thermal AutoSticker with the service, type Y or if you do not want the Thermal AutoSticker to print automatically with the service, type N.
When you are finished setting up all of the service intervals, press [Esc] [Esc] to return to the first screen of the Center Control File.
Use PM Intervals
Type Y if you want use the service intervals from the Preventative Maintenance database instead of the default 3000 miles. Entering Y in this field, service intervals printed on the window sticker will match the owner’s recommendations used during a PM or Graphical Service Review presentation. Any Custom Service Interval entered for a customer will take precedence over using the PM interval. Use of this feature requires either the PM or Graphical Service Review products. If you need information please call your ISI Sales Representative at 1-800-922-3099.
Preventative Maint. Odometer
These fields are used to set up ISI’s add-on product, Preventative Maintenance™. Type the number of miles prior to and following a vehicle’s current mileage for which you want to report preventative maintenance information.
This product works with your POS software to enable you to offer ground-breaking customer service. This invaluable sales tool allows you to create a report for your customers that list the manufacturer recommendations for servicing their vehicles. This redirects your customers’ focus to their fast lube operator for service maintenance information. You must purchase this add-on product separately in order for the Preventative Maintenance function to work.
If you want more information about how this feature could be used in your stores or if you would like pricing information, call the ISI Sales Department at 1.800.922.3099.
| Note: | If you make changes to the Preventative Maint. Odometer fields, it does not affect your system unless you purchase the Preventative Maintenance add-on product. |
Coupon Limit
This field sets the number of coupons Lubesoft will allow the use of when cashing out an invoice.
Minimum value 0, maximum value 12, default 12
Discount Limit
This field sets the number of discounts Lubesoft will allow the use of when cashing out an invoice.
Minimum value 0, maximum value 12, default 12
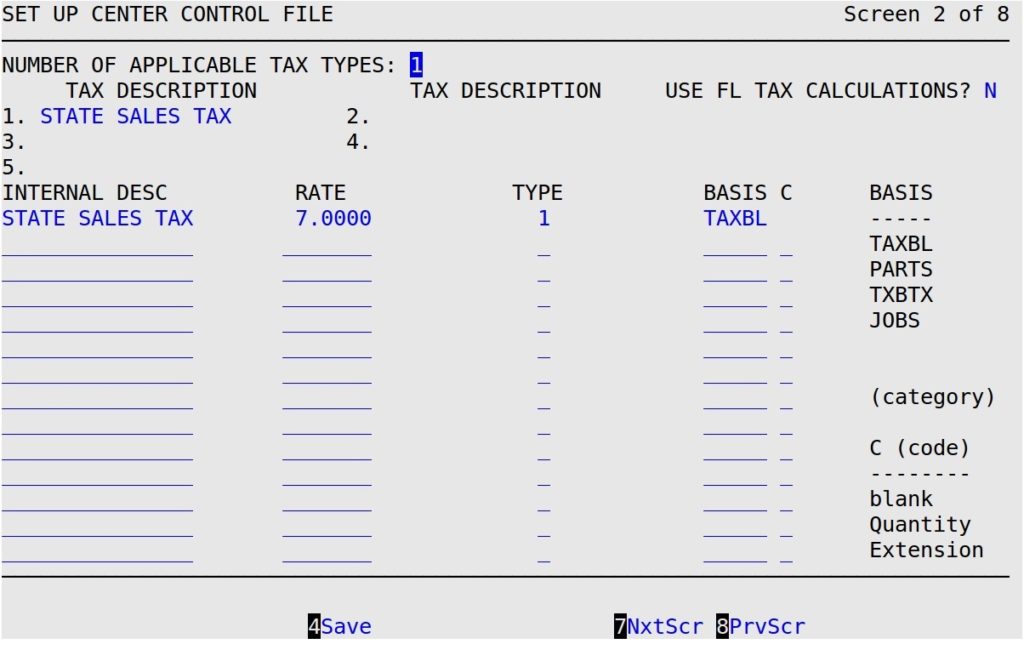
| Note: | If you press [F7] to move to the next screen, your changes will not be lost. You must press [F4] to save your changes before you press [Esc] [Esc]. Saving changes on one screen in a set of screens automatically saves changes to all screens in the set. A set of screens has the words Screen – of – in the upper right corner (see above). |
Number of Applicable Tax Types
Type the number of tax types that affect your sales (between 0 and 5).
Use FL Tax Calculations
Type Y to use invoice tax calculations required by the state of Florida.
Tax Description
Enter the name of each of the taxes that affect your business. You may include five different types of taxes which print on the screen and the invoice, and are tracked statistically. This description prints on the invoice. You cannot specify more description fields than the number of applicable tax types you specified above. This description prints in the tendering section of the invoice.
| Note: | Tax type 1 should be your most common tax, because it is first to be printed and it is used to determine the taxable and nontaxable amounts printed on an invoice. |
For the remaining fields, you may notice that there are 15 tax lines available and a limit of only five tax types. These lines are available for the different components of one tax. For example, two different oil tax lines could show that the oil is taxed 10% per quart and 2% for an oil disposal charge. Both lines would be combined into tax 3, and labeled “Oil Tax” on the customer’s invoice.
Internal Desc
The name of each tax that you use for your internal reference. This field is not printed on an invoice or any other customer document. (Reference only)
Rate
Type the tax rate for each tax. The tax calculated on each invoice is based on this tax rate. For example, type 4 for 4%.
Type
Fill in the number of the tax (between 1 and 5) you assigned in the Tax Description field above for this type of tax. Taxes can have the same type number, as explained in the tax description example above, as long as they are the same kind of tax. There can be more than one tax for a tax type. For example, the Oil Tax and the Disposal Tax are both tax type 3 – an oil tax.
Basis
Use one of the following codes to specify the basis that applies to each tax.
| Note: | For all tax bases except Category, you can set up Coupons and Discounts to be subtracted either before or after tax is calculated. |
By default, Warranties reduce the taxable amount. If you would like to change this, please contact ISI Customer Support.
| Basis | Description | Summary | ||
|---|---|---|---|---|
| Taxbl | This tax is applied to all inventory items marked taxable in Set Up Inventory Items. During invoicing, you can indicate that the item is not to be taxed for the current sale by typing an N or W in the Code column. | Taxbl=Sum of all items that do not have an N or W in the code column on an invoice. | ||
| Parts | This tax is applied to all parts set up in inventory that are marked taxable (types P, L and W only). During invoicing, you can indicate that the item is not to be taxed for the current sale by typing an N or W in the Code column. | Parts=Sum of all type P, L and W items that do not have N or W in the code column on an invoice. | ||
| TXBTX | This tax is applied to taxable sales (see Taxable) plus all taxes listed previous to this one. For example, if net sales totals $10 and tax 1 is $1, NT+TX taxes on $11.
Taxes applied to the invoice after an NT+TX tax basis is used are not used to calculate the NT+TX tax. |
NT+TX=Net plus any taxes charged to the invoice before this tax is applied. | ||
| Jobs | This tax basis allows you to tax a fixed amount for the parts included in a job. This basis is frequently used if parts are taxed and labor is not. For example, if the total retail price for a job is $25, you can use this basis to tax a fixed price for the parts (for example, $15). This gives a fixed amount of tax for parts for each customer, instead of a variable amount of tax. For any part sold that is not a job (any non-J type items), this basis functions the same as the Taxbl basis (described above).
|
Jobs = All non-J type items minus coupons and discounts minus any item marked with a W or N in the Code column on an invoice. | ||
| Category | This tax is applied only to a certain category. For example, the previous screen shows a tax on oil.
Coupons, Discounts, and Warranties never reduce the taxable amount for a Category tax. |
Category = All items with the same category as the category entered for this tax will be taxed. |
C
Use one of the following codes from the table that applies to the tax if you are taxing a category. This code defines the method used to calculate the tax.
Codes:
Example: 10% (.10) tax on oil for the following invoice
| Item | Description | Price | Include | C | Qty | Unit | Amount |
| 1030 | 1030 Motor oil | 1.50 | 5.00 | 4.00 | 0.00 |
If oil were the category for inventory item 1030, then the tax would be:
Require Alternate ID?
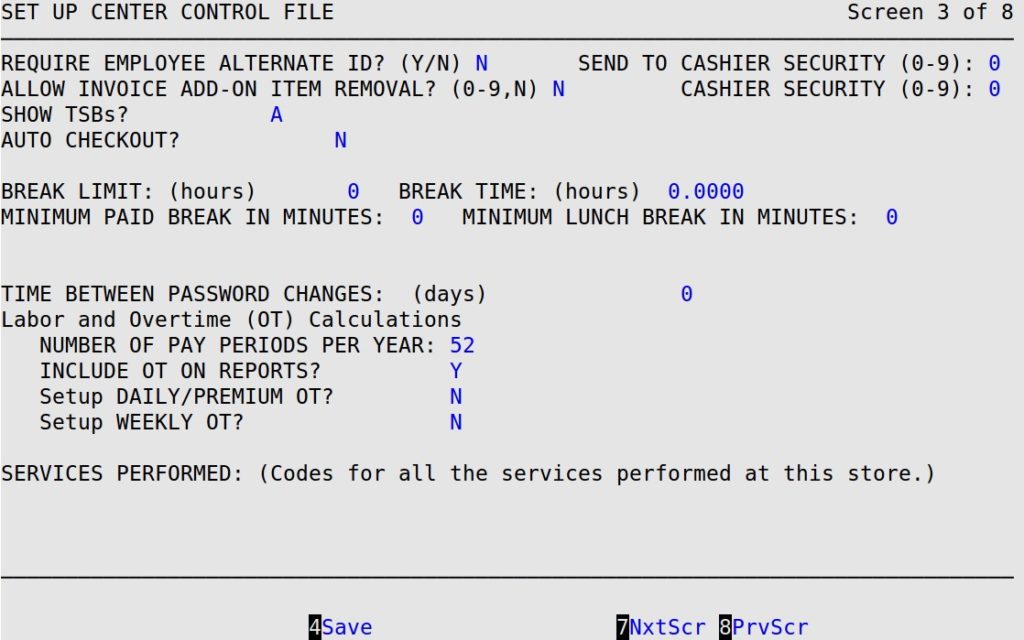
This field allows you to select whether LubeSoft will or will not automatically prompt for an employee’s alternate ID when clocking in or out.
Send to Cashier Security (0-9)
Type in the desired employee security level required to send a work order to the cashier station. Employee security levels can be modified in the Set Up Employees (1-5-1). Type 0 to not prompt for employee password when sending to cashier. This feature is only applicable for Bay/waiting room processing mode (screen 1).
Allow for Invoice Add-On Item Removal? (0-9,N)
This field will determine if type O inventory items can be removed from an invoice when they are attached to another inventory item (except when they are attached to a type J inventory item). When the cursor gets to this field you will see the following window appear:
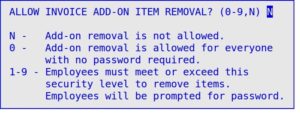
Enter N in this field if you never want employees to be able to remove type O add-ons from an invoice. Enter 0 if you want all employees to be able to remove type O add-ons from an invoice and do not want employees to be prompted to enter their employee password. Enter 1 through 9 to indicate the minimum security level required to remove an add-on from an invoice.
Cashier Security (0-9)
Type in the desired employee security level required to access a work order from the Cashier Station.
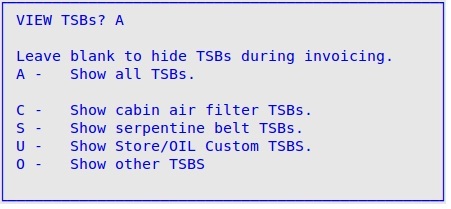
Show TSBs?
Specify which technical service bulletins are displayed during invoicing by typing the corresponding codes listed in the popup. (Defaults to A)
Auto Checkout?
This field allows you to select whether LubeSoft will or will not automatically, during the center closing, clock out an employee who has failed to clock out before leaving. If you type Y, the computer looks for the last time this employee’s number was assigned to an invoice and uses that as the last time he or she worked during the day. If you type N, the system prompts you during closing to clock out all employees that are still clocked in.
Break Limit
Fill in the break limit for your employees. The break limit is the length of time an employee must work before the computer automatically deducts a specified amount of break time. For example, if your employees get a break after four hours of work, type 4.0 for the break limit.
Break Time
Fill in the time your employees are allowed for a break. An example is .5 for a half hour break.
| Note: | If you use the Break Limit and Break Time fields, your employees must not clock in and out for breaks. |
Minimum Paid Break in Minutes
Specify the minimum amount of paid break time the employee will take. Entering an amount in this field means that employees will not be able to clock back in from a paid break until the amount of specified minutes has passed without an Override (refer to the article Clock In Overriding for an explanation of Override functionality). Entering time in this field will not affect timeclock calculations.
| Note: | The Break Time field must be set to 0 in order for this field to appear. When set to 0, the length of breaks the employee takes are not restricted. |
Minimum Lunch Break in Minutes
Specify the minimum amount of lunch break time the employee will take. Entering an amount in this field means that employees will not be able to clock back in from a lunch break until the amount of specified minutes has passed without an Override (refer to Clock In Overriding for an explanation of Override functionality). Entering time in this field will not affect timeclock calculations.
| Note: | The Break Time field must be set to 0 in order for the break time field to appear. When the break time field is set to 0, the length of lunch breaks the employee takes are not restricted. When the above two fields are set to 0 or not used on the Employee Clock Out screen, there will not be a popup screen to enter reasons for clocking out. For more information, see Using the Employee Timeclock. |
Allow ID of Employees on Break or Lunch to be Entered on Invoice
If you wish to place an employee ID on an invoice for work performed or products sold while the employee is on lunch or break, type Y. If you would rather not allow an employee ID who is clocked out for lunch or break to be placed on an invoice, type N (this is how LubeSoft functions if an employee is clocked out for the day). This field will not appear on the screen if the Minimum Paid Break in Minutes and the Minimum Unpaid Break in Minutes fields are set to 0.
Time Between Password Changes
The employee password feature in LubeSoft is designed to add security to the LubeSoft system. These passwords should be changed regularly to keep the system as secure as possible. Type the number of days you want to pass between employee password changes. For example, if you specify 30 in this field, employees are prompted every 30 days to change their passwords. They are prompted in the Employee Timeclock (1-1-4) function to enter a new password.
| Note: | If you do not want this security feature activated in your store, make sure the value in the field is zero (0). |
Number of Pay Periods Per Year
Enter the number of pay periods in one year for your store. For example, if your store is on a weekly pay period, you would type 52.
Include OT on Reports
Type Y in this field if you want to include overtime in the Transaction, Franchise, Employee Earnings, Employee Productivity, and Quick Statistics reports. (Defaults to N)
More Information About Overtime
In order for LubeSoft to know how to calculate overtime hours, wages and labor, you have to specify the rates at which you pay your employees for regular overtime hours, extended overtime hours, Sunday hours, and holiday hours. You need to set up the values for these pay schedules and turn on the overtime option for your stores. Also, make sure you set up the hourly wage correctly for each employee in Set Up Employees (1-5-1).
To calculate overtime according to your payment schedules, you need to fill in the three fields in the Overtime (OT) Calculations section on this screen: Include OT on Reports, Setup Daily/Premium OT, and Setup Weekly OT.
The Employee Overtime Spreadsheet has been created to print employee overtime, total overtime for each employee and total overtime for the store over a selected period of time. For more information about this report, see the Employee Overtime Spreadsheet articles.
Setup Daily/Premium OT
If you use daily overtime and want to calculate it in LubeSoft, type Y and press [Enter] in this field to receive the following popup window.
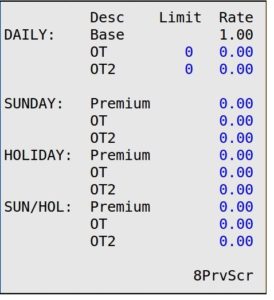
Fill in the Limit and Rate fields for each of the payment schedules in the popup. In the Limit field, you specify the number of hours after which the overtime calculations start. In the example above, overtime is calculated when an employee works more than 8 hours. Extended overtime is calculated after an employee works 12 hours.
In the Rate field, you cannot change the base rate. It is always set to 1 and it is the basis for the other Rate fields. When you have finished, press [F8] to return to screen 3 of the Center Control File.
| Note: | If you pay a special holiday rate, you must make sure that each holiday is marked on your calendar. For more information, see the Setting Up the Calendar article. |
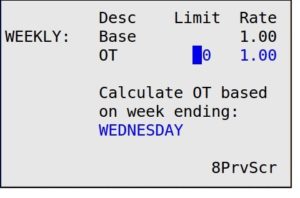
In the Rate field, you cannot change the base rate. It is always set to 1 and it is the basis for the other Rate fields. In the example above, overtime is calculated as “time and a half” or 1 ½ times the base rate. When you have finished, press [Enter].
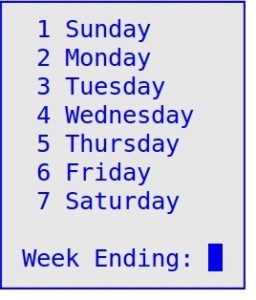
| Note: | The weekly overtime is calculated separately from the daily overtime. You can calculate daily overtime, weekly overtime, or both. |
This feature is especially helpful to stores in an Office Information Link network, with other centers in the network that perform services that you do not perform at your store. Using this field in conjunction with the Service Codes field on the Set up TSBs screen will allow you to avoid receiving TSBs during invoicing for services you don’t perform. If you only want to see TSBs for services you perform at your store during invoicing, you should enter the service codes for those services in the Services Performed field; otherwise, you should make sure the Services Performed field is blank.
 |
If you do not want to limit the TSBs that appear on your system during invoicing, you must delete any service codes that appear in this field. |

Employee Tracking by Invoice Number of Employee Positions
Enter 0, 1, 2, 3, 4, 5, or 6 to indicate how many employees are included on each invoice (in other words, how many employees normally work on one vehicle). This affects the Employee Productivity Report, which bases its output on the services and sales that each employee is involved in, and the commission amount, which is paid to each employee listed on the ticket. This also affects how many employees can enter their user IDs in the Employee PopUp in Invoicing. Pre-printed invoice formats can only print up to 3 employee positions. Plain paper invoices can print all six.
| Note: | Only positions 1-3 will be able to accumulate commissions. |
Position Descriptions
Fill in up to six 10-character descriptions of the employee positions that will appear in the Employee PopUp during invoicing. You will only be able to enter as many descriptions as the number you entered in the Number of Positions field. These will print on the Employee Activity By Item Report and the Employee Activity By Invoice Report. For example, many stores use Upper, Lower, and Courtesy as positions.
Positions Required
Enter a Y or N into each field to indicate if entry of the position is required. For example, if you want to require an employee ID be entered for position 1, enter a Y in the first field. You will only be able to enter as many descriptions as the number you entered in the Number of Employee Positions Entered field.
Cashier
Enter a Y or N into this field to indicate if the ID of the cashier is required before tendering.
Employee Tracking By Inventory Item Position Descriptions
Fill in up to three 10-character descriptions of the positions that will pop up in the Employee Tracking By Inventory Item PopUp during invoicing. This is typically used to track employee productivity by inventory item. These will print on the Employee Activity By Item Report and the Employee Activity By Invoice Report.
Copy Within Invoice Group
Enter a Y to enable the ability to copy Employee IDs from other line items within the same group on a work order. The first time you set the employee position 1, 2, or 3 field in any line item employee tracking item of a group, that employee’s ID becomes the default for that position within the group.
Validate at (Bay/Cashier)
Employee line item tracking is validated for completeness either in the Bay Invoicing Station or Cashier Station.
Allow Item Price Change
Enter a Y to enable the ability to change the price of an inventory item during invoicing.
Allow Skip Credit Card Auth Code
This allows you to skip entering in a credit card authentication code during invoicing.
Ignore Inactive Items
Select Y if you would like the system to ignore inventory items that have been inactive for 90 days with 0 quantity on hand. This feature relates to what items print on the Inventory Count Worksheet and display in the Enter an Inventory Count screen.
Enable Tire Help
There are three valid options for this menu.
Enable Electronic Integration With CIMS
Turning on this flag will enable a monthly export file creation of DOT#s to be transmitted to CIMS. To work, this requires an account with CIMS E-Tire Registration service.
Tire Rotation Interval Default
Enter the default interval for tire rotations. This option is only used on certain Thermal Autosticker formats.
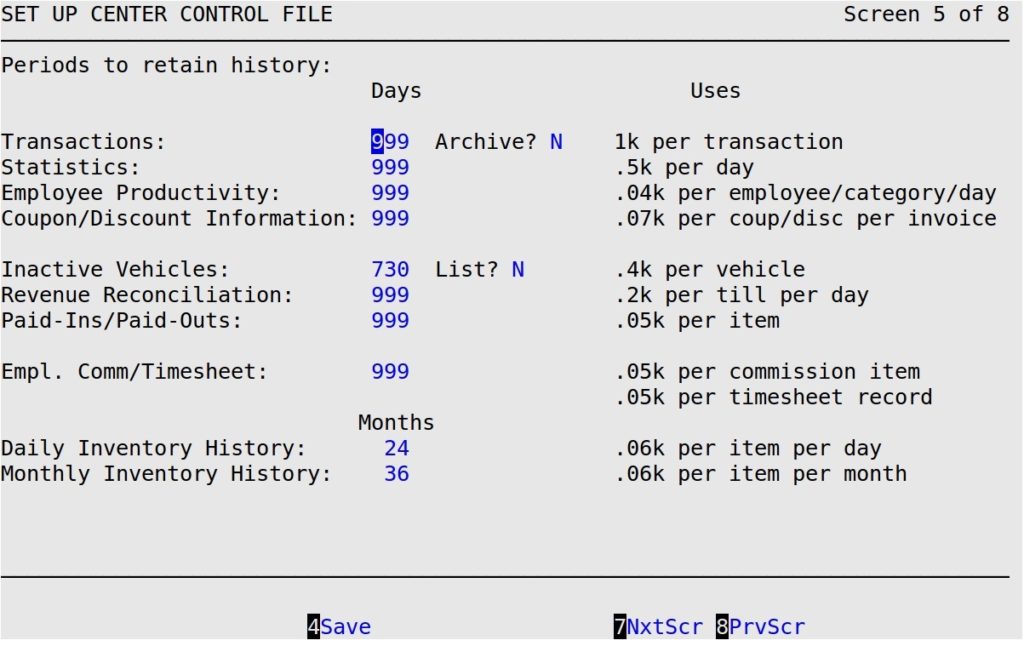
Transactions
Type a 1- to 3-digit number to indicate the number of days you want to keep invoice and estimate transaction information on your system for report purposes.
| Note: | The number in the Coupon/Discount Information field should never be less then he number in the Transactions field. |
Archive?
Type Y or N to indicate whether you want to receive the reminder to archive during the Start of Day procedures. If you use Plain Paper Invoices, your system will indefinitely (or until your system runs out of space) retain your invoice for reprint. If you are not using Plain Paper Invoices and select Y, your system will prompt you to archive your invoices to a floppy disc.
Statistics
Type a 1- to 3-digit number to indicate the number of days you want to keep statistics information on your system. This is the source of information for all statistics reports. These statistics take up a large amount of space. If you will not use this information, type a zero (0) in this field.
Employee Productivity
Type a 1- to 3-digit number to indicate the number of days you want to keep employee productivity statistics information on your system. This information is only used for the Employee Productivity Report. These statistics take up a large amount of space. If you will not use this information, type a zero (0) in this field.
Coupon/Discount Information
Type a 1- to 3-digit number to indicate the number of days you want to keep coupon and discount information (invoice and setup) on your system. The expiration date of your coupons and discounts helps determine when that information is removed from the system. Once a coupon is older than the number of days to keep coupon and discount information, it is compared to its expiration date and that information is removed. When a coupon or discount is automatically deleted, so is the setup information and the information relating to the invoices. For more information about setting up coupons/discounts, see the Setting Up Coupons/Discounts article.
| Note: | The Clearing Report, which prints during the closing processes (weekly, monthly, quarterly, and yearly), lists the date range of coupons/discounts removed and the date range of invoicing coupon and discount information that was removed from the system during the close. |
Inactive Vehicles
Type a 1- to 3-digit number to indicate how many days you want to keep your inactive customers’ information on your system. Inactive customers are those who have not returned to your store for service within the number of days you specify in this field.
| Note: | Entering a number smaller than 300 will not remove any information. |
List?
Type Y if you want a list of customer names and addresses of the inactive vehicles as they are deleted from the system. These names, along with other vehicle information, print on the Inactive Vehicle List during monthly closings. See the Inactive Vehicle List article for an example. This can sometimes be an extremely long report.
Revenue Reconciliation
Type a 1- to 3-digit number to indicate how many days you want to keep information on your system for your Revenue Reconciliation Report. See the Revenue Reconciliation Report articles for a report sample.
Paid-Ins/Paid-Outs
Type a 1- to 3-digit number to indicate how many days you want to keep your paid-ins and paid-outs information on your system. This is for the Paid-In/Paid-Out List. For more information on Paid-Ins and Paid-Outs, see the Paid-Ins/Paid-Outs articles.
Empl. Comm/Timesheet
Type a 1- to 3-digit number to indicate how many days you want to keep information for your employee commission, timesheet, and distribution reports on your system. These statistics take up a large amount of space. If you will not use this information, type a zero (0) in this field. See the Lubrication Reports articles for report samples.
Daily Inventory History
Type a 1- to 3-digit number to indicate how many months you want to keep your daily inventory history on your system. These statistics take up a large amount of space. (Required)
Monthly Inventory History
Type a 1- to 3-digit number to indicate how many months you want to keep your monthly inventory history on your system. After this time, the monthly inventory is removed entirely. These statistics take up a large amount of space. (Required)
More Information About Inventory History
The fields Daily Inventory History and Monthly Inventory History can affect the Inventory Valuation and Usage Reports. The purpose of these fields is often misunderstood.
The Daily Inventory History field determines how many months of daily inventory history are kept on your system. All inventory report calculations are accurate if the reports are run within this range.
The Monthly Inventory History field determines when daily sales are consolidated into monthly totals. Any reports run after the daily inventory history has been consolidated must have a monthly date range to be accurate. If you want to submit reports for a partial month for a period longer than indicated in Daily Inventory History, you should increase the number of months in the Daily Inventory History field. This only affects the future history, and not the existing history.
Note that this keeps additional daily sales information on-hand and takes up more room on your hard drive, which could cause problems.
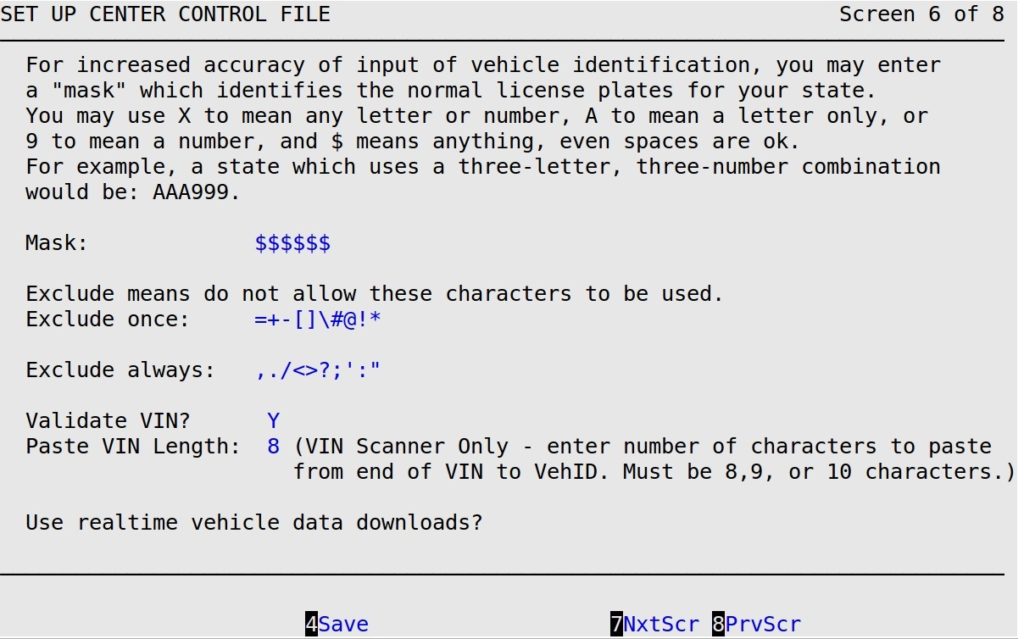
Mask
The license mask feature permits you to define the standard vehicle license plate configuration for your state or province (for example, ABC123 is letter, letter, letter, number, number, number). Use the following chart to determine what to enter in this field.
| To | Do this |
|---|---|
| Mask letters | Type A for each letter. |
| Mask numbers | Type 9 for each number. |
| Mask all letter and numbers | Type X for each letter or number. |
| Accept any character in the mask except the characters specified in the Exclude Once and Exclude Always fields | Type $ for each character. |
Exclude Once
Specify up to 10 characters you prefer not to be included in a vehicle ID. The system beeps and gives the message Vehicle ID does not fit template when the specified character is included in the vehicle ID. You can then accept the vehicle ID or change it to get rid of the character. For example, a vehicle ID that could be accepted would be ABC=123 if “=” is one of the characters in the Exclude Once field. You may be willing to accept “=”, “+” and “!” in a vehicle ID. If you are, you would type =+! in the Exclude Once field.
Exclude Always
Specify up to 10 characters you never want to be included in a vehicle ID. When one of these characters is entered, the system beeps and gives a message similar to You cannot use ? in a license number. For example, this message appears if “?” is one of the characters entered for the vehicle ID that you have entered in the Exclude Always field. You cannot bypass this message and accept the ID. You must re-enter an ID that does not have any of the characters in the Exclude Always field.
For example, if you do not want “/”, “[“, “#”, “@”, “%”, “&” and “?” to ever be entered in a vehicle ID, you would enter /[#@%&? in the Exclude Always field.
Validate VIN?
Type Y if you want LubeSoft to validate the VIN when it is entered during invoicing or on the Maintain Vehicle History screen. The system will check that the VIN is correct in length and has the allowed characters. (Defaults to Y)
More Information About Masks
Proper use of the masking function helps decrease the number of incorrect Vehicle ID entries by forcing the bay technician to double-check their entry of inappropriate keystrokes, such as the number zero (0) where the letter O should be and vice versa.
With the mask activated, the system accepts, without question, any license entry that matches the mask exactly. If the license entry differs from the mask, the system highlights the license number with the cursor blinking at the start of the Vehicle ID field. The message Vehicle ID does not fit template shows up at the bottom of the screen. This indicates that the system questions the license format and wants you to confirm the license number. If the license is correct, press [Enter], and the system accepts it. If the license is incorrect, type the correct ID and press [Enter].
If the license number does not match the mask format, it will again hold and blink to await another [Enter]. An example of a license that does not fit the mask AAA999 is a personalized plate such as BMW1. You must press [Enter] twice when entering the vehicle ID during invoicing to accept this input.
If you do not want the system to double check your license plate entry, put in a mask which contains XXXXXXX.
If a character is in both the Exclude Always and Exclude Once fields, the entry in the Exclude Always field overrides the entry in the Exclude Once field.
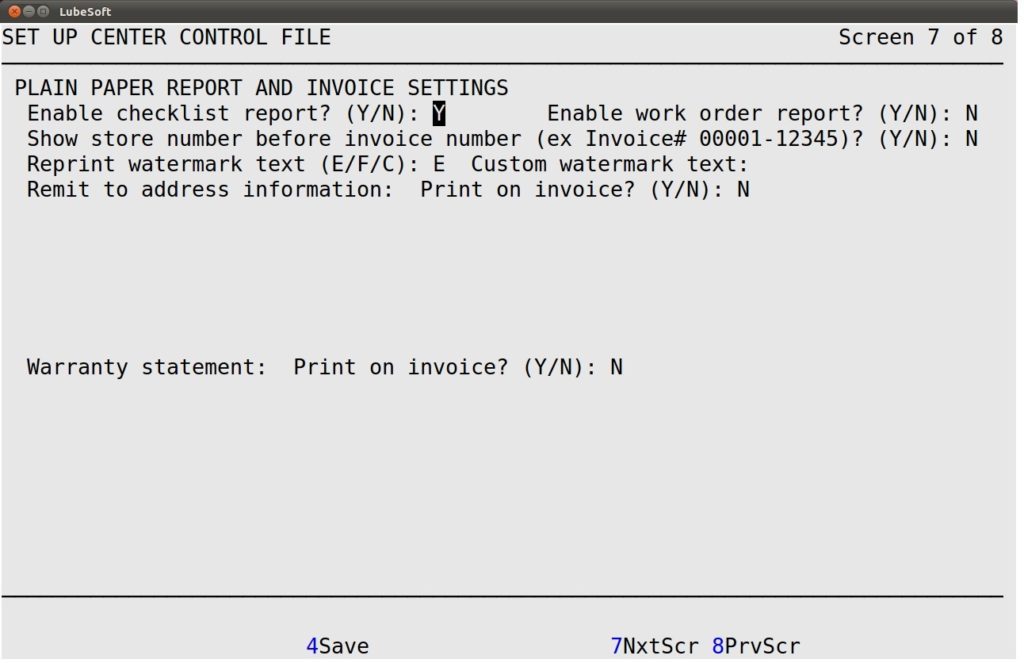
Enable checklist report? (Y/N)
Enter a Y in this field if you want to allow printing the checklist report from the checklist popup during invoicing.
Enable work order report? (Y/N)
Enter a Y in this field if you want to allow printing the work order report during invoicing.
Show store number before invoice number (ex Invoice# 00001-12345)? (Y/N)
Enter a Y in this field if you want your store number to print in front of the invoice number on the invoice. An entry of N will only print the invoice number.
Reprint watermark text (E/F/C)
Plain Paper Invoice customers can select if the system saves the REPRINT watermark in (E)nglish or (F)rench. A (C)ustom watermark may also be configured.
Custom watermark text
If you have selected (C)ustom in the previous field, you may enter up to 15 characters to print as the watermark or leave it blank and print without a watermark. Only alpha-numeric characters are allowed in the watermark, and spaces are not allowed.
Print remit to address for fleet invoices? (Y/N)
Enter a Y in this field if you want to be able to enter a remit to address that will print on all fleet invoices.
Address Information
Enter the remit to address that you want to print on all fleet invoices.
Print warranty statement on invoice? (Y/N)
Enter a Y if you want a custom warranty statement to print on each invoice.
Statement
Enter the warranty statement you want to print on every invoice. This statement will appear on the last page of every invoice.
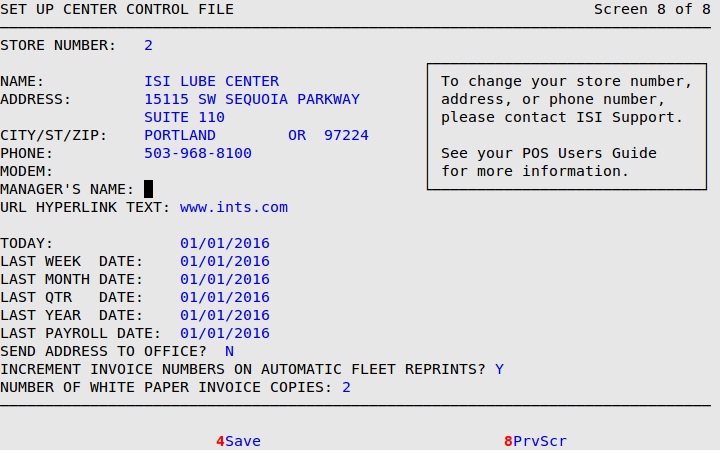
Store Number
The system displays the store number of your store. (Display only)
Name/Address/City/St/ZIP
The system displays the name and address of your store, which prints on the invoice and service review. (Display only)
Phone
The system displays the phone number of your store, which prints on the invoice and service review. (Display only)
| Note: | The Store Number, Address, and Phone fields are “Display only” and are set this way in order to secure your ISI system and ensure data integrity. Changes made to these fields can have unintended results, therefore, it is necessary that you contact ISI Customer Support if changes need to be made. |
Modem
Type the phone number of the modem in your center. (Reference only)
Manager’s Name
Enter the first and last name of the store manager. (Reference only)
URL Hyperlink Text
Enter in the text you want to display on the following printouts as a hyperlink:
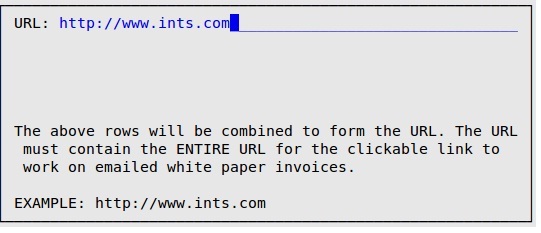
This URL hyperlink text will print in the header area underneath the phone number on these printouts. When you press [Enter] on this field, the following window will display for you to specify the URL to embed in the hyperlink.
The following fields should not be changed after initial setup unless ISI Customer Support instructs you to change them. Changing the dates can cause serious problems.
| Note: | The last week, month, quarter, year, and payroll dates should agree with the codes set up for these closings on your calendar. This ensures that the information used in many reports will match up to the actual closings. To determine what your calendar setups are, go to the Set Up Calendar (1-6-4) screen and see the Setting Up the Calendar article. |
Send Address To Office?
Not currently used.
Increment Invoice Numbers on Automatic Fleet Reprints?
Type Y (default) to increment the invoice number that prints on the next invoice, based on the number of additional automatic fleet reprints. The invoice number printed on each automatic fleet reprint is the same as the original invoice. Type N to print the next invoice number in sequence, regardless of any additional automatic fleet reprints.
Number of White Paper Invoice Copies
Enter the number of plain paper invoice copies you wish to print. (Defaults to 1)