Your screen usually shows the codes that were set up during your system’s installation. The codes you use depend on the printer model you use and how your printers are hooked up (to a terminal, the main computer, or a network). For this reason, you should verify each terminal’s printer setups.
The codes you use also depend on the type of invoice, estimate, and service review form you are using at your store: long form, short form, or plain paper formats. All of these forms fit on 8½” by 11″ paper.
This article contains instructions for setting up laser printer codes, copying print codes between terminals, and enabling PDF report printing. If you have a Dot Matrix Printer, refer to the article Setting Up Printer Controls for Dot Matrix Printers. If you have a Laser Printer, follow the instructions below.
Use the following steps to set up your printer information:

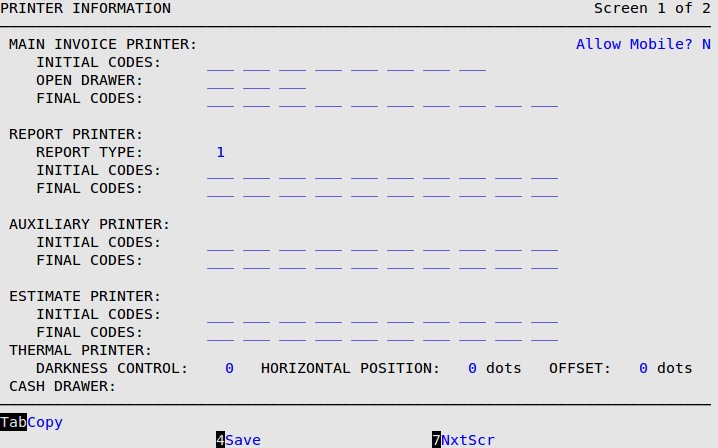
Main Invoice Printer
Fill in this field to send the invoicing output to the correct printer. Your invoice printer can be plugged into a terminal, computer, or network. Other options not listed below are available for this field. If you have a unique situation, please call ISI Customer Support for help.
| If your invoice printer is: | Fill in this code: |
|---|---|
| Attached to the computer and you want the invoices to be sent to the printer scheduler | =inv |
| The same printer as your report printer | Leave this field blank |
Invoice Printer Initial Codes
Type 999 27 69 27 38 108 53 101 in these fields. The initial codes ensure the invoice is printed correctly when it gets to the printer. These codes are not just random numbers; each code has a specific purpose. The codes allow the output to flow to the printer and set the printer to the correct number of characters per inch.
Invoice Printer Open Drawer
These codes automatically open the cash drawer for cash sales. If these codes do not open your cash drawer, please call ISI Customer Support for help.
| If your cash drawer is: | Fill in these codes: |
|---|---|
| Connected to the invoice printer | 7 7 7 |
| NOT connected to the invoice printer | Leave this field blank |
Invoice Printer Final Codes
The final codes prepare the printer for the next print job.
| If your invoices are… | Fill in these codes: |
|---|---|
| Short Form | 108 54 46 55 99 54 50 102 50 88 |
| Long Form | 108 54 50 102 50 88 |
Report Printer
This field sends reports to the correct printer. Your report printer can be attached to a thin client, computer, or network. If you have a unique situation, please call ISI Customer Support for help.
| Note: | If you have the Preventative Maintenance Module (PM), the printer entered here is the printer to which that report is sent. Therefore, if you have PM, the normal setup would be to put the PM printer (usually a separate printer) in this field for each bay terminal and to enter the report printer for the console. |
| If you want the reports: | Fill in this code: |
|---|---|
| sent to the printer scheduler (this is the standard choice) | Leave this field blank or =rpt |
Report Type
Leave this set to 1 to continue using the codes referenced in the section below. Change to 2 if you want to use PDF reports. See the PDF Report Printing section later in this document.
Report Printer Initial Codes
Type 27 69 27 38 49 88 in these fields. The initial codes ensure the report is printed correctly when it gets to the printer.
Report Printer Final Codes
Leave these fields blank.
Auxiliary Printer
Fill in this field if you print service reviews or cash receipts on a separate printer, known as the auxiliary printer. Your service review printer can be attached to a terminal, computer, or network. Other options are available for this field. If you have a unique situation, please call ISI Customer Support for help.
| If your auxiliary printer is: | Fill in this code: |
|---|---|
| Attached to the computer and you want the service reviews to be sent to the printer scheduler (this is the standard choice) | =srv |
| The same printer as your report printer | Leave this field blank |
Auxiliary Printer Initial Codes
Type 999 27 69 27 38 108 53 101 108 54 in these fields. The initial codes are used to have the service review print correctly when it gets to the printer.
Auxiliary Printer Final Codes
Type 46 55 99 54 50 102 49 88 in these fields. The final codes prepare the printer for the next print job.
Estimate Printer
If you have set up your LubeSoft system to create Estimates, fill in this field to send the estimate output to the correct printer. Your estimate printer can be plugged in to either a terminal, computer, or network. Other options not listed below are available for this field. If you have a unique situation, please call ISI Customer Support for help.
| If your estimate printer is: | Fill in this code: |
|---|---|
| Attached to the computer and you want the estimates to be sent to the estimate printer | =est |
| The same printer as your report printer | Leave this field blank |
Estimate Printer Initial Codes
Type 999 27 69 27 38 108 54 101 54 99 in these fields. If you have set up your LubeSoft system to create Estimates, the initial estimate printer codes ensure the estimate prints correctly when it gets to the printer. These codes are not just random numbers; each code has a specific purpose. The codes allow the output to flow to the printer and set the printer to the correct number of characters per inch.
Thermal Auto Sticker Printer
Fill in this field if you are printing thermal auto stickers. This line will designate to which thermal auto sticker printer this terminal prints.
| If your Thermal Auto Sticker printer is… | Fill in this code: |
|---|---|
| Attached to the computer and you want the thermal sticker to be sent to the print scheduler (this is the standard choice) | =ovation |
| Note: | If you are using multiple thermal printers and you want to print to the scheduler, you will first need to set up your printer in CUPS. |
Darkness Control
Enter a higher number to print darker text for stickers, or a lower number to print lighter text. Darker text causes more wear on the print head, so use the lowest setting that makes stickers legible. (Default is 50)
Horizontal Position
Enter a higher number to move sticker text to the left, or a lower number to move sticker text to the right. A change of 20 dots will shift the text by about one character or 1/8th inch (3 mm). (Default is 455)
Offset
If you have a Pennzprint sticker printer, enter a value to set the horizontal position of sticker text. Positive numbers move the text left, and negative numbers move the text right. (Default is 0)
Cash Drawer
Your cash drawer can be plugged into a computer or a network device. Call ISI Customer Support for help with setup.
| If your cash drawer is: | Fill in this code: |
|---|---|
| Attached to the back of the computer | /dev/lp0 or lp1 |
| Attached to a network print server | =cashdrawer |

| Note: | When you press [F7] to move to the next screen, your changes will not be lost. However, you must press [F4] before exiting the menu option to save your changes. Saving changes on one screen in a set of screens automatically saves changes to all screens in the set. A set of screens has the words Screen _ of _ in the upper right corner (see above). |
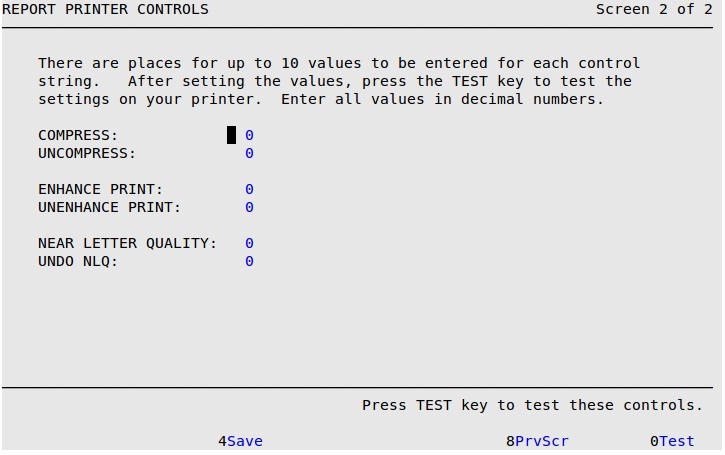
Compress
Type 27 38 107 50 83 in these fields. This information is sent to your printer when a report needs to be compressed to fit across a page. This field is not affected by the printer or form type. (Required for compressed reports to print correctly.)
Uncompress
Type 27 38 107 48 83 in these fields. This information is sent to your printer when compression is no longer needed to fit a report across a page. This field is not affected by the printer or form type. (Required for compressed reports to print correctly.)
| Note: | If a report cannot fit one line across a page and seems to wrap around to the next line, check to make sure that you have entered the compress and uncompress codes correctly for the terminal from which you are printing. |
| Field: | Fill in these codes: |
|---|---|
| Enhance Print | 27 40 115 52 66 |
| Unenhance Print | 27 40 115 48 66 |
| Near Letter Quality | 0 0 |
| Undo NLQ | 0 0 |
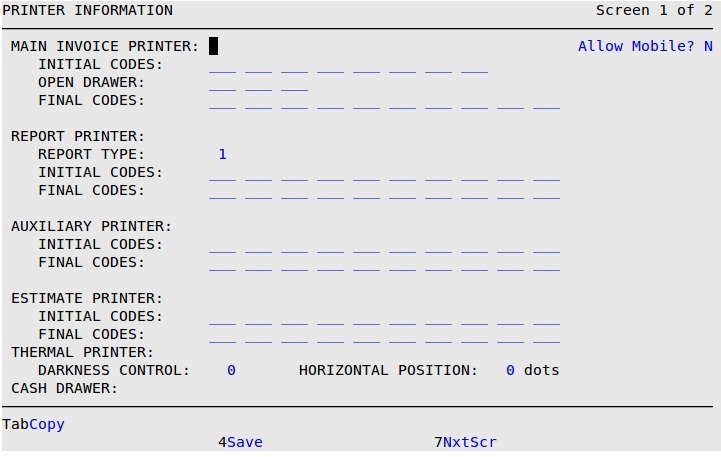
Once the first terminal printer information has been set up and tested for your specific operation, you can copy the first terminal’s printer information to the other terminals.
Use the following steps to copy printer information from one terminal to another.

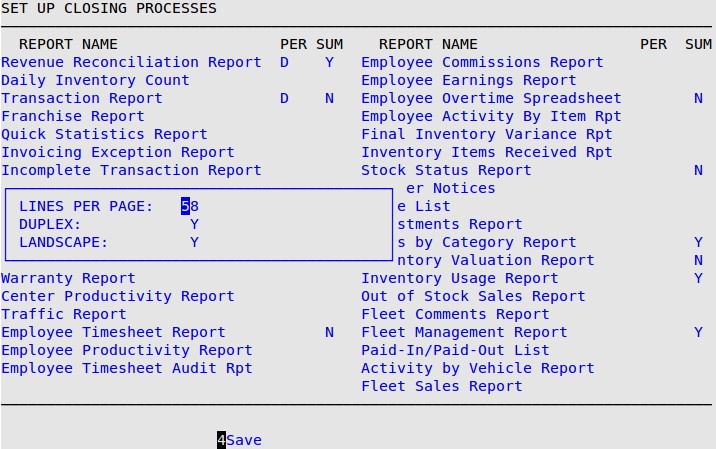
If your laser printer accepts raw PDF documents, you can now utilize features such as printing in landscape (horizontally) or duplex mode (double-sided).
To activate PDF Report Printing:

| Note: | Your original print codes will not be saved. If you switch back to Report Type 1, you will need to manually correct the codes for your printer setups. |

