
Screens are a large part of the system and you need to learn how to use them efficiently. There are three types of screens in LubeSoft: Information Entry Screens, Report Control Screens, and Information Viewing Screens. The procedure for using each of these types of screens is the same throughout the system.
This article describes the details of a typical Report Control Screen. The exact format of the Report Control Screen is specific to each report. Because reports vary in content, the information you can specify varies from report to report. In addition, not all fields are found on every Report Control Screen. For example, the Summary Only field only appears for those reports that offer both a detailed and summary version. Information about the Report Control Screen for each report, including the default values, is included in each report article. Detailed instructions on the information in specific reports and how you can use those reports can also be found in the Lubrication Reports and LubeSoft Reports articles.
Your POS system uses Report Control Screens to give you control over what information is printed on the reports. The fields on a typical Report Control Screen allow you to specify the following information.
| Note: | Duplex and landscape print options are only available for select reports when the printer controls are set to report type 2. See the article Setting Up Printer Controls for Laser Printers for more information. |
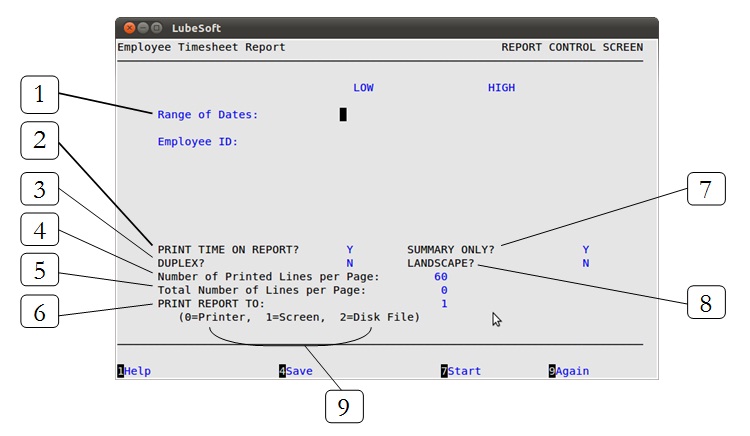
The following is an example of a typical Report Control Screen. The available fields are discussed in detail below.
| Callout | Menu Option | Function | ||||
|---|---|---|---|---|---|---|
| 1 | Report Ranges | Most reports allow you to select a range of information. For example, you can request information for certain dates, items, or transaction types. Some reports give you multiple ranges, which further reduces the amount of information on the report.
To specify a range, you fill in the low and high end values in the Low and High fields. This can be the earliest and latest date, the lowest and highest number, or the first and last word alphabetically. For example, to print a report for November 2002 you enter 11/01/2002 in the Low field and 11/30/2002 in the High field.
|
||||
| 2 | Print Time on Report? | Printing the time helps you identify the most current report when the same report is printed more than once during a day. This field defaults to Y to print the time on the report. If you do not want the time to print on a report, type N. We recommend that you always print the time on a report. | ||||
| 3 | Duplex | This field appears for terminals that have report type 2 enabled in the Set Up Printer Controls screen. Duplex mode enables printing on both sides of the paper.
|
||||
| 4 | Number of Printed Lines per Page | This value tells the computer how many lines to print on each page of the report. A typical 11-inch page can contain up to 66 lines, but this field defaults to 60 to allow three-line margins at the top and bottom of the page.
|
||||
| 5 | Total Number of Lines per Page | This field indicates the length of the paper in the printer. A typical 11-inch page contains 66 lines. Your system interprets a 0 or 66 in this field to mean that standard 11-inch paper is loaded in the printer. Because a 66 causes a form feed to take more time, accepting the default, 0, is recommended. | ||||
| 6 | Print Report To | This field tells the computer where to send the report. The following list contains the different selections available for this field.
|
||||
| 7 | Summary Only | This field appears for reports with both detailed and summary versions. To print the summary version, enter Y in this field. Enter N to print the detailed report. We recommend printing a summary report under normal conditions. Print a detailed report only if you need detailed information in a report. | ||||
| 8 | Landscape | This field appears for terminals that have report type 2 enabled in the Set Up Printer Controls screen. It prints horizontally on the paper. | ||||
| 9 | Command Line Options | The line at the bottom of the screen contains commands to print the report and to save or change the report settings.
|

