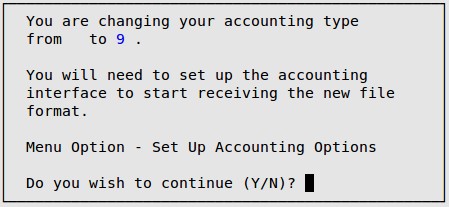
There are several screens in LubeSoft® that must be set up correctly in order to create the QuickBooks Online export files. Follow the instructions below. If you are using QuickBooks Pro, please refer to the article Setting Up LubeSoft® to Use with QuickBooks Pro. If you have any questions about the setups, call ISI Support.

For a list of the account numbers currently set up in LubeSoft® , print the General Ledger Accounts Report (1-6-1-5). If there are any account numbers you wish to use in LubeSoft® that are not on this list, you need to add them in Set Up General Ledger Accounts (1-6-1-4).
You also need to print an Account List (1-6-1-8). Any account number with the word FIX beside it does not exist in LubeSoft® . The category, coupon, discount, or credit card either needs to be updated with the correct account number, or the account number needs to be added in Set Up General Ledger Accounts (1-6-1-4).
The following are lists of common account ranges used for various types of G/L accounts and common account numbers used in LubeSoft® setups. Refer to the Default Chart of Accounts for a full list. You do not have to use the default account numbers.
| Account Type | Account Range |
|---|---|
| Asset | 1000 to 1999 |
| Liability | 2000 to 2999 |
| Owner Equity | 3000 to 3999 |
| Revenue | 4000 to 4999 |
| Cost of Goods Sold | 5000 to 5999 |
| Expense | 6000 to 6999 |
| Other Income/Expense | 7000 to 7999 |
| Account | Description | Explanation | ||
|---|---|---|---|---|
| 1011 | Cash in Bank | This account records cash and check deposits. This is the default account for Cash in Set Up Accounting Options. | ||
| 1016 | Credit Card Over/Short Offset | This account records the impact on your bank deposit resulting from a credit card over/short amount reported during a till closing. This is the default account for Credit Card Over/Short Offset in Set Up Accounting Options. | ||
| 1050 | Credit Cards | This account records credit card deposits. This is the default account for Asset Account Number in Set Up Credit Card Types. | ||
| 1100 | Accounts Receivable | This account records accounts receivable generated from charge customer transactions in LubeSoft® . This is the default account for Accounts Receivable in Set Up Accounting Options. | ||
| 1105 | QuickBooks A/R Offset | This account is required as an offset when posting A/R transactions from LubeSoft® . This is the default account for QuickBooks A/R Offset in Set Up Accounting Options.
|
||
| 1201 | Inventories | This account records the value of your inventory. This is the default account for Inventory in Set Up Categories. | ||
| 2020 | Purchases Clearing | This account records the liability resulting from a receipt of goods. This is the default account for Purchases Clearing in Set Up Categories. | ||
| 2099 | Sales Tax Payable | This account records amounts owing for sales taxes. This is the default account for Tax Accounts in Set Up Accounting Options. | ||
| 4011 | Sales of Goods/Services | This account specifies where you would like sales to post. This is the default account for Sales in Set Up Categories. | ||
| 4111 | Customer Discount | This account records the value of discounts applied to invoices. This is the default account for Account Number in Set Up Coupons/Discounts. | ||
| 4112 | Coupons | This account records the value of coupons applied to invoices. This is the default account for Account Number in Set Up Coupons/Discounts. | ||
| 4113 | Warranty | This account records the value of warranties invoiced. This is the default account for Warranty in Set Up Accounting Options. | ||
| 4210 | Cash Over or Short | This account records the impact to income resulting from a cash or check over/short amount reported during a till closing. This is the default account for Other Over/Short in Set Up Accounting Options. | ||
| 4211 | Credit Card Over or Short | This account records the impact to income resulting from a credit card over/short amount reported during a till closing. This is the default account for Credit Card Over/Short in Set Up Accounting Options. | ||
| 5011 | Purchases – Category 1 | This account records the cost of the products sold. This is the default account for Cost of Goods in Set Up Categories. | ||
| 5111 | Shrinkage | This account records the value of inventory shrinkage. This is the default account for Shrinkage in Set Up Categories. | ||
| 6530 | Bank Charges | This account records credit card processing fees. This is the default account for Expense Account Number in Set Up Credit Card Types. |
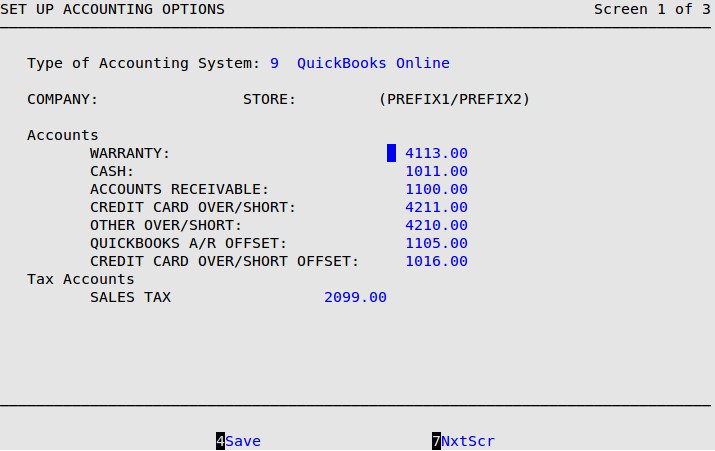
Use the following steps to set up your Accounting Options:

| Note: | If you receive the message Accounting type must be selected, you must return to screen 1 of the Center Control File (1-6-1-1) and fill in the Type of Accounting System field. |
Accounts
Fill in account numbers for each of the listed accounts. These account numbers must match the account numbers in Set Up General Ledger Accounts (1-6-1-4). If an account is not set up, an Invalid base account – chart of accounts message is displayed. See the default list of accounts above, or use your own custom account numbers. All accounts with the same number (cash account, sales, etc.) will be consolidated. To view them separately, each item will need to have a different account number.
Tax Accounts
On screen 2 of the Center Control File, you set up the taxes that are used at your location. In this field, you need to fill in the account numbers to which you want these taxes reporting.

| Note: | If you press [F7] to move to the next screen, your changes will not be lost. You must press [F4] to save your changes before you press [Esc] [Esc]. Saving changes on one screen in a set of screens automatically saves changes to all screens in the set. A set of screens has the words Screen – of – in the upper right corner (see above). |
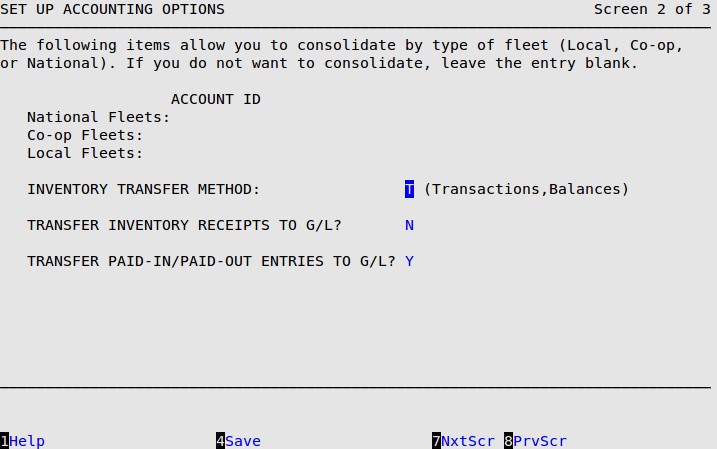
Inventory Transfer Method
Type T to select the Transaction Transfer Method and send all transactions to G/L.
Transfer Inventory Receipts to G/L
Type Y if you want to transfer inventory receipts to General Ledger.
Transfer Paid-In/Paid-Out Entries to G/L
Type Y if you want to transfer paid-in and paid-out entries to General Ledger.

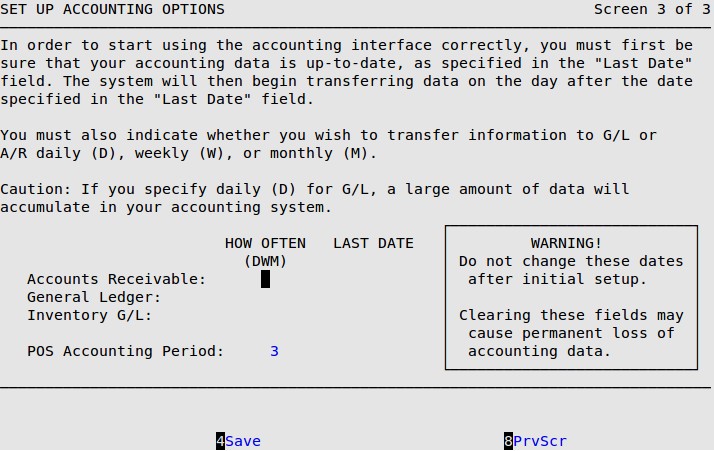
Accounts Receivable
Type a D, W, or M to indicate that you want A/R interface information created on a daily, weekly, or monthly basis (D is the most common entry in this field). Leave blank if you do not want the AR file. Set the date under the Last Date field to the day before the date that you want to start transferring the information. (For example, if you want to start transferring on 7/1/2021 then the date in the field should be 6/30/2021).
General Ledger
Type a D, W, or M to indicate that you want G/L interface information created on a daily, weekly, or monthly basis. Leave blank if you do not want the GL or inventory files. Set the date under the Last Date field to the day before the date that you want to start transferring the information. (For example, if you want to start transferring on 7/1/2021 then the date in the field should be 6/30/2021).
Inventory G/L
Type a D, W, or M to indicate that you want inventory G/L interface information created on a daily, weekly, or monthly basis. Leave blank if you do not want the inventory file. Set the date under the Last Date field to the day before the date that you want to start transferring the information. (For example, if you want to start transferring on 7/1/2021 then the date in the field should be 6/30/2021).
POS Accounting Period
Type the number of the current accounting period in your POS system. This number should match the current month of your fiscal year. For example, if it is July and you are on a January to December fiscal year, your accounting period would be 7.
| Note: | If you have invalid account numbers in your system and you are trying to turn on the Accounts Receivable or General Ledger interface(s), the following popup will appear.
Type Y to print the Account List. Look for invalid account numbers on this report. An account is invalid if it has not been set up in the Chart of Accounts. After you have made the changes, repeat steps 2 through 10. |