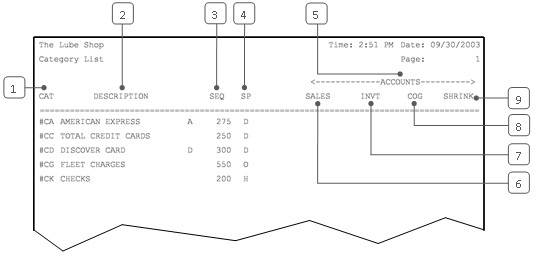
The summary version of the Category List shows how all categories are set up in the system. For each category, the report shows the following items:
This information tells you how each category is defined for accounting and statistics reporting.
Use the following steps to print a Category List:
| Field | Description | ||
|---|---|---|---|
| Print Time on Report | Printing the time helps you identify the most current report when the same report is printed more than once during a day. This field defaults to Y to print the time on the report. If you do not want the time to print on a report, type N. We recommend that you always print the time on a report. | ||
| Summary Only | This field appears for reports with both detailed and summary versions. Enter Y to print the summary report. We recommend printing a summary report under normal conditions. | ||
| Duplex | This field appears for terminals that have report type 2 enabled in the Set Up Printer Controls screen. Duplex mode enables printing on both sides of the paper.
|
||
| Landscape | This field appears for terminals that have report type 2 enabled in the Set Up Printer Controls screen. It prints horizontally on the paper. | ||
| Number of Printed Lines per Page | This value tells the computer how many lines to print on each page of the report. A typical 11-inch page can contain up to 66 lines, but this field defaults to 60 to allow three-line margins at the top and bottom of the page.
|
||
| Total Number of Lines per Page | This field indicates the length of the paper in the printer. A typical 11-inch page contains 66 lines. Your system interprets a 0 or 66 in this field to mean that standard 11-inch paper is loaded in the printer. Because a 66 causes a form feed to take more time, accepting the default, 0, is recommended. | ||
| Print Report To | This field tells the computer where to send the report. The following list contains the different selections available for this field.
|
||
| Command Line Options | The line at the bottom of the screen contains commands to print the report and to save or change the report settings.
|
Type Y in the Summary Only field to receive the summary report. Fill in the rest of the report control parameters, explained in the Report Control Screens article.
Report Contents

| Callout | Item | Description | ||
|---|---|---|---|---|
| 1 | Cat | Category of the inventory item. | ||
| 2 | Description | Category description. | ||
| 3 | Seq | Sequence. This is the statistics sequence number, which determines where the category is included on statistics reports. | ||
| 4 | SP | Special type. A code here indicates a special non-inventory category. For example, S represents ticket sales and D represents credit cards. | ||
| 5 | Accounts | Account numbers, which show how the categories interface with accounting files. Each category has an account number for each of the four account types. | ||
| 6 | Sales | The income account that is updated when the category of items produces revenue. | ||
| 7 | Invt | Inventory. The asset account that includes the value of the on-hand items in this category. | ||
| 8 | COG | Cost of goods. When an item is sold, the cost of that item is removed from inventory, becomes an expense and is added to this account. | ||
| 9 | Shrink | Shrinkage. Any adjustments made to items in the category affect this account and offset the inventory account.
|
Because this report is a complete list of all the categories in your system, it is often used when trying to determine into what category a new item should be placed. It is also an excellent check after modifying your category information. The detailed version of this report also includes information on individual inventory items. You should use the detailed Category List for a complete check of system setups.
When viewing this report, look for the following: