Five standard text layouts and one custom layout is available for the message section. The standard layouts have four lines of text and the custom stickers can have five lines of text depending on layout. The text size and the number of characters vary with each layout. A larger text size is easier to read, but allows fewer letters and numbers on a line. Sometimes, in order to fit your message in the space, you may need to use a layout with small text.
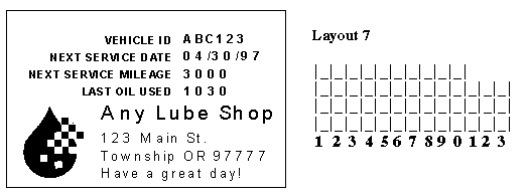
The following pictures show typical examples of the five standard Thermal AutoSticker layouts. The appearance of the text is similar to what will appear on your sticker. The first line is always in the largest font. It is usually used for the store name, because it stands out more than any other information except your logo. However, you can use any text that fits. Next to each layout, you can see the approximate number of characters that fit on each line. Use the numbers as a guide when choosing a layout and message.
| Note: | The layout grids show the approximate number of spaces available if you use uppercase letters or numbers. If you include lowercase letters, you may be able to fit more extra characters on a line. |


Use the following steps to select a new layout or change the text for the message section of the Thermal AutoSticker.
| Note: | To edit a sticker, see the Editing a Sticker section later in this article. |
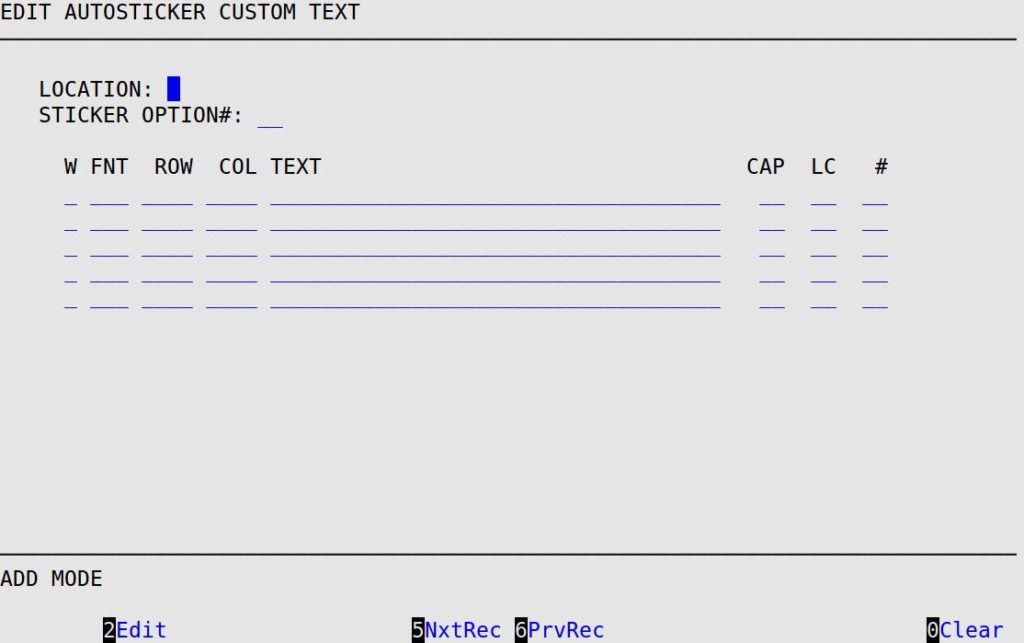
Cap – indicates about how many capital letters can be printed on the line.
LC – indicates about how many lowercase letters can be printed on the line.
# – indicates about how many numbers can be printed on the line.
| Note: | If you are in sticker option 6 these fields will not be displayed because they depend on the layout that you choose.
To print a Vehicle ID barcode, select sticker option 6 and type BARCODE on one of the available lines. Type nothing else on the line with BARCODE. You must use a sticker that has a milky-white background that allows you to see the barcode on both sides of the sticker for the Lube Handheld to scan the barcode. |
More Information on Barcode Vehicle ID
Using a barcoded vehicle ID along with the Lube Handheld can speed up the time that your greeters spend looking for the vehicle information. The greeters do not have to manually type in the vehicle ID, which can speed them up and they can have fewer errors.
| Note: | Deciding on a message can help you choose a layout. Use the layout guides to determine which layout best fits your message and what words to put on each line. For example, in layout 9 the first line only contains about 7 characters. To print more than 7 characters on the first line, you should choose one of the other layouts. |
You can mix uppercase letters, lowercase letters and numbers on the same line, and you can also leave one or more lines blank. For example, you may want to leave the first line blank if your store name is pre-printed on the stickers.
W – This is the width of the characters. The range of the width is 1 to 4 with 4 being the widest. If you use the BARCODE feature, this field will control the size of the printed barcode.
FNT – This is the font size of the characters. The range of the font size is 1 to 9 with 9 being the largest. This could also be considered the height of the characters. If you use the BARCODE feature, this field will not have any effect on the barcode.
ROW – This is where the characters begin printing on the sticker vertically. The range is from 1 to 200, with 1 being the bottom of the sticker.
COL – This is where the characters begin printing on the sticker horizontally. This ranges from 300 to 900 going from right to left.
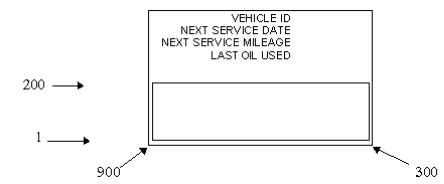
| Note: | These numbers are approximate and may change depending on the layout of your sticker. |
| Note: | Press [F10] to clear all lines of text at once. |
| Note: | If you include more characters than fit on a line, your text prints off the edge of the sticker. If this happens, you should either choose a different layout or shorten the text on those lines that print off the edge. |
Use the following instructions to change the setup or text of a Sticker.
You can set up additional sticker functions by pressing [F3] to enter the sticker setups.
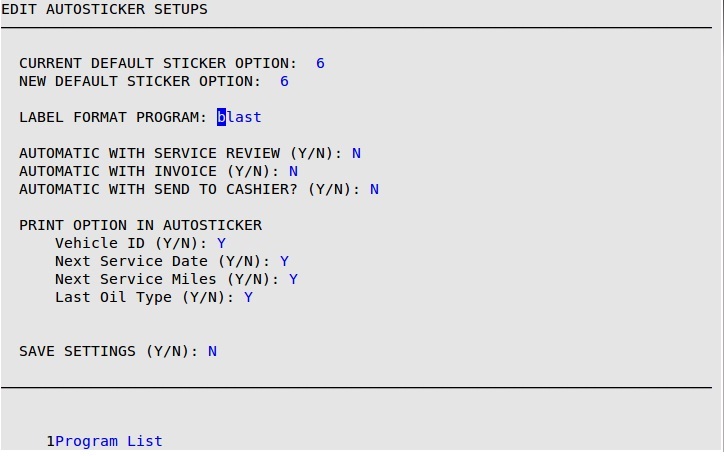
Current Default Sticker Option
This is automatically filled in by the system with the current default sticker option.
New Default Sticker Option
Type the sticker option number to set as the default.
Label Format Program
Press [F1] and select the label format program that matches the sticker printer and label set that you are using.
Automatic With Service Review
Type Y to print stickers automatically when the service review is printed.
Automatic With Invoice
Type Y to print stickers automatically when the invoice is printed.
Automatic With Send To Cashier
Type Y to print stickers automatically when the invoice is sent to the cashier.
Print Option In Autosticker
Type Y in the fields below to print the information on your autosticker.
Save Settings (Y/N)
Type Y and press [ENTER] to save your settings.
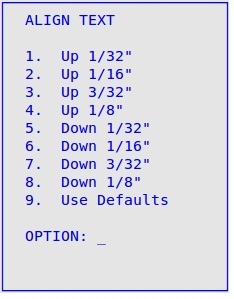
You can align all of the printed text on your sticker for the customized layout (6) by using the [F7] function key. The text aligns from the position of the last saved sticker.
| Note: | In order for changes made in Edit Custom Sticker to be recognized at the Bay Invoicing Station, you need to exit to the Main Menu and re-enter the Bay Invoicing Option. |